Thursday, January 29, 2015

Best. Day. Ever!

I held my annual Soup & Stamps night last weekend and it was a BLAST!  I made 2 big pots of soup (Corn Chowder & Taco Soup) and a double batch of biscuits to enjoy.  At Soup & Stamps, you can eat as much as you want and I think most of us enjoyed a bowl of each soup!  The dinner conversation was fantastic and we wrapped up our dinner with some delicious cake.  Then, it was stampin' time!


Because Soup & Stamps is a kick off to SAB, the stampin' project featured some of the fab SAB products...the Best. Day. Ever stamp set and the Best Year Ever DSP.

I was inspired by a project my friend Becky made at Christmas time.  I loved the way she put small boxes into one of the Tag-A-Bag Gift Boxes and when I realized that 3 of the Tiny Treat Boxes fit inside the Tag-A-Bag box, I knew what the project was going to be!


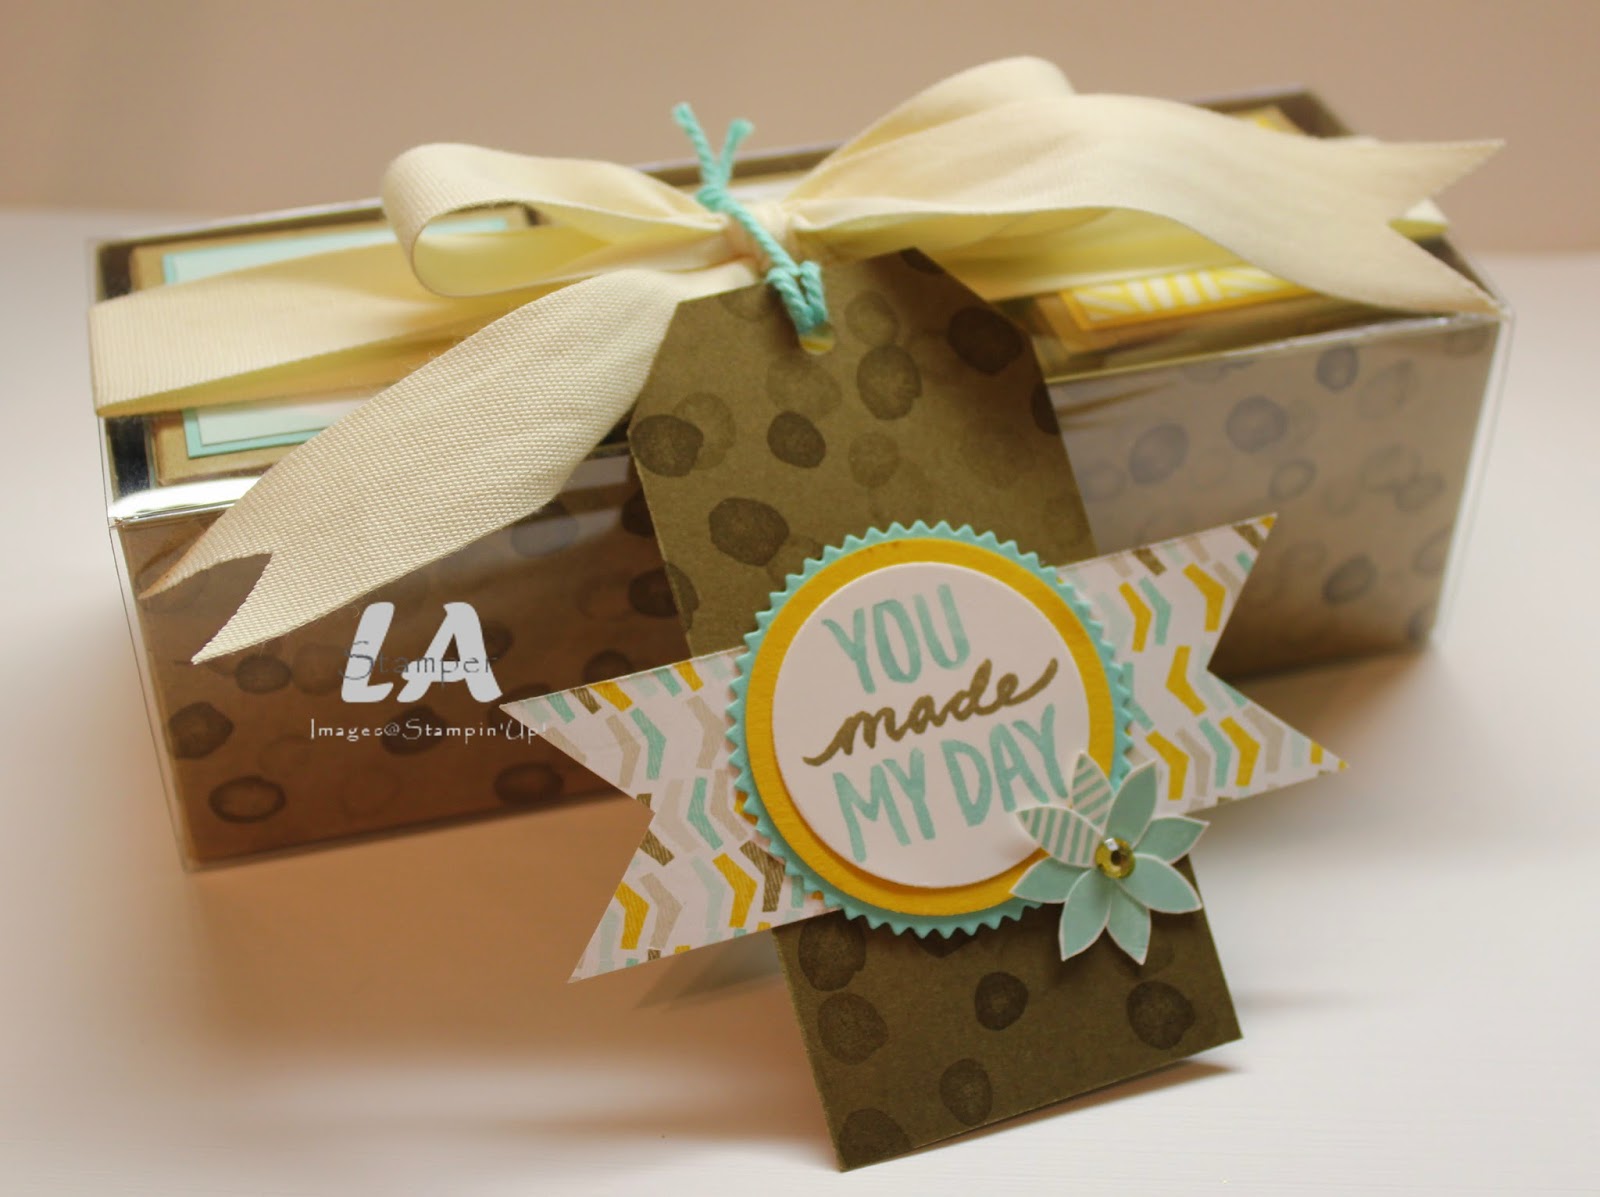
Super cute, isn't it!  I love how easy it is to dress up our boxes with a little stamping and some DSP!

The tag is tied on to the sleeve of the Tag-A-Bag box so you don't have to untie it all to get into the treats!  You just slide the sleeve off and all the prettiness stays right where you want it to!  We finished it off with a fun and simple tag.


Did you notice the yellow rhinestone on the tag?  That is done by coloring a regular old rhinestone with BLENDABILITIES!!!!!  Yes, you can use your Blendabilities to color rhinestones (although you want to be careful that the rough surface of the rhinestone doesn't cause the tip of the Blendabilities to fray).  And, don't forget you can get the Blendabilities as free SAB items when you place a $60 order (before shipping and tax)!  Check out the SAB brochure for more details!

Are you Canadian and need a Stampin' Up! demonstrator?  I would love to help you out!  Contact me and I can get some catalogs to you or if you're local you can join some of my classes.

Have an inspired day!


Tuesday, January 27, 2015

Boys Will Be Boys

Hi Stampers!  There are a lot of boys in my life...I have three of my own, three nephews and 4 out of the 5 kids I look after are boys!  With all those boys around, it was a no brainer that the stamp set Boys Will Be Boys would end up on my stamp shelf!

At Christmas my sweet little nephew lost one of the people to his new playmobile set and was devastated to have to go home without it.  We searched everywhere and it seemed as though it vanished into thin air....until yesterday!  I went to take a load of clothes out of my washing machine and what did I find, the missing playmobile person!

Of course this toy is going in the mail to it's forever home, and I decided a simple card needed to go with it!


I kept is SUPER simple and just stamped the robot image from the Boys Will  Be Boys set with my Memento Black ink pad.  Then I colored him with my Blendabilities, added a couple cardstock layers and popped everything in the mail.


I love how easy it is to blend and shade colors with the Blendabilities!  Four new colors were added to the Blendabilities line in the Occasions 2015 Catalog and during Sale-A-Bration, you can earn Blendabilities as your free products for every $60 order you place (before shipping and tax).

You can find everything I used to make this card in my online store.  Head on over there to place your order today, or contact me to place your order...don't forget to get it up to $60 so you can get some free Blendabilities!

If you like what you see and are Canadian, I would love to be your Stampin' Up! demonstrator.  Contact me today to get a catalog and start your creative journey with me!

Have an inspired day!


Sunday, January 25, 2015

Simple Card Sunday 13 - Pacific Point Painted Petals

Hi Stampers!  It's Simple Card Sunday and I have a great card for you this week featuring the new Painted Petals stamp set and Painted Blooms DSP from the 2015 Occasions Catalog.


It's been a while since we had a Simple Card Sunday, so let me refresh your memory about what kind of card a Simple Card Sunday card is!
  • It must be able to be completed in 10-15 minutes max
  • It must use minimal supplies
  • It must be able to be made in 5 easy steps

Are you ready?  Let's get started with the step-by-step!

  • Start by folding a 5-1/2 x 8-1/2 piece of Pacific Point cardstock in half.
  • Stick a 1-1/4 x 4-1/4 strip of Painted Blooms DSP along the right side of the card base.  Stick a 1 x 4-1/4 strip of embossed Wild Wasabi cardstock right beside it followed by a 1/4 x 4-1/4 strip of Crushed Curry stuck beside the Wild Wasabi.
  • On a 1-3/4 x 2-3/4 piece of Whisper White cardstock, stamp the floral image from the Painted Petals stamp set with Soft Sky ink.  Stamp the leaves and stems with Wild Wasabi ink and then stamp a sentiment over the flowers with Pacific Point ink.
  • With ribbon scraps (Wild Wasabi Seam Binding, Soft Sky 1/8" Taffeta & a Burlap Ribbon string), make some ribbon loops and layer them together.  Staple them to the Whisper White piece with the Handheld Stapler.  Apply Stampin' Dimensionals to the back and stick it to a 2 x 3 piece of Soft Sky cardstock
  • With SNAIL, stick the Soft Sky cardstock to the center of the card.
Here's the video so you can follow along in real time.


I have another card done with the same layout to share with you today.  This one features the new BYOP stamp set, also in the Occasions 2015 Catalog.


I love the ombre look of the letters!  I did that with my Bermuda Bay Blendabilities.  So fun!  Here's the inside of the card....


I added a strip of Bermuda Bay cardstock to the bottom on the inside of the card, but only stuck it down on three sides creating a little pocket perfect to hold a gift card!

Everything you need to make the two cards featured today can be found in my online store and because it's Sale-A-Bration, you can earn free product with every $60 you order (before shipping and tax).  You can also contact me to place your order!

If you like what you see and are Canadian, I would love to be your Stampin' Up! demonstrator.  Contact me today to start your creative journey!

Have an inspired day!