Thursday, January 30, 2014

Muslin Bags with Gold Glitter Hearts!

It glitters, it glitters!!!!!  I came across a super fun glitter heart bag when perusing Pinterest a few weeks ago and fell in love.  Of course, I had to re-create it with my SU supplies.  So out came the Mini Muslin Bags, Gold Glitter and Tombow glue!  I did try it with Heat & Stick powder, versamark and a heart stamp first and was NOT impressed with the results...so don't try that, it didn't work as well!

I knew my club ladies would LOVE it as much as I did so it became one of our club projects in January.....and I've had gold glitter ALL over my dining room and kitchen for a couple weeks now (It just keeps showing up!).  My poor puppies have had sparkly noses and I'm sure the delivery guy is wondering why I always have glitter on me now!!!


Isn't it pretty!!!!  I'm so excited with how it turned out.  We finished our bags off with a cute little tag and filled them with a bag of bath salts.  Super fun gift idea!  Here's a little photo tutorial so you can make one too!


To make my little heart stencil, I used a piece of the cardboard that comes in the back of a pack of DSP.  I cut it to the size that I wanted and used a heart framelit to cut out the heart shape.  I also used a piece of that same cardboard inside my bag to give it some stability when gluing and glittering.  Make sure to put a piece of waxed paper or parchment paper inside the bag too so you don't glue the bag together.  Seriously, with all the colors of glitter you can get and all the shapes of framelits we have the possibilities for this project are endless!

You can find all the stuff you need to create this project in my online store.  Don't forget that when your order gets to $60 you can choose a FREE SAB product!

Have an inspired day!


Tuesday, January 28, 2014

Sale-A-Bration, Soup & Stamps!


I just love that sentiment stamp!  It's part of the Yippee-Skippee set and I think it's a perfect way to sum up last Saturday when I held my annual Sale-A-Bration kick off...Soup & Stamps!  This is one of my favorite events to do!  I make 2 HUGE pots of soup (this year it was Creamy Tomato Tortellini & Beef Vegetable with Barley), some biscuits and delicious dessert.  My ladies are treated to supper and then we stamp! This event is always so much fun and this year was no exception.


Busy creating!
Mmmmm...fresh out of the oven (as people were arriving) cheese biscuits!
"Souper" yummy Texas Sheet Cake....I used Pioneer Woman's recipe!
Blueberry Lemon Bundt cake...the recipe for this one was from my Looneyspoons Collection cookbook (LOVE that cookbook!)

Can you believe I totally forgot to take pictures of the delicious soups?  You'll just have to take my word for it...they were yummy!

I bet you want to see the project everyone made, right?  I usually do a set of cards or a box and some cards at Soup & Stamps, but this year I decided to do something totally different and we did a mini album!  I actually used 5, yes 5, SAB products...Sweet Sorbet DSP, Petal Parade stamps, Banner Blast stamps, Banner punch, and the Decorative Dots embossing folder!  Of course, I had to throw in some Occasions Catalog products too...Basic Metal Buttons, Perfect Pennants stamps, Banners framelits, and the Angled Tag Topper punch!

The mini album starts with one piece of 12x12 cardstock which you score and cut to make your "pages".  It all folds up in to a small package.  The pictures show it as you would unfold it.....


It was loads of fun to make.  Here are a few of my favorite parts...


I love, love, love these little banners!  They are the perfect little accent for the corner of a page or card front.  And, I love that the coordinating punch punches out the stamped images without leaving a white border around them...small things like that make me happy!


This part makes me REALLY happy!  Do you recognize the metal buttons?  I used the one with the raised edge and realized that the small circle punch from the Itty Bitty Shapes Punch Pack fit right on there like it was meant to be!  Here's the part that made me squeal with delight.  A dimensional under each button and shazaam there was the perfect closure for the flap on this pocket!  Here's a little tip...put the dimensional on the button, then stick the tail of the Baker's Twine to the dimensional and then stick it down on the cardstock.  It seemed to work best that way for me!


This is my favorite stamp in the Perfect Pennants set!  And I just love it here with a little ruffled ribbon along the bottom!  So cute!  And, check out that Distressed Dots embossing action...LOVE it!

Lastly, I have the measurements for you so you can create one of these little beauties yourself!


You basically take a 12x12 piece of cardstock and score it at 2 3/8 and 7 1/4.  Then you turn it and score at 3 7/8, 4 1/8, 8 and 8 1/4.  You can see in the picture where you need to cut the skinny sections out.  Any of the flaps can be made into pockets or you can cut any of the flaps off to change up your album.

Have fun with this one!  I would love to see your version of this mini album!

Head on over to my online store (or contact me) to purchase the supplies you need to create one of these and earn some free SAB products!  Have an inspired day!


Sunday, January 26, 2014

Perfect Pennants Love

Happy Sunday!  I hope your weekend was fantastic!  Mine was good, but "souper" busy....more about that in Tuesday's post.  Today I have a fun and simple valentine card to show you because it's Simple Card Sunday!


When I first saw the Occasions catalog I immediately love the Perfect Pennants set and coordinating Banners framelits (which are available separately or in a bundle so you can save 15%)!  When it came time to place my pre-order I waffled on the set a bit, but in the end I ordered it and boy am I glad I did!  I'm finding it a great and versatile set that works well with the Banners framelits and without.  Today's card is a great example of how I've used it without the framelits.


I created a fun and simple card using the popular ombre effect.  The heart image is from the Perfect Pennants set and stamped in shades of purple...Wisteria Wonder, Perfect Plum & Elegant Eggplant.  I stamped the hearts on Whisper White cardstock which was matted with Brushed Gold cardstock.  Gold is so trendy right now...I'm seeing it everywhere!  I used the "love" from the Pennant Parade set and stamped it on one of the Wisteria Wonder hearts with some Elegant Eggplant ink.  I finished the card off with an Elegant Eggplant card base.

Head on over to my online store to get everything you need to re-create this card at home...you could even get a series of pink or turquoise inks to create your card!  Remember, if you're ordering ink pads you're going to want to order an ink refill at the same time.  Our firm foam ink pads ink our stamps beautifully, but don't hold as much ink as our old felt ink pads.  By having an ink refill on hand you will always be able to have a nice juicy ink pad ready for stamping!  And, don't forget to check back on Tuesday to see about my "souper" fun weekend!

Have an inspired day!


Thursday, January 23, 2014

Fresh Prints Dog Tag

My youngest son has a pretty awesome teacher this year for Grade 1 and he absolutely adores her!  Last week one of her dogs turned 9 and he thought that he should give Weezie (her dog) a present because "9 human years is, like, so old in dog years"!!!!  So we put some fancy dog treats in a little bag.  It's clear that he is MY  son because the little bag wasn't enough, he thought it needed a nice tag that said "Happy Birthday Weezie" with room for him to write "love Sawyer".


I used the new Scallop Tag Topper punch (LOVE IT!!) to make my tag.  There's a little piece of Fresh Prints DSP along the bottom (also LOVE IT!!!).  I wrapped some of the Real Red Stitched Grosgrain around it and then stamped some candles (from the Create A Cupcake set).  I finished it off with a Vintage Button tied with some Linen Thread.


Super, super simple and sweet!  I love how he signed his name, and that he was adamant that there be 3 treats in there...2 for the birthday dog and one for her new puppy!  Sigh...I have a sweet boy!

Head on over to my online store to stock up on everything you need to make some super awesome tags...a Tag Topper Punch, some Fresh Prints DSP, some cardstock, ribbon and maybe even some buttons!

Have an inspired day!


Tuesday, January 21, 2014

Just Sayin'...It's Painter's Tape!

Today I have a really fun and easy technique to show you!  Since Valentine's day is just around the corner, my clubs are doing Valentine's projects and this is one of the ones they did this month!


Confession time...I keep a notepad and pen beside my bed for when ideas come to me at night!!!  Seriously, sometimes I dream about cards and stamps.  Some of my best ideas have come from my dreams and me writing them down or sketching them when I wake up...or when I'm trying to fall asleep and can't!  I can't be the only one who does this, right?!?!?!? Today's project is one of those dream projects.  It just came to me one night, and I love how it all turned out in the end.


I started with the white piece and did the Painter's Tape Technique on it with Pink Pirouette and Strawberry Slush ink.  Once that was done, I used the Word Bubbles Framelits to cut out the word bubble shape.  Some sponging with Real Red ink around the edges, including the word bubble, help the white layer to stand out a bit.  I stamped in the word bubble with the Just Sayin' stamp set on a piece of Pink Pirouette cardstock.  It's embellished with a little pink pirouette button (from the Subtles set) and some Real Red Taffeta ribbon.  The whole white layer is put on the card with some Stampin' Dimensionals so it has a little pop to it!

Check out my Painter's Tape video so you can see how easy this technique really is!


And, here's one more card I did with the Painter's Tape Technique.  This card was inspired by a card I saw that fellow demonstrator, Deb Valder, did.  It features some of the In Colors this year as well as one of my favorite stamp sets, Flower Shop!


Head on over to my online store to place your order for everything you need to re-create both of these cards at home!  Have fun trying the Painter's Tape Technique...and let me know how it goes for you (I would love to see some of your painter's tape technique creations).

Have an inspired day!


Sunday, January 19, 2014

Sweet Sorbet Simple Cards

I'm bringing back Simple Card Sunday!  I feel that it's important to send out cards to people, both for special occasions and just because.  And, with the busy lives we all lead, simple cards are the way to go!  Don't get me wrong, I love a card that I can get lost in...layers, stamping, embellishments and so on, but sometimes ya just need to do something quick and simple!

In my post last Thursday I showed you the box 'o cards I made for my grandma, with the promise that I would show you the cards today.  Well, here they are!  I did 10 cards total and to keep it simple I did 5 designs, 2 of each design.


And, there they all are!  I kept with the colors from the Sweet Sorbet DSP and used the Petal Parade stamp set as well as a variety of sentiments.  I think it took me less than an hour total to make all 10 cards...cute, easy and simple!

Don't forget that Sale-A-Bration starts at the end of the week.  With every $60 you purchase (before shipping & tax) you will qualify for a FREE SAB item...including the Petal Parade stamp set, the Sweet Sorbet DSP and the embossing folder I used on the last card pictured!  Start making your list so you're ready to order when SAB starts!

Have an inspired day!


Thursday, January 16, 2014

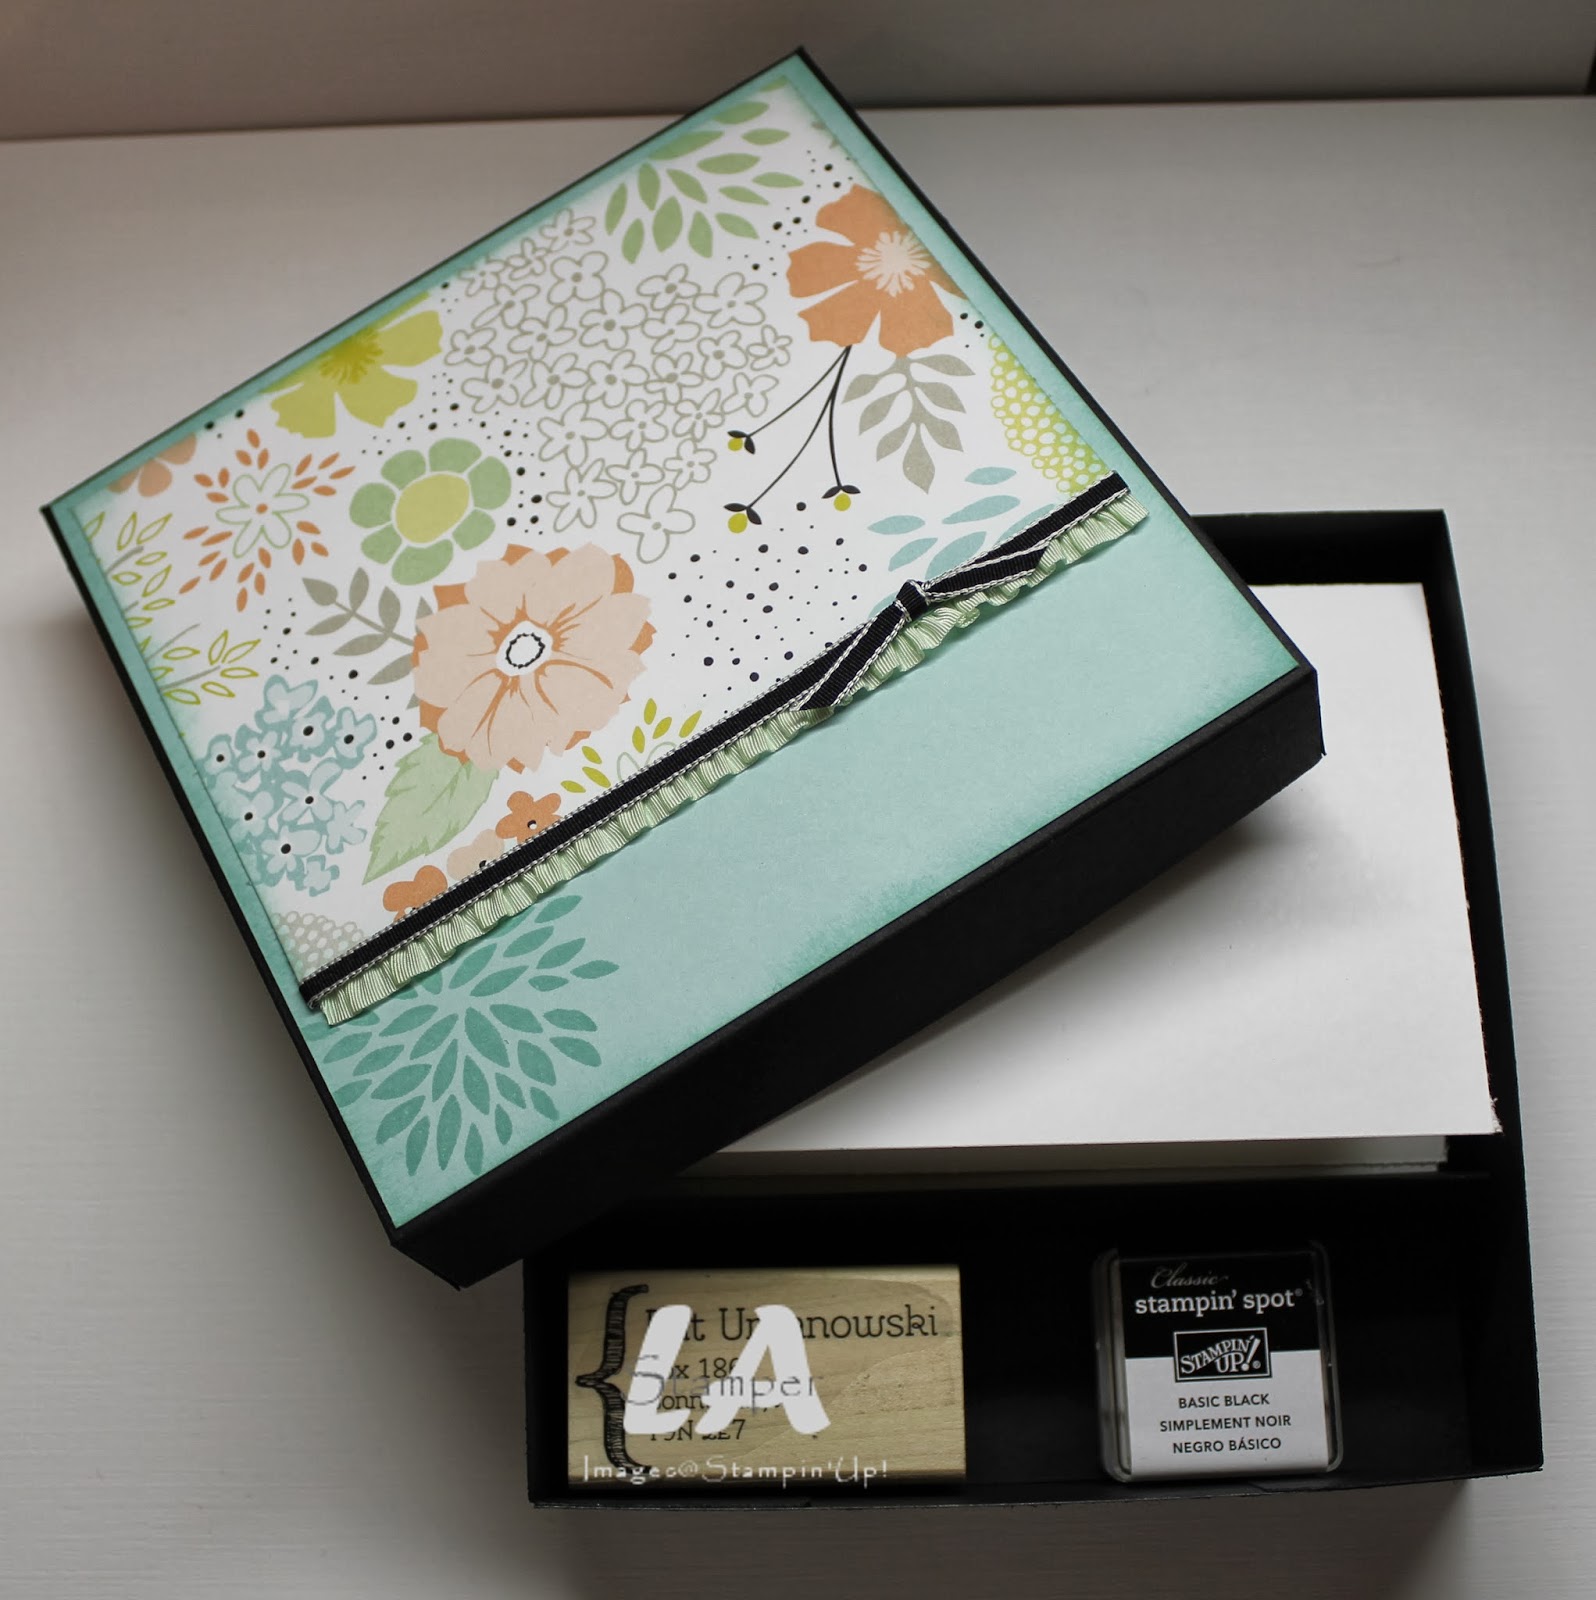
Sweet Sorbet Stationary Box

Last fall my grandma moved out of the house she has lived in for longer than I can remember and into a senior's lodge.  I was happy that she made the decision that it was time, but I know it was difficult for her.  And, I know it was difficult for all of us!  I have so many memories of going to visit her at that house when I was a kid and my own kids have memories of visiting her at that house.  I remember my parent's putting my brother and I on the Greyhound and we would ride the bus to go visit her (what a different world we live in now...I don't think I could do that with my boys!).  I remember her making us homemade french fries and she made the BEST donuts!  She had a swing in the backyard that my brother and I would play on for hours!  She would take us to the park and the Farmer's Market to see my other grandparents.  She would take us on walks and to the lake.  She would take us shopping and for dinner with her friends and relatives we didn't know!  But, most of all, she showered us with love.  While I'm sad she isn't in that house anymore, I'm thankful we got to visit with her this summer and that I will always have the memories...and that we will make new memories with her living in a different place!

So, after all that, you're probably wondering how that relates to stamping, right?  Well, I decided that she needed a special stamp with her name and new address and, of course, some cards to go with it so she could send notes to her friends.  And, I had to put all this in a special little box, 'cause that's what I do!


I used the Sweet Sorbet DSP which is one of the Sale-A-Bration items this year!  This is such fun DSP...I can't wait to use it on more projects!  I took my colors for this project right out of the DSP.  The box and lid are basic black.  I added a Pool Party layer which was sponged and stamped (with the new Petal Parade stamp which is one of the SAB items this year too!) with Pool Party ink.  Then I added a layer of the DSP and finished it off with some ribbon!

It's a super easy box to put together.  Here are the measurements as well as where you need to score.

Box Base:  8 1/2" x 8 1/2" (score 1 1/2" on each side)
Box Lid:  7 5/8" x 7 5/8" (score at 1" on each side)
Insert:  5 1/2" x 7 1/4" (score at 3 3/4", 4 3/4" & 5 3/4")

Here's what it looks like open.


There's 10 note cards with envelopes, a personalized stamp and a Basic Black Stampin' Spot in there for her!  Check back on Sunday to see the cards I made!

Remember, when Sale-A-Bration starts next week, you can get the SAB items free with every $60 of product you order (before shipping & tax).  So start making your list because there is some super fun SAB products this year!

Head on over to my online store to get some cardstock, note cards with envelopes and a personalized stamp so you can make this project for someone special in your life!

Have an inspired day!


Thursday, January 9, 2014

Language of Love Meets Fresh Prints

Last weekend I did one of my favorite things...got together with my downline!  We had a blast learning about some of the new products in the Occasions catalog and Sale-A-Bration, enjoyed a delicious potluck lunch and then stamped the afternoon away together!  I have some crazy talented demonstrators in my downline who I am proud to call my friends.

One of the projects I did for our swap was a fun little Valentine's bundle full of chocolates, of course!


And, here's a little different view so you can see the chocolates better!


You can see I covered 6 chocolates with some of the patterns from the Fresh Prints DSP stack.  I love this little stack of DSP...the colors are perfect and the patterns are so fun for a variety of projects.  And, it's cut to a perfect size for card making!

The chocolates are stacked and then wrapped with a piece of Burlap Ribbon and tied at the top with some Cherry Cobbler Chevron Ribbon to make a little pouch.  To finish it off, I made a fun tag.


For this tag, I used the new Angled Tag Topper Punch...LOVE these new punches so much!  I did some stamping with the new Language of Love stamp set both on the tag and also to make the little pennant with the metal button on it.  I think the Language of Love set is quite possibly one of the CUTEST stamp sets in the Occasions catalog!  The little striped banner was cut with the new Banners Framelits.  It's embellished with some new Natural Chevron Ribbon (another of my favorite new products!) layered with some ruffled ribbon.

Isn't it the cutest little bundle of chocolates?  I love how it turned out!

Head on over to my online store to order some of the fabulous Fresh Prints DSP and don't forget to add on the super cute Language of Love stamp set!

Have an inspired day!


Tuesday, January 7, 2014

Retro Fresh Start

It's no secret that 2013 was a ROUGH year for my family, and so I am determined to make 2014 so MUCH better.  With a new year, I decided it was time for a new look around here at LA Stamper so I set to work making some new blog elements...background, header and signature.  All were designed with MDS.  So, what do you think of the new look?

 
I'm not one to make resolutions, but I am a goal setter and am always assessing and adjusting how those goals are going.  One of the goals I have for this year is to have an "attitude of gratitude".  I believe that by being grateful, even for the little things, life is just better and it will be harder to focus on the difficult things when they come along.  To help me with this change, I made myself a journal using the new Retro Fresh suite of products found in the Occasions Catalog!


And THAT is my "365 Reasons to be Thankful in 2014" journal.  Everyday I write down something I'm thankful for.  I used a variety of new products both from of the Retro Fresh product suite and from other suites in the Occasions catalog to make this journal.

See hat long piece of Soft Suede cardstock?  It's not a die, it was done with a NEW PUNCH!!!!  I used one of the new Tag Topper Punches to make it.  I am LOVING these new punches...hands down my favorite product in the Occasions catalog!  There are two different designs...scalloped and angled.  Not only do they punch the top edge of the tag, they also punch the hole!  Did I mention I LOVE them!  Make sure you check them out in my online store, and watch for them in more projects as well as an upcoming class that will be announced soon!  Another element you may be wondering about is the buttons!


I know!  RETRO FRESH BUTTONS!!!!!  To make them, I covered some of the Basic Metal Buttons with some Retro Fresh Washi Tape.  It's that easy!  And, so you can see just how easy it is, I made you a little video!


See, I told you it was easy!  It works best on smooth neutral colored buttons.  Have fun with that...the possibilities are truly endless with a little washi tape and some buttons!

My attitude of gratitude is not the only thing that I'm making a change with.  I'm making a lot of little changes both in my personal and family life as well as with my business.  I'm excited for what 2014 is going to bring!

Make sure you stop by my online store to order some washi tape and buttons...and while you're at it why not some other Retro Fresh products like a journal, some DSP and maybe even the designer stickers!

Have an inspired day!