Well, it is sweltering here...not that I'm complaining because it won't be long before it's minus 5 million and snowing again!!!! Along the lines of thinking cooler thoughts, I decided it would be fun to have a Christmas in July class. So, at the end of July I had a group of ladies over to get a jump on their jingle with this fun project!
The did a card & tag set featuring the Christmas Bliss stamp set and some new DSP, All is Calm (which will be in the upcoming Holiday Catalog...coming soon to a mailbox near you!). They made a fun divided box to hold their creations which had a clear lid! Yep, we used the window sheets to make a lid for our boxes so you can see the fun creations inside! In addition to their boxes, they also made 4 cards with lined envelopes and 4 tags.
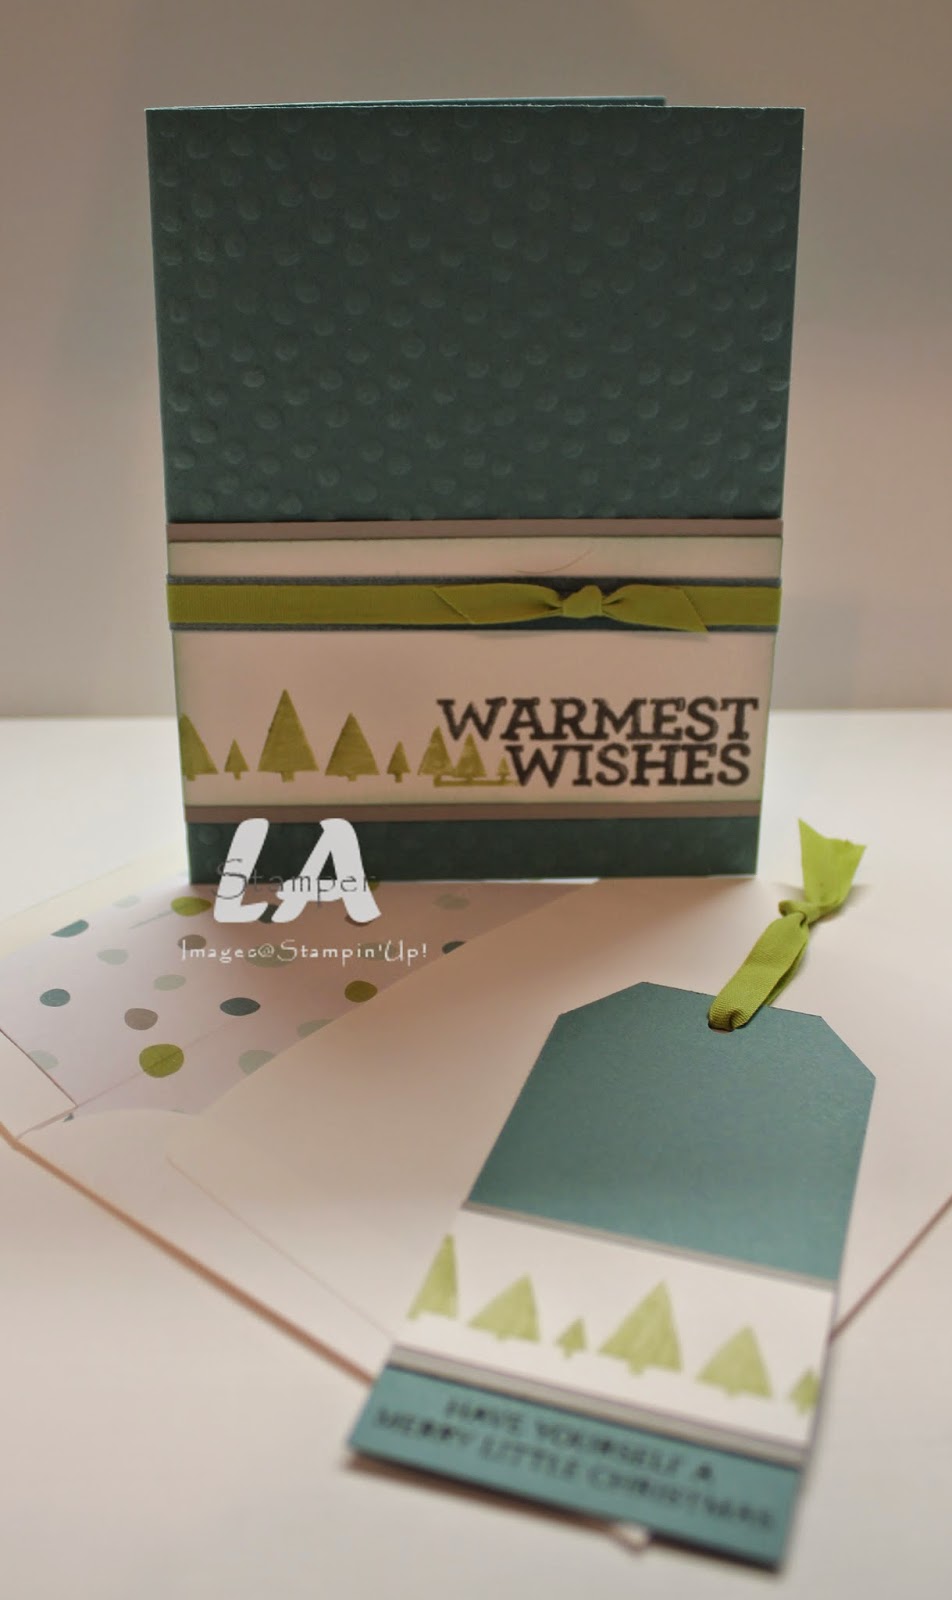
I am loving the colors in the All is Calm DSP...I'm pretty sure I will be using a lot of this DSP in the coming months!!!! Did you notice the DSP in the envelopes? It's super easy to fancy up your envelopes with the Envelope Liner Framelits and DSP of your choice!
And, here it is all packaged up nice in the box! I tied a piece of Smoky Slate chevron ribbon around the box when all was said and done just to finish it off.
I still have a few kits left if you are interested in doing this class virtually. The virtual class includes the stamp set, supplies for the projects (excluding tools and inks), written instructions, postage to get it to you and a link to exclusive videos so you can see how to put it all together. Cost is $50. Let me know if you are interested! Please note this is only available to Canadians.
Have an inspired day!
Showing posts with label Holiday Catalog. Show all posts
Tuesday, August 5, 2014
Monday, December 10, 2012
Happy Frog
Happy Monday! I hope you're having a GREAT day today!
One of my favorite images in the RMHC set, Moving Forward, is the little frog. He is just so CUTE! And, perfect for all kinds of cards, especially birthday cards.
For this card, I used the same layout as this Christmas card. For my frog card, the main image is colored with shades of green and brown markers. I stamped frogs all over some Certainly Celery and Wild Wasabi cardstock and then punched some squares to put along the bottom of the card. It's finished off with some layered ribbon and a fun little frog jumping off the happy birthday!
Have an inspired day!
Sunday, November 25, 2012
Easy Peasy
I have some super easy cards to share with you today.
Have you seen the tags in the Holiday Catalog? There's so much fun stuff in that catalog, that they're easy to miss. But they're right there...page 12..Snow Festival Designer Printed Tags. Seriously, these babies are going to make your life (and the Christmas season) SOOOOO easy! You get 25 tags in the package and they're only $4.95! That's like 20 cents per tag!!! If you don't have a Holiday Catalog, you can see them in my online store. Either way, you NEED to check them out. They will change your life!
Now, you may be thinking, "Lisa, how can some silly little tags change my life?" Well, let me enlighten you. Imagine you rushing to get Christmas Cards done, presents wrapped with tags so you know whose is whose, and other little finishing touches ready for your holidays. It's crazy and stressful. And, I have the perfect product to make it less stressful. Let's start with cards...
All you need is a package of tags, a package of Notecards with Envelopes, ink (I recommend Gumball Green or Cherry Cobbler), Stampin' Dimensionals and a stamp set (I recommend Greetings of the Season). Put all that together and you get 20 super simple cards ready for the holidays! And, you will still have 5 tags left over for another project...which I will show you later this week!
So, there you have it. Easy peasy! So, what are you waiting for, go and order what you need TODAY so you can get your cards done in time and be sure to check back later this week to see what else you can make with these fantastic tags.
Have an inspired day!
Friday, November 2, 2012
Parade of Ornaments-Day 2
Well, after a few attempts of filming my video without kids screaming and fighting in the background, I gave up yesterday and decided to give it a go today. And, you will be happy to know I was successful!
Today I'm going to show you how to make the inner decorative piece for the paperbag ornament I showed last week and also show you another way to use this technique.
Here is the ornament for this week.
You can see a brown one and a green one hanging on my little tree! They are so super easy and in the video I tell you some different ways to use this particular ornament. Without further adieu, here is the video!
That's it for today! Have an inspired day!
Friday, October 26, 2012
It's So Sparkly, I Could Die!!!!!
In my head I'm saying my title like the little girl on Despicable Me when she gets the fluffy unicorn at the fair!!! So, you need to read it with that voice too...it's funnier that way!!!! And, if you have never seen Despicable Me...you need to!!
Now that we've got that out of the way lets continue with the post. Today I'm going to start out with a story...about my childhood. I have fond memories of decorating the Christmas tree each year when I was a kid. It was always so fun to open the boxes and remember where we got or made each of the ornaments. Some of the ones we made as preschool aged kids got a lot of laughs as we got older!!!! My brother and I each had some special ornaments that only we could hang...and now I'm experiencing that with my own kids! When I saw the long ovalish ornament in the Ornament Keepsakes set, it quickly reminded me of a particular set of ornaments we had (and my parents still have...well, most of the set!). The ornaments are long and skinny just like the one in the stamp set and they have diagonal glitter stripes on them (my description isn't doing it justice...sorry!). When I saw that ornament, I knew exactly what I wanted to do with it.
After stamping the ornament I used my 2-Way Glue pen on the solid parts of the ornament and then dumped glitter on it! Anyone who knows me well, knows I don't do glitter very often especially in this amount or at workshops. Truth be told, glitter and it's ability to stick to EVERY surface scares me! Inevitably when the glitter comes out I sparkle from head to toe, my office looks like Las Vegas threw up in it, and my dogs end up with glittered noses. But I did it...I braved the glitter mess and used it on this card...at a workshop...and everyone loved it!!!!! Hard to photograph all that sparkle and shine, but trust me, you almost need sunglasses to look at this card!!!!!
Did you notice the stamping along the side of the card? It's also done with an image from the Ornament Keepsakes set which I just stamped (with the help of my Stamp-A-Ma-Jig) down the side of the card. Even with clear mount stamps, the Stamp-A-Ma-Jig helps when you're stamping multiple images and want them perfectly lined up.
A little paper piercing, a ribbon knot and a sweet "merry" finish off this card nicely. Here are a couple close-up shots for you.
It's a fairly simple card, but it packs a lot of punch with all that glitter! And, I love the non-traditional colors of it...Island Indigo, Pool Party and Whisper White.
Have an inspired day!
Monday, October 22, 2012
Happy Birthday
Whose birthday you say? I don't know! But, if it's yours, let me be the first to say HAPPY BIRTHDAY!!!! Today, I have another RMHC card to share with you and, it's a super simple birthday card. Check it out!
A few strips of DSP (Summer Smooches), some punching, a sentiment, a cute little button and VOILA...a super simple birthday card.
And, just for fun, here's a version with the Candlelight Christmas DSP!
Remember, the DSP is part of the bundles on special this month and if you purchase one of the bundles you qualify to attend a special class on November 17 for only $5! Check out all the details on the bundle on my Specials page and the class on my Events page!
Have an inspired day!
Labels:
Big Shot,
Birthday,
Cards,
Charity,
Christmas,
Holiday Catalog,
RMHC,
Stampin Up,
SU Specials
Monday, October 15, 2012
Super Simple
Happy Monday! It's the start of a new week and I have some inspiration for you...another RMHC card and this one is super simple!
I saw a card similar to this on Pinterest and loved the simplicity of it, so I re-created it using the Twitterpated DSP and the Moving Forward set. In fact, I love this card layout so much, that I also did a Christmas version using the Candlelight Christmas DSP and Ornament Keepsakes stamps and framelits (which are part of the bundle on special this month!).
Check out all the details on the Bundle on the Specials Page (link at the top) and remember if you purchase one of the bundles, you qualify to come to a fun class on November 17 for only $5! You can find all the information on the class on my Events page (link at top).
Have an inspired day!
Friday, October 12, 2012
Fall Yummies
Peanut Butter and Chocolate...the perfect combination, right? So, it's only natural that the best candy is Reece's Pieces! And, it just so happens, that Reece's Pieces are the perfect colors for use in fall projects!
This little gem was one of the projects my Stamp Clubs did in September. I found the little jars at my local craft store (a loooooong time ago) in the wedding section. They are PERFECT for all kinds of projects. We filled our jars with Reece's Pieces and then did a little decorating...a fun tag tied on with some Early Espresso stitched ribbon.
Lots of new Big Shot stuff was used for the tag...Wood Grain Embossing Folder, Window Frame Framelits, Autumn Accents Bigz die (all from the Holiday catalog) and my old friend the Square Lattice Embossing Folder!
Now, we made ours with a to/from tag, but you could easily do this as a table marker and put names on the tags. They would look super cute on a Thanksgiving table (for my American friends who haven't had their turkey day yet!), or any fall gathering with family and/or friends!
If you are interested in making fun projects like this and having a night out each month to craft, consider joining one of my stamp clubs! My clubs are now flexible and you can choose to come on Monday, Tuesday or Thursday on the third week of the month. I have both a Scrapbook and a Stamp club starting in November. If you have any questions, please contact me and ask away! I would love to have you and your friends join one of my clubs.
Have an inspired day!
I'm not sure how half my Reece's Pieces went missing!!!! |
Lots of new Big Shot stuff was used for the tag...Wood Grain Embossing Folder, Window Frame Framelits, Autumn Accents Bigz die (all from the Holiday catalog) and my old friend the Square Lattice Embossing Folder!
Now, we made ours with a to/from tag, but you could easily do this as a table marker and put names on the tags. They would look super cute on a Thanksgiving table (for my American friends who haven't had their turkey day yet!), or any fall gathering with family and/or friends!
If you are interested in making fun projects like this and having a night out each month to craft, consider joining one of my stamp clubs! My clubs are now flexible and you can choose to come on Monday, Tuesday or Thursday on the third week of the month. I have both a Scrapbook and a Stamp club starting in November. If you have any questions, please contact me and ask away! I would love to have you and your friends join one of my clubs.
Have an inspired day!
Wednesday, October 10, 2012
Spider Cider!
When I first saw the Monster Munchies set in the Holiday Mini, I fell in love with it! And, for some reason I really love the spider cider stamp in the set! It's weird, because you all know I'm definitely not a fan of spiders...at all!!!
I think I like that stamp so much because I love Apple Cider The brand that I buy at Costco come in single serving packets that you mix with boiling water and those little packets are PERFECT for crafting (and drinking!)!!!!!
So, check out the Spider Cider project my Stamp Clubs did in September.
It's like a card, but with a surprise in side...a pack of Apple Cider mix! The outside is stamped with the the spider web image from the Mixed Medley exclusive Hostess set in the Holiday Catalog. A belly band was made with some cardstock, Howlstooth & Scarringbone DSP and some More Mustard ribbon! To get the dual color image, I colored my stamp with markers before stamping and to finish it all off, I added some of the super fun Googlies!
A cute and simple Halloween project that you could mass produce for Halloween treats for kids class friends or your co-workers.
Have an inspired day!
Thursday, September 13, 2012
I love Snowmen!
I know what you're thinking...Lisa, the leaves are only just starting to change color and you're talking about snowmen!!!! That's right! It's hard not to with the super cute snowman stamp, Frosty Friends, in the Holiday Catalog.
A while back, I signed up for this stamp set in a demonstrator swap thinking I would have lots of time to get it done and sent off. Fast forward to a wrist surgery with complications, a long recovery time and an inability to really use my stamping stuff and it taking me a good 3 weeks to make my swaps!
I had my card designed, but getting 23 of them made proved to be quite a challenge, so I enlisted the help of my kids! My younger two lasted about 5 punches and then were done with the whole process, but my oldest was fantastic and pretty much made the cards! He punched everything, helped with the Big Shot stuff (embossing and cutting), sponged everything and then helped put it all together. He did almost everything except the ribbon (which I did with my right hand and my teeth...don't worry ladies who received my swaps...the ribbon ends that came in contact with my teeth were cut off!!!) and a little bit of coloring on the snowmen. SO, swap recipients, if your swap from me looks like it was made by a 10 year old, that's because it pretty much was!
I was so grateful for his help and it was so nice to sit at my little table and chat while we crafted together. That's something him and I don't do very often because he would usually rather be outside or playing lego! I guess, in a way, my injury was a blessing in disguise!
Have an inspired day!
Subscribe to:
Posts (Atom)