Have you ever thought to use your clear blocks as stamps? It's super fun and easy and you get a really interesting effect. A couple months ago at one of my Best Of classes, I used this technique with the Best of Birthdays set.
I used the A, C and G blocks as stamps to create blocks of color on my card. Then I embellished the blocks of color with some stamping or other embellishments (like a super fun button!). I added a little bling...a rhinestone on the button and some Dazzling Details on the heart on the cupcake. The whole card is finished off with some ribbon.
The fun thing about this technique is that it looks different each time depending how much ink you put on the block. I especially love this technique with more masculine colors or nature colors because it gives a great natural looking texture kind of like rocks! Give it a try and let me know what you think.
Everything you need to make this card can be found in my online store, so head on over there with the shopping list to place your order!
Shopping List:
Carstock (Basic Gray, Very Vanilla, Primrose Petals, Summer Starfruit)
We have less than 48 hours left in SAB. Have you got your free SAB items yet? You still have a bit of time to place those orders and get some free product and why not choose the Happy Hello Simply Sent Kit. This is a fantastic card kit that comes with 8 pre-cut, pre-scored, and pre-printed cards! All you have to do is embellish (with the fun embellishments provided), write a little message, pop it in an envelope and you've made someone's day!
Like most Stampin' Up! products, demonstrators get it in their hands and find new and different ways to use it! The Happy Hello kit is no exception and there's loads of ideas out there for this kit. Today I have one of those "other ideas" to show you!
Yep, that's right...it was a card, but now it's a box! I've seen this idea all over the place, so I'm not sure who to credit the original idea to, but whoever it was, THANK YOU!!!!
It's super simple to make. Lay your flat card on the Simply Scored so that the original score line is vertical. You will want to score a line 1/2" on either side of the original score line (parallel to the original score line). Then turn the card so that your score lines are horizontal and score 1" in from each side. Then you just want to do some trimming on those score lines so that you can fold it up into a box. Secure the sides with some Tombow and you're ready to embellish with the fun embellishments that come in the kit. We used some Basic Gray ink and a stamp to add the word friends to the box.
Now, some of the cards are pre-printed with the word "hello" on them. That's ok, they will still work for this project.....that's why my flower is where it is!
We put a cello bag full of yellow jelly beans in our boxes.
Remember SAB ends tomorrow, so you will want to head over to my online store ASAP to take advantage of the sale and get some super fun free products for yourself!
Consider this a PSA...Sycamore Street will be closing on Friday! That's right, we will be saying good bye to Sycamore Street DSP, ribbons and buttons on Friday when SAB ends for another year. The good news is that you still have today, tomorrow and Friday to place your last minute orders to qualify for SAB and stock up on some Sycamore Street products (and the other products, if you want!).
I love the Sycamore Street DSP. There's such a wide variety of patterns that I find it easy to use for all kinds of occasions and looks.
I originally saw this card on Pinterest, but rather than pin it I filed it away in my brain for future reference and now I can't find it again to give the original creator credit. So, if you made a card like this and pinned it...thanks for your inspiration!
This card is a Basic Gray base with a piece of embossed Basic Gray cardstock over top it. Don't you just love the new Honeycomb Embossing Folder? I love how it can look fun and whimsical, casual or elegant! I added a piece of the Sycamore Street DSP along the bottom of the card and covered the "seam" with some of our luscious Two-Toned Ribbon (also from the Spring Catalog).
Everything you need to create this card can be found in my online store. So, head on over there with the shopping list to place your order today!
Shopping List:
Cardstock (Basic Gray, Whisper White)
DSP (Sycamore Street...FREE with a qualifying SAB order and only available until Friday!)
Bad title...I know! That's what I get for trying to be cool! With one child heading into middle school next year I know we are headed into the teenage years...I'm not ready for that, but at the same time I'm looking forward to it!
Last week the downloads were aimed toward tween/teen projects. While I totally saw those kinds of projects when I looked at the downloads, I also saw a BUNCH of potential in the Seriously Teen kit for projects for all my boys from the 11 year old right down to the 6 year old. I immediately downloaded it and have been playing around with it a bit.
Since March Madness is coming up soon I decided to kick it off early on my blog with a basketball layout!
This was the first layout I came up with. My oldest son finally got to play Grade 5 Basketball (he's been looking forward to it since Grade 1!!!). It's a short season and they get to play against other elementary schools around town. I know he loves basketball, but I was surprised that he's pretty good! He has pretty good ball control, he can dribble good and he made some sweet baskets during their 3 week season. His goal is to be on the school team in Middle School next year, so he's been practicing hard outside between snow storms when our snow is melting.
Supply List for my layout:
Background Designer Series Paper\_Designer Kits\Serioulsy
Teen - designer series paper\Seriously Teen - summer starfruit stars
Embellishments _Designer
Kits\Seriously Teen - embellishments\Seriously Teen - torn paper 2
(re-colored) _Designer Kits\Seriously Teen -
embellishments\Seriously Teen - torn paper 1 (re-colored) _Designer
Kits\Seriously Teen - embellishments\Seriously Teen - star
Stamps Seriously
Awesome\Seriously Awesome - rule no 1, Color = 0,0,0 Scoreboard\Scoreboard
- 3, Color = 0,0,0 Scoreboard\Scoreboard - 0, Color = 0,0,0 Athletic
Department\Athletic Department - hustle, Color = WHISPER WHITE 255,255,255 Athletic
Department\Athletic Department - nothing but net, Color = 0,0,0
Stampin' Up! announced some pretty fantastic things about MDS yesterday, so allow me to share!
Starting today (or yesterday!):
We've changed the name of the software from MDS 2 (and MDS 2+) to MDS.
We've lowered the price. What has been known as MDS 2+ is now $19.95 US/$24.95 CAN.
Coming soon:
The upgrade will be free! If you have been holding onto the original My Digital Studio software, you will be able to upgrade to the new software for free. We will let you know when it is available. We have discontinued the item number for the MDS 2 Upgrade (item 130650) until it's available for FREE.
Other information:
MyDigitalStudio.net is currently under construction as we make all of the changes. Just keep in mind that you may see outdated information for awhile.
We will remove the My Digital Studio Catalog at the end March from MyDigitalStudio.net. If you would like to keep of copy of it, go grab it before then. We have not been maintaining this file since last fall and it is outdated, so we feel like it's time to delete it.
We understand that when a price changes after you have made a recent purchase it can be frustrating. If you purchased the software at the old price from March 1 to March 17, 2013, the following will be added to your Download Manager by Wednesday, March 20: MDS 2+ or MDS 2
Up To Date Planner Template (item133271, retail value $14.95 US/$18.50 CAN)
Hello There Kit (item 133374, retail value $9.95 US/$12.50 CAN)
Everyday Woodcuts Embellishments (item 132191, retail value $5.95 US/$7.95 CAN)
MDS Upgrade
Hello There Kit (item 133374, retail value $9.95 US/$12.50 CAN)
Isn't that awesome news?!?!? The former MDS2+ (now known as MDS) is FULL of SO much content. I'm excited that all of you can get it at such a low price now!
And, finally, it's Tuesday which means there's some brand new downloads available. You can find them in my online store here. With a house full of boys, I'm loving the downloads today!
I know there's a silver anniversary and a gold anniversary, but is there such a thing as a blue anniversary?!?!? Well, there is now! Once again I have a card made with one of the Best Of sets, Best of Love.
I chose blues and gray for this card because I thought it would be a perfect anniversary card to give a man....and then I shimmered it!!!!!! The three panels are Pool Party, Baja Breeze and Not Quite Navy. Each of them was stamped with a heart from the Hearts A Flutter set (spring catalog). I used Versamark for this stamping...easy, got the tone on tone look I was going for and I didn't have to switch ink colors for each cardstock color.
The white piece was stamped with all three colors and I added a little paper piercing in the corners. Then, I shimmered it with a little concoction of Champagne Mist Shimmer Paint, Rubbing Alcohol and water.
It's finished off with a piece of Basic Gray stitched Grosgrain ribbon. Super simple and would make a great card for any occasion if you just changed up the sentiment.
As I write this post, I am most definitely not sick, but I know a lot of people are. I have the perfect little pick-me-up project that you could easily make and give to someone who is a little under the weather.
It's a cute little get well soon mug! It's super easy to make...
you need a 4x11 piece if cardstock
score at every inch (1, 2, 3, 4, 5, 6.....)
then along the long side, you want to score at an inch
trim up the score lines along the bottom to the long score line you made
either stamp or add some DSP
using the oval framelits made a handle and glue it partly onto the last flap
glue the last flap on to the first flap creating a tube like shape
then you want to put the tube over a can (helps to make the shape) and glue the flaps down
embellish with a tag and fill with fun stuff!
I started with a Chocolate Chip piece of cardstock and embellished with some Tea for Two DSP. My tag was made with the Two Tags die (wide tag cut shorter) and I stamped with the s{ick} stamp from the Word Play set. To get all the colors on my stamped image, I used my Stampin' Write markers. And to attach my tag I used some of the Ruffled Calypso Coral ribbon. All the colors I used I pulled from colors in the DSP.
This little mug is perfect for so many different occasions. I did one at Christmas for teacher gifts and included hot chocolate mix, peppermint sticks, marshmallows and a Tim Card. You could also make a fun tea or coffee themed gift in one of these too. Since this one is a get well soon mug, I put an assortment of comforting stuff for when someone is sick...tea, cup-a-soup, kleenex, sanitizing wipes.
There you have it...a super fun little gift that would brighten someone's day for sure! All the products I used to make this fun little project are available in my online store.
Shopping List:
Big Shot
Two Tags Die
Ovals Framelits
Chocolate Chip cardstock
Very Vanilla cardstock
Calypso Coral cardstock
Tea for Two DSP
Calypso Coral Ruffled Ribbon
Stampin' Write Markers (Calypso Coral, Lucky Limeade, Island Indigo)
I am loving the Best Of stamp sets that Stampin' Up! is releasing every month this year. Did you know that each set is composed of images from the last 25 years along with one new exclusive image. So far we have had 3 sets released and you can find links to each one if you click on the tab at the top labelled "Best Of".
So, here we go with a Best Of project today. I used the February set (Best Of Love) for this project.
Little bit of embossing with the Big Shot, little bit of paper piecing and one of those super cute Soda Pop Tops (squished, of course!).
You can find my video on how to squish the Soda Pop Tops here, or you can see it on my You Tube channel here.
Remember, the Best Of sets are available until March 2014, so you have lots of time to collect them all! Also, don't forget to put the little 25 sticker onto your collectors card...for every 6 stickers, Stampin' Up! will give you a stamp set of your choice (valued at $17.95 or less), and you have until April 2014 to redeem your free sets. Join me for my Best Of classes each month (they include the stamp set and some cards!)...you can find all the info on them under the Events tab. And, you can order any of the sets already out in my online store!
At first I wasn't sure about the Soda Pop Tops in the Spring catalog. But, now that I have played around with them, I can say with confidence that I LOVE them!!!! I do find them a little bulky, so I like to squish 'em for my projects! This is a project I made for all my downline who attended the Calgary Regional last weekend.
I started with MDS and made the part that was going to go in the squished soda pop top. I sized a circle punch to 1", filled it with some DSP and then added some hearts and a name. Then I copied and pasted a bunch of times to get enough for all my downline that was attending the Calgary Regional last weekend. After printing on whisper white cardstock, I punched them all out with my 1" punch and stuck them into the squished soda pop tops. The next step is to fill the soda pop top with crystal effects and let it sit for a looooooooong time to dry...like 24 hours! After they were dry, I punched a hole in them with my retired crop-a-dile and fed a chain through (I found the chain at my local craft store). The final little touch was to tie a strip of the More Amore Designer Fabric on it.
These make perfect scissor charms......
They also are cute on a bag (in a room of hundreds or thousands of demonstrators with the same bag it's important to make yours a little different than the others!). Some of my downline even put them on their lanyards along with their name tags for the day.
And, here's a little video showing you how to squish your Soda Pop Tops...it's easier than you think!
Go forth and squish your soda pop tops people...it's loads of fun!
Buckle up, grab a hot beverage and get comfy...this is a long post with a ride through my stamping adventure in Calgary, some card samples and a video! An adventure from start to finish!
Last weekend I had the opportunity to attend a super fun Stampin' Up! event...the Calgary Regional Seminar! Stampin' Up! takes their "show on the road" and does day long regional seminars in select locations across Canada and the US. We were lucky to have one so close to home, so I had to attend! And, I was thrilled when the lovely Donna Griffiths from SU phoned and asked me if I would do a 10 minute "WOW Demo"! Of course, I said yes (I may have yelled it!!!). I was SUPER excited!
Since I had a 2 hour drive to Calgary and wasn't planing to spend the night, Donna said she would put me in the afternoon so I wouldn't have to get there super early to set up...I could do it during the morning stamping break and lunch.
I got everything ready on my table and chatted with Tom (the best video guy ever!) about what I was going to be showing. He gave me some tips...how to show my projects to the camera, what area on the table to be stamping on so it shows up on the camera well, etc. And, after lunch I got all miked up and ready to go!
I couldn't wait to get up there and show my stuff!
There's my name up on the big screen when they announced me! And, here I am on stage doing my thing! That's Tom to the right.
All the demonstrators in the audience that day were wonderful...I had a cheering section (actually a couple!). It was a pretty cool feeling to have my name announced and hear cheers as I walked across the stage to get to my chair! I wish my kids would cheer like that when I say things like, "we're having beans for supper", or "time to get up, it's a school day", or "time to do chores"!!!!!
I was surprised that I wasn't really nervous at all! I actually felt super comfortable up there on that stage in front of 500 other demonstrators...I think that's because I love what I do and I love sharing about it...or maybe it's just my crazy need to be the center of attention sometimes!!!!! I will say this wasn't my first time at the rodeo! I have demoed at an SU event a couple times before and a LOT at the Millet Meetings I attend...I guess I'm just comfortable stamping in front of hundreds of people! Everyone seemed to enjoy what I was talking about and the samples I showed.
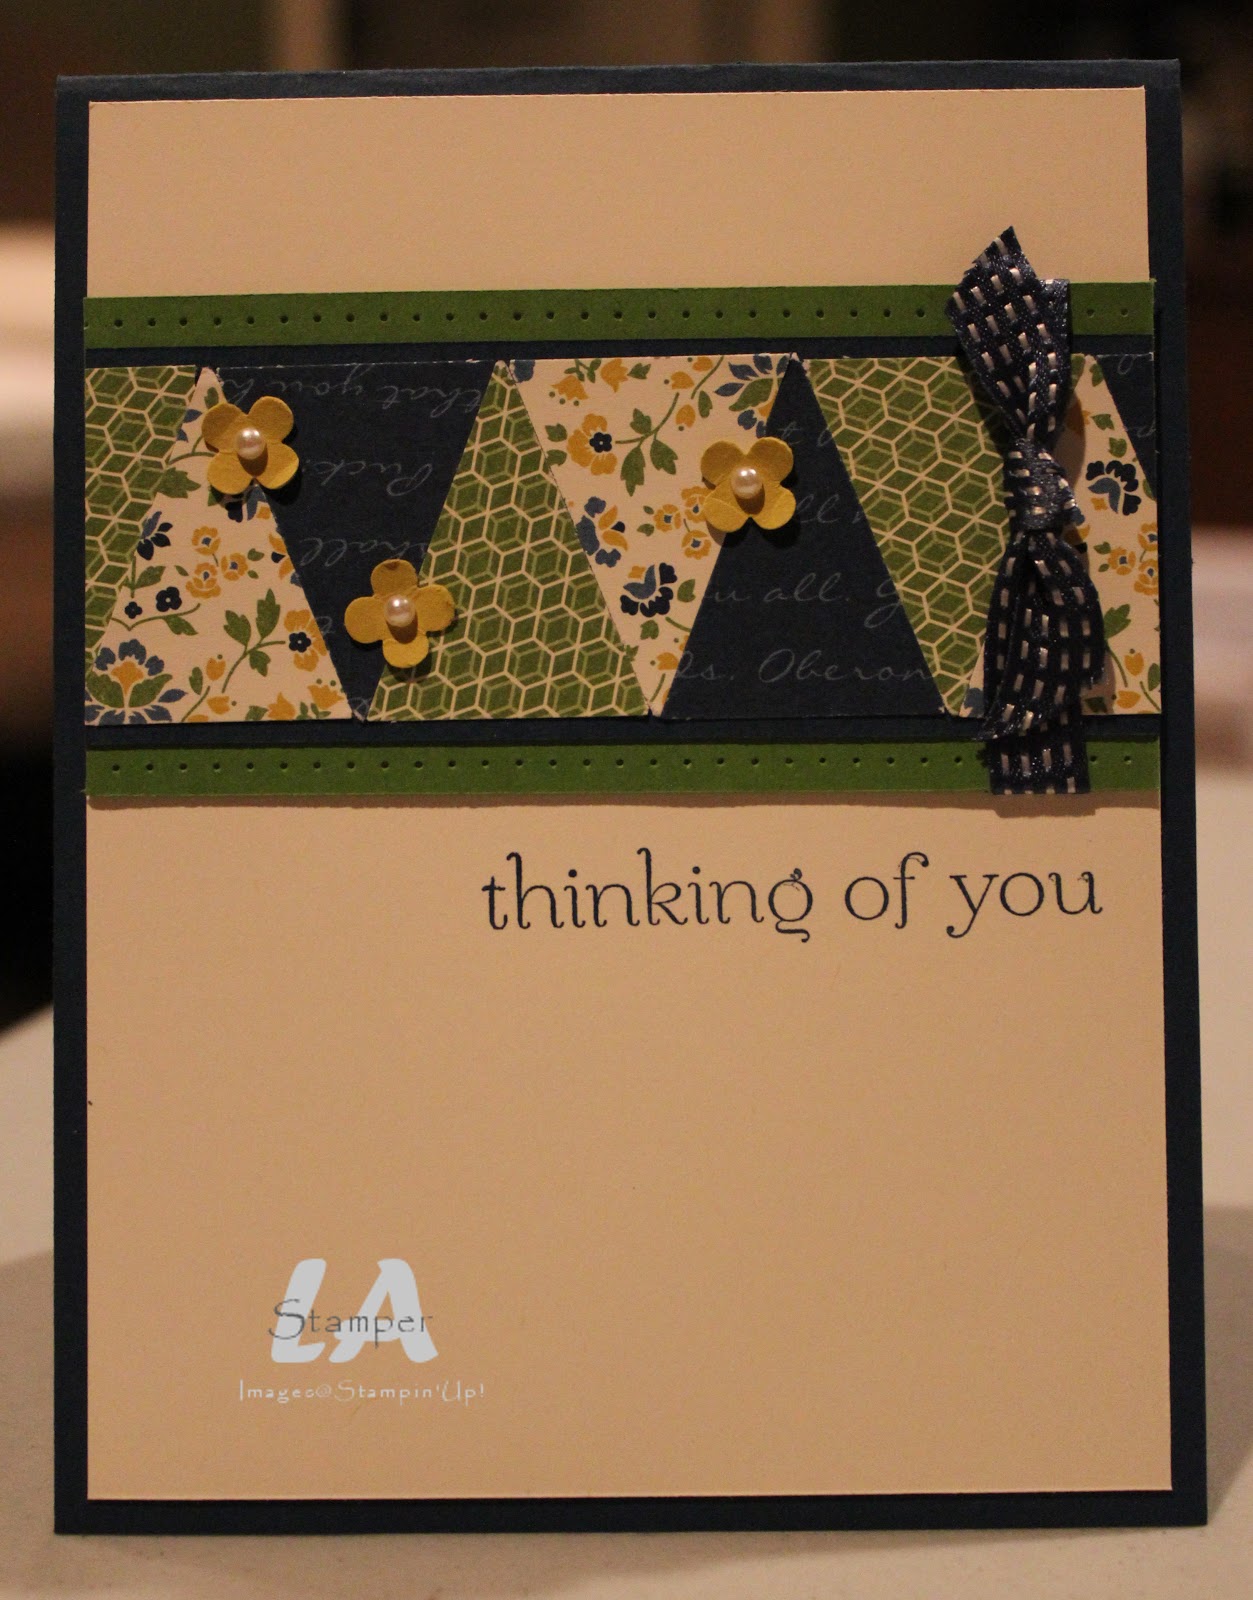
I talked about classes based on products. One of the products I chose to talk about was the Pennant Punch. Do you have the Pennant Punch? If not, you NEED it! It's an amazingly versatile punch. And, if you already have it, dust it off and show it some love with cards like I made to share in Calgary! Here are my samples.....
You can't really tell in this picture, but the sun was shimmered so it sparkled and shone!
I love a stamp set where you can do everything from baby to Christmas cards and everything in between!
This one was inspired by a card the very talented Kimberley Van Diepen did!
I think that last card was my favorite!
And, I put together a fun little video with one of the tips I shared during my demo. Enjoy!
Finally, I want to share 2 more pictures.
Me and Donna Griffiths
Shannon West, Me & Bonnie Thurber
The Stampin' Up! staff are so AMAZING! They are friendly, creative, helpful and always willing to chat. I truly feel blessed to be part of such a great company!
It's a big day at Stampin' Up!......it's the day that SU Photopolymer stamps are being introduced! These stamps will bring clear stamping to a whole new level with clear blocks AND clear stamps!
Here are some of the features you're going to love....
top-quality polymer that will give a perfectly stamped image every time
transparent for perfect placement
stick amazingly well to our blocks
age tested so they won't yellow or cloud over time
These stamps will be introduced slowly over time beginning with the Designer Type Photopolymer set (132956) that is offered for $16.95. Brace yourself...this is a set of 57!!!!! Yes, you read that correctly...57 stamps for $16.95 (take a few deep breaths so you don't faint!). You will need clear blocks with these stamps and this set requires blocks A, B, G, F & I for best results!
Head on over to my online store and order your stamps today! Have an inspired day!