Monday, December 7, 2009

Baby, It's Cold Outside!

Brrrrr! This morning it was -33 C (with a wind chill in the -40's) when we got up. It has warmed up a bit...now it's -30 C (which is about -22 F). Yikes!

We had some blizzard conditions here this weekend, which meant LOTS of snow and wind. Yuck! We decided to stay home this weekend rather than travel up to the Edmonton area to visit family. I'm glad we did...they closed highways and there was lots of accidents.


On Saturday afternoon, it calmed down enough that I ventured outside with two of our boys to start shovelling. Man, there were some impressive drifts...not fun to shovel! Here's a look at the drift out our front door! I literally had to shovel us out of the house...by myself since Kevin's back isn't really in a condition to shovel snow.


Taylor, our 7 year old, was more than happy to help shovel. Carter, on the other hand, was more excited to slide down the drift on the front steps! Understandable...he's only 5! He did help out though before he got cold and went in for hot chocolate.


Here's a shot of the drifting that was around Kevin's car.


It doesn't look that bad until you look at the shot I took sitting on the driveway. Notice the hockey net barely peeking out from behind the drift! It was drifted over top the hood of his car. I told him that if his boss wanted him at work today he would have to send some guys to shovel him out! Kev gunned it out of the driveway since the drift behind his car wasn't that bad and brushed his car off on the street and off to work he went this morning! I was surprised his car even started since it's so cold and it wasn't plugged in last night.


Here's another shot of our front sidewalk. Notice the fire hydrant peeking out of the snow!


It took me about 6 hours to shovel us out and muscles that I didn't even know were used to shovel snow hurt. Seriously...do you really use butt muscles to shovel? I guess I do...my butt muscles hurt! Maybe I'm just that out of shape!!! LOL!!!


We don't usually get snow like this here, and if we do it doesn't usually last that long thanks to the chinooks we get. However, I think I'm going to have to learn to live with this snow sticking around for a while. According to the forecast it's supposed to be pretty cold for the next little while, and it will take one heck of a chinook to melt these drifts. Maybe we will have a white Christmas this year!


If it's cold where you are, stay warm today! Until next time my friends!


Sunday, December 6, 2009

Simple Card Sunday-Butterflies!

Happy Sunday to you! I have a great simple card for you today! I had to do a project to help me think warm, happy thoughts after spending about 6 hours of literally shovelling us out of our house this weekend after the blizzard we got! *grin*


Now, remember I said that my definition of a simple card is one that takes 10-15 minutes to complete start to finish. Well, this card took about 10 minutes, if that...but I'm still cleaning up glitter!!! The picture doesn't do it justice. In real life those butterflies sparkle something fierce! They're gorgeous.

I started with a 6x6 piece of So Saffron cardstock folded in half. I *heart* this size of card. And, if you're looking for envelopes to fit a 3x6 card you'll want to check out Stampin' Up!'s Small Open-Ended Envelopes. They only come in Whisper White, but they are sooo smooth and fabulous...yes, envelopes can be fabulous!


Ok, back to the card. I stamped the En Francais background stamp with So Saffron ink on the front of the card. Then I did the Direct To Paper technique (simple drag your ink pad directly on the paper) around the edges. The butterflies are punched out of Chocolate Chip cardstock with the Butterfly Punch. I ran them through my Big Shot with one of the Texture Plates and then on the raised part I applied some of the chocolate glitter from the Fine Cosmo Supernova Glitter set. To finish off the butterflies, I tied a piece of Chocolate Chip Taffeta Ribbon around them to make a little body and antennae. The butterflies are stuck to the front of the card with Stampin' Dimensionals. And, the finishing touch is a little sentiment from the Short & Sweet set stamped with Chocolate Chip ink. This card just makes me smile...*grin*!


I was so thrilled with the butterfly card that I made this one...

Supplies: Polka Dot & Punch Pals sets, Bashful Blue & Night of Navy ink, Bashful Blue & Shimmery White cardstock, Snowflake Punch.


And...somebody stop me...I also made this one...

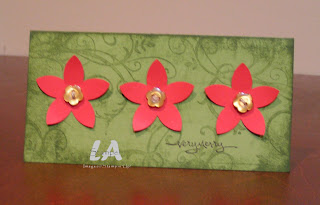
Supplies: Baroque Motifs and Short & Sweet sets, Old Olive & Chocolate Chip ink, Real Red & Old Olive cardstock, Playground Buttons, Linen Thread & the 5-Petal Flower Punch.


And finally this one...which was the fastest of the bunch because I found the Pretty In Pink cardstock already stamped in my scraps! I love when that happens!!!!

Supplies: Love You Bunches and Short & Sweet sets, Rose Red & Basic Black ink, Rose Red & Pretty In Pink cardstock, Stampin' Dimensionals, Full Heart Punch, Stampin' Sponges.


Wow! I think it took me about 45 minutes start to finish to complete all 4 cards. This is a super quick and easy to mass produce card! So which one is your favorite? Leave me a comment and let me know.


As always, you can go shopping for any of the products I used on these cards in my online store through my website or you can contact me.


Until next time my friends!

Saturday, December 5, 2009

Scrapbook Saturday

Hello! Today's Scrapbook Saturday is a birthday spread from my son's 5th Birthday Party last summer.
I often start my scrapbook pages with a sketch, and this one was no different...only, this time I actually followed the sketch almost exactly! I don't usually do that! The sketch I followed was by Becky Higgins.

I included some cool little embellishments on this spread. Let me show you my favorites. This is my favorite part of the page. The balloons are watercolored, cut out and stuck on with Stampin' Dimensionals. But before I stuck them on, I tied a piece of Linen Thread on them and tied the other end of the Linen Thread to the chipboard letters at the bottom. The Chipboard Letters are sponged with Pumpkin Pie Classic ink and then sponged again aroudn the edges with Chocolate Chip classic ink. The picture is put on over top the Linen Thread.

Here's a couple different views...

Here's the title...

And a bit of the journalling. I did one word journalling for each picture along the side of the picture. I figured it was pretty self-explanatory that it's a birthday party so I didn't include that much journalling. Although I did make sure to put that it was his 5th birthday!

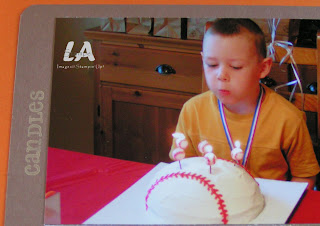
Look at that cute picture of him blowing out his candles! He loved that cake and those candles!

I often get asked why I choose the colors I do for layouts! This time, I chose So Saffron, Pumpkin Pie and Close to Cocoa based on the colors of the clothes my two older boys were wearing at the party and also the park we went to is orange and yellow.

I used So Saffron, Pumpkin Pie and Close to Cocoa ink and cardstock for this layout. I used the Varsity Alphabet, Calendar Alphabet and Crazy for Cupcakes sets for this layout. There's also some chipboard letters from one of the sets in the Idea Book & Catalogue as well as Aqua Painters, Watercolor Paper, Corner Rounder Punch, Linen Thread & Stampin' Dimensionals. As always, all the supplies I used can be purchased through my website or by contacting me.

Until next time my friends!


The Ninth Week of Christmas-Gift Card Holder

It's time for the Ninth Week of Christmas and this week I have a Gift Card Holder for you.
This Gift Card Holder is made from an envelope! Can you believe it? This is a great little project that is easily re-created to suit any occasion you need, and with Stampin' Up!'s envelopes, you have a few different choices of color. I used a Kraft one for this project.

To start, you want to fold your envelope in half so that the flap is on the inside. Then you cut half the flap off and glue down the other half of the flap. And then, you're ready to embellish for whatever occasion you need a gift card holder for.

I started by stamping a piece of Naturals Ivory cardstock with the Serene Snowflakes set using Real Red, Old Olive and Soft Suede ink I sponged around the edges of the stamped piece with Soft Suede ink, then mounted it on a piece of Soft Suede cardstock. Before I stuck that stamped piece on the envelope, I sponged around the edges of the envelope and stuck the ribbon on. The ribbon I chose for this project is the Sleigh Bells Ribbon from the Holiday Mini Catalogue. Get it while you can ladies. There's less that a month left to order from the Holiday Mini Catalogue!

The focal point of this project is one of the stamps from the Level 2 Hostess set, Christmas Punch. I colored the image with Stampin' Write Markers (Old Olive, Real Red, More Mustard & Soft Suede) and then stamped it on a piece of Naturals Ivory cardstock. It is punched out with the Large Oval Punch and mounted on a piece of Soft Suede cardstock punched with the Scallop Oval punch. The Scallop Oval is sponged around the edges with Soft Suede ink and stuck on the front of the card with Stampin' Dimensionals.

On the right side (the side where the flap is glued down) of the inside, I stuck a piece of Soft Suede cardstock. On top of that, I stuck a piece of Naturals Ivory which was stamped with the same ink and stamps as the front piece. I used the To/From stamp from Christmas Punch and also added a little Merry Christmas from Teeny Tiny Wishes.

The left side is the side where the half flap was cut off. You can see that I also cut a little chunk off the envelope so the gift card shows up better.

There you have it! I hope you enjoyed this project. As always, the supplies I used to make this project are in bold and can be ordered through my website or by contacting me.

Until next time my friends!


Tuesday, December 1, 2009

Earn some LA Stamper Bucks

How would you like to earn some LA Stamper Bucks?

Here's the deal, everyone who places an order, comes to a club, class or event during the month of December has the opportunity to earn Stampin' Bucks to use for Occasions Mini Catalogue purchases beginning in January. All you have to do to earn the Stampin' Bucks is bring a non-perishable food item to your class, club or event. For each non-perishable food item you bring, you will earn one LA Stamper Buck. There's no limit...if you bring 5 items you get 5 LA Stamper Bucks. Your LA Stamper Bucks can be redeemed just like money on Occasions Mini Catalogue merchandise in January when the mini comes out...and trust me, your wish list will be HUGE!!!!


At the end of December, all the food items will be donated to the Interfaith Food Bank here in Lethbridge.

So what do you say? Are you in? Let's fill up a HUGE basket that I will have a hard time carrying into the Food Bank at the end of the month!

Until next time my friends!