Sunday, January 10, 2010

Baby, I'm Back...

Hello! I'm back from sunny Phoenix! It wasn't as warm as I thought it would be, but there was no snow and I didn't have to wear a coat during the day so I'm not complaining!!! *grin* I know my family missed me...the kids ran outside when they heard the car door shut...Kevin was moving a bit slower. : ) And, my sweet little Sawyer immediately asked if I had presents!!! While I know my mom took good care of all my boys, I know they're happy to have me home and have things back to normal!

I was hoping to post some updates during Leadership, but I was so absorbed in what I was learning and spending time with friends I haven't seen for a long time that I decided not to! Not to mention, I was pretty exhausted at the end of each day. I'm so excited about all the fun ideas I learned and I can't wait to share them in upcoming classes and projects.

Because I know you're wondering, Kevin still hasn't been given another surgery date yet. I HATE this waiting and wondering...but I'm sure he's hating it even more than me!

Ok, enough yapping! I've got a card to share. Actually it's 2 cards...or one card two ways!

Quite a few of my club members are expecting so I had babies on my mind. When I was making prototype swap cards for Leadership, I did a couple quick baby cards. In case you're wondering, the baby cards didn't make the cut, and yes, I will share my swap cards later this week!

Here's a closer view of the girl card.

Supplies: Whimsical Words (SAB) & Holiday Blitz stamp sets; Certainly Celery, Regal Rose, Apricot Appeal and Soft Suede classic ink; Kraft, Soft Suede, Whisper White & Regal Rose cardstock; Sweet Pea DSP; Whisper White Taffeta Ribbon; Scallop Trim Border Punch (SAB)

And the boy card.

Supplies: Whimsical Words (SAB) & Holiday Blitz stamp sets; Certainly Celery, Bashful Blue, Apricot Appeal and Soft Suede classic ink; Kraft, Soft Suede, Whisper White & Bashful Blue cardstock; Sweet Pea DSP; Whisper White Taffeta Ribbon; Scallop Trim Border Punch (SAB)

They're pretty much the same except I used Regal Rose for one and Bashful Blue for the other. They would also be really easy to do unisex in green (like Certainly Celery) or yellow (like So Saffron or Barely Banana). These cards would be great birth announcements, welcome baby or congratulations cards or even thank you cards for a new mom so she could thank family and friends for all the wonderful gifts and well wishes. There you have it. A cute and VERY versatile card that would be simple to mass produce!

Until next time my friends! Have a great day!

Tuesday, January 5, 2010

Thank You

Good morning! I have to start by saying thank you to all of you who emailed about Kevin's surgery! We are so blessed to have so many people pulling for him! We haven't heard from the surgeon yet today with the new surgery date, but I promise I will update when we do.

My suitcase is re-packed and I'm almost ready to head out to go to Leadership in sunny Phoenix! I will update when I can while in Phoenix!


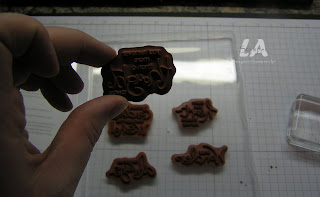
As promised, I'm going to show you about the new Clear Mount stamps today! On that note, here's some pictures of how to use them.


They come in a DVD type case. The one I'm showing today is the SAB Whismical Words set. I *heart* this set! You can get the set free with a $65 purchase (before shipping & tax).


The blocks! They look like giant ice cubes to me!

I really like that the images of the stamps on the front cover of the case are 100% sized. To choose which block to use, it's super easy to just place them over the stamp you want to use.


When you get your stamps, you will have to punch them out of the rubber sheet (just like the wood mount stamps) and then if you want put the label on them. There's instructions right in the case and I promise it's super easy! Here's what they look like in the case.


When you're ready to use them, you choose the one you want, choose the appropriate block and then put the stamp on the block. You need to hold it for a few seconds to make sure it's clinging properly.

Now you're ready to stamp!

The best part...you can see where you're stamping!

I love these stamps and think I will be purchasing clear mount most of the time now! They are easy to use, I get the same great results, they take up less space on my shelves and are a bit cheaper! The only downside I've found is that when I used my markers for this project and huffed on my stamp, the block fogged up!!!!

Well, I'm off to put my stuff in the car, pick my boys up for lunch, have a little snack and head out! Until next time my friends!

Monday, January 4, 2010

Change of Plans...

This morning I woke up thinking today was the day that my husband would have his back surgery. I packed my stuff thinking I would take him for his surgery, stay the night in Calgary and then head to Phoenix for the Leadership Conference while my mom & dad took care of my husband and kids. It all started off according to plan...we even got almost half way to Calgary and then he got a call on his cell. It was the hospital. Surgery is cancelled today...the surgeon is sick. What? Yep, the surgery he (well, actually all of us) have been waiting for is delayed and we will have to wait a bit longer. Hopefully not too long...we find out tomorrow.


Not a great start to the day! But, here's something that will make you smile...it made me smile when I made it!

Supplies: Stamps-Short & Sweet; Ink-Basic Black Classic; Paper-Whisper White, Real Red & Basic Black cardstock; Accessories-Real Red Chunky Glitter, Full Heart Punch, Stampin' Dimensionals, Assorted Real Red & Whisper White Ribbon scraps, Pinking Hearts Border Punch


I was inspired by this project by Heather Summers and I had a whole lot of ribbon scraps from this project. It seemed like a perfect fit! I'm quite pleased with how it turned out! And, I got to use one of my new punches. This border punch is available in the Occasions Mini, which you can start ordering from tomorrow! Yahoo!


So sparkly with the glitter! I love the dimension and texture of this card and I have a big jar of ribbon scraps, perfect for this type of card, calling me.

Well, hopefully tomorrow will go according to plan for our family! Until next time my friends!


Sunday, January 3, 2010

Simple Stars

Today's simple card is yet another simple birthday card for my boys to give to their friend for his birthday! My card today is 3x6. I love this size! It's a bit different from the usual card size and shape, but still a really easy to work with!
Supplies: Stamps-Seeing Stars, Teeny Tiny Wishes; Ink-Old Olive, More Mustard, Not Quite Navy & Chocolate Chip classic pads; Cardstock-Old Olive & Sahara Sand; Accessories-Star Punch, Natural Hemp, Tombow Multi-Purpose Adhesive


Because it's a boy card, I chose More Mustard, Not Quite Navy, Old Olive and Chocolate Chip and I threw in Sahara Sand for my neutral. The base of my card is Old Olive and it started as a 6x6 piece. Did you know that your paper has a grain? Yep, that's right! There's a grain which means it folds one way better than the other. Next time you're making a 3x6 card give it a try! I guarantee that it will fold one way easier than the other.


To start, I chose 4 stars from the Seeing Stars set and randomly stamped them all over a piece of Sahara Sand. I then tore it. To add a little interest, I wrapped some hemp around it a few times and tied a knot, which I then covered with a punched star! I glued it to the card with my trusty Tombow Multi-Purpose Adhesive because I know it will stay stuck with that stuff!

I finished it off with a Happy Birthday stamped with Chocolate Chip ink.


Until next time my friends! Have a great day!


Saturday, January 2, 2010

Best Friends

Happy Saturday! I had a layout all ready for you today, but then I started working on another one and decided that I had to share it.

This layout is all about my little guy and his best buddy, Klair! Sawyer just adores her and is always thrilled when she comes over to play. The two of them are such good friends and so cute together!
Supplies: Just Right Alphabet; Cardstock-Sahara Sand, Chocolate Chip; DSP-Sweet Pea; Sweet Pea Stitched Felt pieces; Ribbon-Old Olive Narrow Grosgrain; Ink-Chocolate Chip Classic, Bashful Blue Craft, Chocolate Chip Stampin' Write; On Board Loads of Letters; Border Punch (SAB)

I used the new Sweet Pea DSP and the Sweet Pea Stitched Felt embellishments for this page. I have to admit, I wasn't going to order the Sweet Pea Stitched Felt pieces, but I got them free from Stampin' Up! when I completed the My Digital Certification Program. Now that I've played with them, I'm hooked and ordered three more packs!

For this part of the layout, I just stuck some of the felt pieces over the flowers that were already on the DSP to add a little dimension. You'll also notice, I used that great new border punch that is available in the Sale-A-Bration catalogue. Remember, starting Tuesday, you can earn those Sale-A-Bration products FREE with every $65 purchased before shipping & tax. You're definitely going to want to log on to my website and place your Occasions Mini Catalogue order and earn some FREE Sale-A-Bration stuff!

I got the idea for this border from Becky Jensen's project. I just sort of ran with her idea to use the ribbon as a vine to connect the flowers. I'm very pleased with the result!

The title is done with stamps, my computer and some chipboard. For the computer word (friends), I printed it and then traced on the backside of the paper pressing really hard with my pencil. Then I flipped over the paper and placed it where I wanted it on the page and traced over the word again with my pencil. Because I had done it on the reverse side, when I traced it on the right side, it transferred the word to the page. Then I just wrote over it with a Chocolate Chip Stampin' Write Marker.

I'm thrilled with how these pages turned out! And, I used some products that I never thought I would be using in a boy scrapbook, but it just seemed so fitting being that his best buddy is a very sweet little girl!

Until next time my friends!