Monday, May 31, 2010

Yuck!

The weather has been down right frightful for the last week.  I can't believe how much rain we've had!  On the long weekend, I planted my garden...now I think that my poor little seeds have probably floated to the ends of my planter boxes and I will have a jumble of veggies when they start to grow!!!

One would think that with the weather, I would have got lots of stamping done, but this is not the case!  My husband went back to work (yahoo!) and while I'm thrilled that he's back to shift work, it's been a bit of an adjustment...especially for the kids!  Family came first this weekend.  So, on Saturday we spent some family time together and then yesterday I decided to have what my oldest calls a "brother-mom" day.  We stayed in our jammies and watched movies for most of the day.  It was nice to just relax and I had fun watching kids movies!

Tomorrow is the first day that demonstrators can preorder select products from the upcoming catalogue and the retiring lists will be released.  I can hardly stand the wait to see what's on those lists and what I can preorder!

I'll do some stamping this afternoon, so I have something to share with you tomorrow and I will also be posting the Last Chance Lists for you.  So, be sure to check back tomorrow!

Have an inspiring day!

Wednesday, May 26, 2010

Totally Textured

I am LOVING the new Sqaure Lattice Embossing Folder in the Summer Mini.  Now, in the mini it looks like nothing special, but trust me...you need this embossing folder.  When you get it and use it, the results are amazing!  It makes such a deep and fabulous impresssion!  I know you're gonna love it...and if you want to learn some tricks with it, you'll want to register for the To Die For class in June!

Here's a look at it in action...


One word...AWESOME!!!!  Ok, so the colors I used for this card are Always Artichoke, Dusty Durrango and Crushed Curry.  The main image is from the Upsy Daisy set and it's stamped first with Dusty Durrango and then with Crushed Curry.  The trick to getting the double image is to not try too hard...because if you do you will end up stamping both images exactly on top each other.  It's true...you'll line them up perfectly without even trying!!!

Now, my second most favorite product in the mini is the Itty Bitty Shapes Punch Pack!  I love how the Itty Bitty Circle layers perfectly with the 1/2" circle.  I finished off my circle with a vintage brad in the middle.  Have a look...but don't drool on your keyboard over that fabulous texture!


I know...I can hardly stand it either!!!  Like I said, you need this embossing folder...and the Itty Bitty Punch Pack too!  The best part is that you can order it right now in my online store (sorry, Canadians only)!

Have an inspired day!

Tuesday, May 25, 2010

My Inner Granny...

...makes another appearance!

Supplies:  Elements of Style stamp set; Soft Suede, Bordering Blue & Old Olive classic ink, Versamark ink; Soft Suede ink refill; Kraft, Naturals Ivory & Bordering Blue cardstock; Soft Suede Patterns DSP; Very Vanilla Taffeta Ribbon; Stampin; Sponges; Big Shot & Scallop Circle die; Glassy Glaze Embossing Powder; Aqua Painter

Like I said in this post, I didn't really like this set at first, but yowza I'm liking the results I'm getting with it!  It's totally making me take a HUGE step outside my comfort zone and so far so good!

This is one of the cards my clubs did this month.  I showed them how to do the Cracked Glass technique, which I think is a perfect technique for this stamp set!  Cracked Glass is one of those super simple, but fabulous techniques!  You stamp your image and color it, then ink it with Versamark and emboss it with Glassy Glaze embossing powder.  You repeat the Versamark/Glassy Glaze part three to four times until you have a thick layer of embossing completely covering the image.  It totally looks like glass!  Then you stick it in the freezer for a while.  When you take it out of the freezer it will be curled and when you flatten it, the embossing cracks.  Hence, Cracked Glass!  To accentuate the cracks, I put a few drops of Soft Suede ink refill on them and rubbed it in with a paper towel.  I *heart* the results!  It looks so old and vintagey...I think Shelli would be proud!

Here's a closer look at the Cracked Glass part.


I didn't put a sentiment on this card for two reasons...I don't know where to put one, and I thought it would be a great card for lots of different occasions.  I gave this card to my mom for Mother's Day and I think she loved it!  She looked at it for a long time, touching the embossing and just enjoying it.  I was so excited that she loved it so much and I know it's proudly on display at my parent's house!  That's what giving handmade cards is all about...evoking a feeling from someone and the feeling you get when you give the card.

Have an inspired day!


Monday, May 24, 2010

New Classes & Online Registration

I've added some new classes to my schedule!  Take a look and get yourself registered to reserve your spot.  I'm also super excited to let you know that online registration is also now available!

Have an inspired day!

Wednesday, May 19, 2010

Make A Wish

Today I have a great birthday card to share.  This card is one of the cards my clubs are doing this month.


Isn't it great?  The black base of this card really makes the bright colors pop!  I used Bermuda Bay, Elegant Eggplant and Melon Mambo for the squares.  I dragged the edges of each of the small squares in their matching ink pad for added dimension.  And, all the squares were mounted on a piece of Old Olive cardstock.  Each of the little squares is 3/4".


In the middle of each of the large squares is one of those fantastic Bitty Buttons.  I can't get enough of those little beauties!

The card is finished off with some paper piercing on the top left corner and the sentiment was stamped with
Whisper White Craft ink.

That's all for today!  Have an inspired day!

Sunday, May 16, 2010

I Scream, You Scream...

...we all scream for ICE CREAM!!!!!  One of my favorite sets in the Summer Mini is the Sweet Scoops set.  I absolutely love it.  So, for Simple Card Sunday, I'm sharing a "Sweet Scoops" card.


Don't you love it!!!  I stamped the cone with Soft Suede.  The ice cream is done with Pink Pirouette and kissed with Regal Rose.  The scoop is kissed with the stamp in the set that looks like wood grain.  At first I was so confused about that stamp, but doesn't it make the ice cream look real?  Stampin' Up! thinks of everything!

The ice cream image was stamped on Whisper White sponged with Soft Suede ink and then was mounted on a piece of Pink Pirouette.  Then I stuck all that onto a piece of Soft Suede cardstock that was punched with the Scallop Border punch.  It's stuck to the card with Stampin' Dimensionals.  And it's finished off with a "Wish Big" from the Short & Sweet set stamped in Soft Suede.  The entire card is sponged around the edge with Soft Suede ink.


The great thing about makin 3x6 cards, is that you can usually make them into a 6x6 scrapbook page if you don't want to do a card.  Here's a look at the little 6x6 page I made with the same supplies as I used on the card.  I stuck a piece of Soft Suede piece on my page so you can see where I would put a picture.


Well, I feel the need to go eat some ice cream now, so that's all for today!  Have an inspired day!


Saturday, May 15, 2010

Ahhhhhhh!

For Scrapbook Saturday today I'm going to share my layout from our zip lining adventure in St. Lucia a few weeks ago.


This is the one and only layout I got finished during Scrapfest!  I was busy making sure everyone else had what they needed and didn't get much done myself.  But it was a great day!  Here's a close up of my title.

I used the Go Go Boots Alphabet and the new Square Lattice Embossing Folder to create my title.  I love that embossing folder.  It creates such a great deep texture on cardstock.

I used the new mini punch pack, the Island Oasis DSP and the new Island Floral Big Shot die to create some embellishments for my pages.  Have a look.


Well, that's all for today!  Have an inspired day!


Wednesday, May 12, 2010

Grrrr!


It's our anniversary this Saturday.  Kevin and I will have been married for 11 years!  Gosh, time had flown by and our lives have changed so much since we got married and even since we started dating.  We're high school sweethearts!   When we started dating I was 15 and he was 18.  We met at band practice...he played French Horn and I played Flute.  We sat directly across from each other in the semi circle that the band sat in.

The funny thing is that this weekend we will be apart!  I'm heading to Millet to demo at a Stampin' meeting and taking our youngest with me so he can visit with Grandma and Grandpa while I'm at the meeting.  Kevin is staying home with the older two becuase our oldest is running in the Little Souls Marathon this Saturday.  After the marathon, the three of them are having a "boys weekend" and the kids are super excited about it!

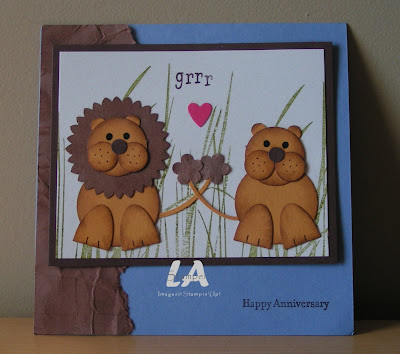
Anyway, in honour of my anniversary, I thought I would share the card I made for Kevin.


I actually made this card for a punch art swap I participated in last fall.  I made 50 little lions for the swap...25 girls and 25 boys!  I think this is one of my favorite cards I have ever made!

It's a 5x5 card.  I started with a Brocade Blue base and layered on a piece of Close to Cocoa.  To add some texture, I crumpled the Close to Cocoa piece and then rubbed some Close to Cocoa ink on it with a sponge.

The main part of this card is the lions!  I started with a piece of Naturals White cardstock stamped with the grass image from Inspired by Nature using Old Olive ink.  I use that grass an aweful lot!!!  The lions are made with various punches and then stuck on over the grass.  I finished it off by adding a punched heart and the "grrr" is from the Under the Stars set.  The whole white piece was mounted on a piece of Chocolate Chip cardstock.

Here's a close up of  each of the lions.

The boy...


And the girl...


Aren't they cute!  Each punched piece was sponged around the edges.  The lions are made with More Mustard and Close to Cocoa cardstock and sponged with Close to Cocoa ink.  I drew on the eyes, the little whisker dots and the toes with a Chocolate Chip marker.

Here's a list of the punches I used...

Mane-Scallop Circle
Head-1" Circle
Cheeks-1/2" Circle
Ears & Nose-1/4" Circle
Body-1 3/8" Circle
Legs-Small Oval
Tail-Small Oval & Trio Flower

The heart was from the Heart to Heart punch (I used the smallest one) and was punched out of Melon Mambo cardstock.  A tip for punch art...the Two Way glue Pen is a MUST!  It's easy to use and not messy, especially with all the little pieces you punch and then have to stick together!

The card was finished off with a Happy Anniversary from the Teeny Tiny Wishes set stamped with Chocolate Chip ink.

That's all for today!  Have an inspired day!


Tuesday, May 11, 2010

My Mini Book

Hello everyone!  What a crazy week I had last week!  It took me a while to get back into the swing of things after we got back and then I was busy prepping for Scrapfest (I'll post more about Scrapfest another day...it was so fun!).  The girls at Scrapfest got to do two projects, and today I'm going to share the project the participants did during the day.


Isn't it cute!  It's a mini book made from one sheet of DSP.  There's lots of versions of these floating around out there on the web.  I was inspired by the fabulous Becky Roberts over at Inking Idaho for mine and used her version/tutorial.

I used the Pawsitively Prints DSP, Pumpkin Pie, Brocade Blue (sniff, sniff...this color is retiring at the end of June and I will really miss it!), and Whisper White.  I didn't want to use any really dimensional embellishments for this project so I kept it to ribbon...Brocade Blue wide Grosgrain (sniff, sniff...again, retiring) and Pumpkin Pie Striped Ribbon.  The spine of the book is embellished with some Jumbo Eyelets and ribbon.  And, to finish it off, I used punches...Designer Label, Itty Bitty Punch Pack (the circle), 1/2" Circle and my Crop-a-Dile.

I chose to do very little stamping on this project.  The little bit I did was done with the new Rough Type alphabet in the Summer Mini and Brocade Blue ink (sniff, sniff).

Here's a look at the inside pages.


I chose to put pictures of my boys on each page and on the pages facing the pictures are tags where I can journal.  Each page is embellished differently with a punch and stamped with their name.  Each tag is embellished differently.

This was a really fun project!  I had a blast making it and I know the girls at Scrapfest had a blast with it too!

That's all for today!  Have an inspired day!

Wednesday, May 5, 2010

Home Again

I'm back!  I hope you enjoyed  my quick posts in my countdown to the Summer Mini while I was gone.  I have so many more ideas for products and stamps in the mini that I can't wait to share with you. 

So, where am I back from?  Well, Kevin and I spent last week on a cruise ship in the Caribbean on Stampin' Up!'s dime!!!  Every year Stampin' Up! has an incentive trip and last year I earned it which is why I was cruising.  It was so fun.   The food was fantastic, the daily naps were wonderful, the entertainment was fun, the places we visited and things we did were a blast, the people we met and the friends we made were awesome and it was great to just relax!  Although it's hard to come home and have to cook and do my own laundry and clean again!!!

Everyone who earned the trip had this magnet on our stateroom door when we got on the ship.  It was so awesome to walk down the hallway of the ship past all the doors with magnets.  There was about 200 demonstrators who earned the trip that were there with a spouse or friend in addition to the Stampin' Up! corporate team.  Kevin and I even had a late lunch with Shelli (the co-founder and CEO of Stampin' Up!) one afternoon!  She walked by and we had empty seats at our table so she sat down and joined us.  The three of us had a wonderful chat about the cruise, life and a little bit of business!


Here's our ship.  We were on Royal Caribbean's Adventure of the Seas.  It was amazing!  I played Mini Golf in the middle of the Caribbean...the rocking of the boat and the wind while sailing add a whole new dimension to mini golf!


We went to five islands on our cruise...Barbados, St. Lucia, Antigua, St. Maarten & St. Croix.  My favorite place was St. Lucia.  It was a gorgeous island and I would definitely go back!  In St. Lucia, we went zip lining through the rain forest.  There was 11 lines in total that we zipped on...I was so nervous on that first line (my knees were wobbly!), but it was fantastic and I'm so glad I did it!


In St. Maarten we went to this beach.


Yes, that's a real plane coming over the beach!  The planes land at the airport on the other side of the road from the beach.  Wild!  It was crazy to be sitting there and have planes so close overhead!

It was a great trip.  After 31 degrees everyday, we're really cold here at home with this ridiculous snow we're getting!  And, we both still feel like we're rocking!   Despite that, we're happy to be home.

Well, that's all for today!  I don't have any stamping to share because the only stamping I did last week on the ship I'm not allowed to show you yet...we got to use one of the new In Colors and a new stamp set that won't be released until July!  I will say that you are going to LOVE the new Color Coach and the new In Colors are great!

I will be back later this week with some stamping to share.  Have an inspired day!

Saturday, May 1, 2010

Celebrate Summer and Scrapbooking

Happy May to you!  Today is May 1, which means there's a fun special and the Summer Mini starts today.

The special this month is all about scrapbooking.  Take a look...

Remember, you can click on the image and see it bigger and/or print it.

Today is the day you can start ordering out of the Summer Mini.  I will have lots more projects to show you with stuff from that mini when I'm settled back into life after being on the fabulous Stampin' Up! Southern Caribbean Cruise the last week.

That's all for today!  Have an inspired day!