Sunday, August 31, 2014

Simple Card Sunday 4 - Kinda Eclectic Card

Happy Simple Card Sunday!  Today I'm sharing a card I came across on Pinterest a while back (and do you think I can find it again...nope...so if you made and pinned a card like the one I'm sharing today, thank you for your inspiration!).  I loved the layout and simplicity of this card and thought it would be perfect for Simple Card Sunday.


Remember, for it to be a candidate for Simple Card Sunday it has to be able to be made in 5 easy steps, take 10-15 minutes to complete and use minimal supplies!


Here are the 5 easy steps:
  • Fold the Crumb Cake cardstock in half (5 1/2 x 8 1/2).  Stick the Tangerine Tango piece (3 7/8 x 5 1/8) on it.  Set aside.
  • Using the Kinda Eclectic set, stamp the dots with Crumb Cake ink and the leaf with Moss Meadow ink on the Whisper White cardstock ( 3 3/4 x 5).
  • Apply a strip of Retro Fresh Washi tape over the top of the dots and bottom of the leaf
  • Stamp the butterfly with Cajun Craze ink on a scrap of Whisper White cardstock.  Punch it out and put a Stampin' Dimensional on the back.  Add some Linen Thread (stick on the dimensional) loops.  Stick the butterfly on the card.  Add 3 pearls to the body of the butterfly.
  • Stick the stamped white piece to the Tangerine Tango piece.
Check out the video so you can see me make the card in real time.


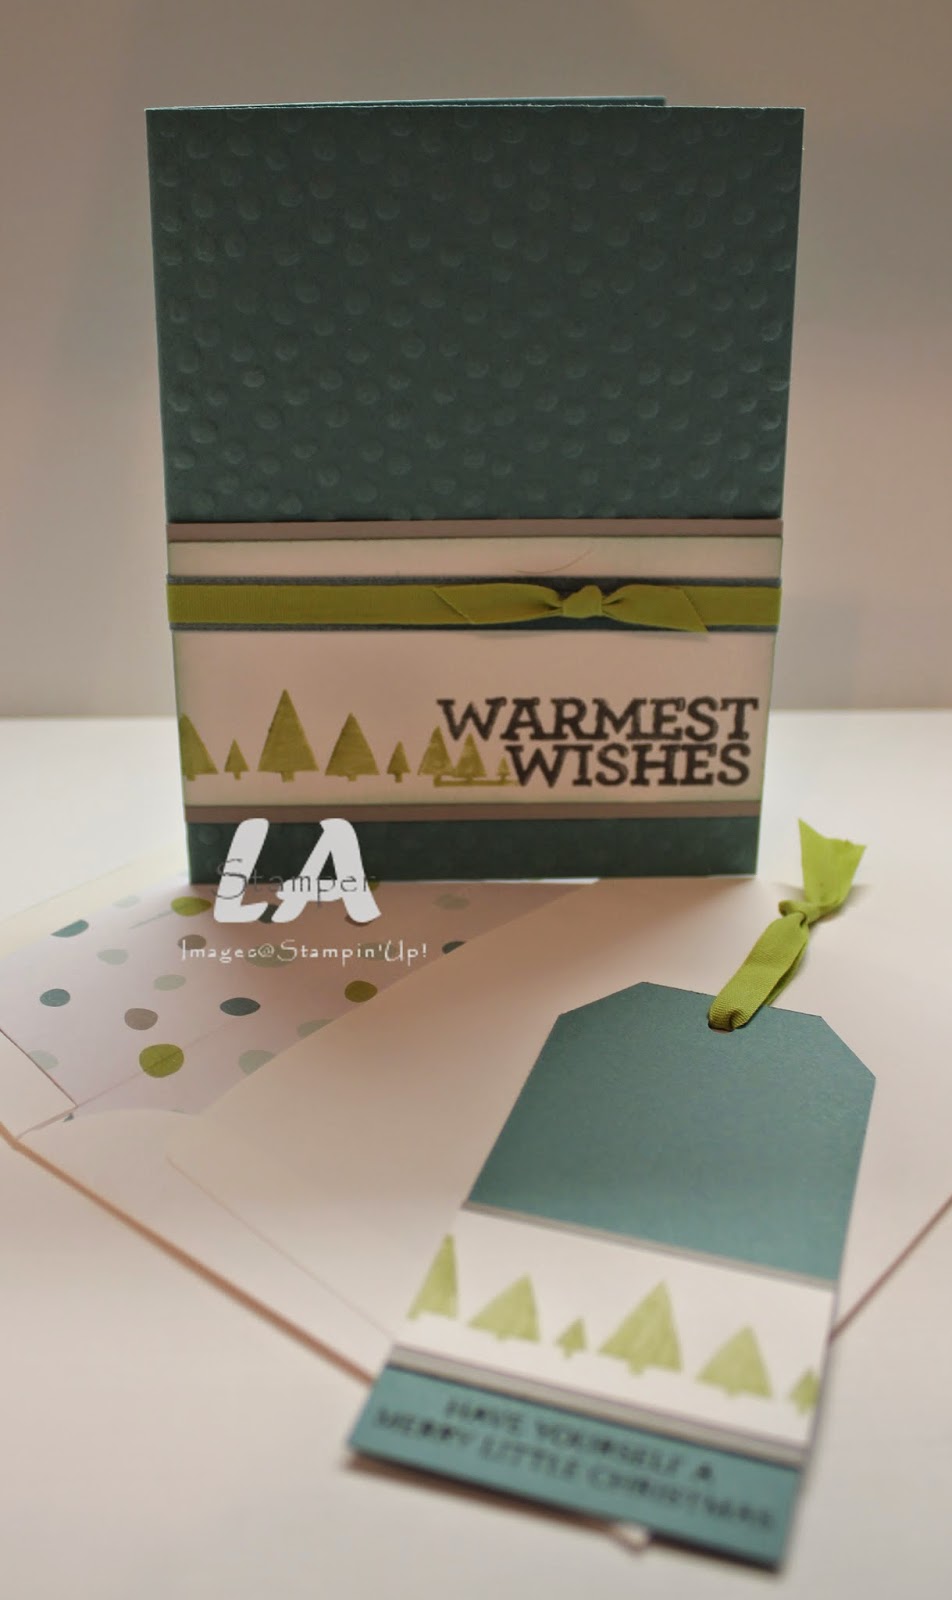
And, here's another card made with the same layout.  For this one, I used the new Festival of Trees set from the Holiday catalog.  I am loving this set almost as much as the Wonderous Wreath set!!!!


You can find everything you need to make both the cards shown today in my online store.  Head on over there with the shopping list (includes the featured card supplies only) and place your order today!

Shopping List
Stamps:  Kinda Eclectic
Ink:  Crumb Cake, Mossy Meadow, Cajun Craze
Cardstock:  Crumb Cake, Tangerine Tango, Whisper White
Accessories:  Linen Thread, Stampin' Dimensionals, Retro Fresh Washi Tape
Tools:  Elegant Butterfly punch

Have an inspired day!


Thursday, August 28, 2014

Frightful Wreath

Hi Stampers!  It's here, it's here, it's here...the Holiday Catalog is LIVE today and you can finally order all of the awesome new products in it!  Today I have a spooktacular project to share with you!


I am in love with this wreath and can't wait to hang it up!


This spooky project is a kit in the Holiday Catalog!  I've made mine a little different than the instructions (no surprise, right?!?!?!).  You can find this kit on page 36 of the Holiday Catalog or in my online store here.

And, here's the best part!  I'm offering this project as a private class.  All you have to do is find a minimum of 4 friends and choose a date!  It's $40 per person and after I receive payment for everyone attending, I order the kits.  Then on the date we choose, I show up at your place kits in hand (or you come to me) and we craft the afternoon or evening away!  Sounds like fun doesn't it?  So, don't delay!  I have limited dates available in September and October for you to have a spooktacular wreath class with your friends.  Contact me today to book your date!

Have an inspired (and spooktacular) day!


Monday, August 25, 2014

Happy Stampaversary!

On August 31, I will be celebrating my 12th anniversary as a Stampin' Up! Demonstrator!  Oh my, how the time has flown by!!!  It's been a great ride for sure!


Until August 28, you can join my awesome team of demonstrators with the Short & Sweet Starter Kit sale!  You get to choose $190 of product for your kit for only $125!  In addition to the product you choose, you also get a bunch of business stuff to get you started...we're talking catalogs, the new Holiday Catalog, order forms and so much more!  If you have an order that totals $200 waiting to be placed you deserve a discount and should give being a demonstrator a try.  Sounds super fun doesn't it?  Head over to my website and get signed up today!  You have nothing to lose!

Check out what I got in the mail a couple weeks ago...


It's a great card congratulating me on my 12th anniversary!  This is something relatively new that Stampin' Up! Canada has started.  Every demonstrator gets a card celebrating their anniversary, or as I like to call it a Stampaversary, from head office!


It was a great mail day when this came and I opened it!  One of the best parts was the back.  Look what was stamped on it...


Love!  That's right...there is a group of Canadian Demonstrators that has volunteered to make a bunch of these kinds of cards that get sent out for the anniversaries!  Isn't that awesome! 

So, what do you think?  Can you picture yourself getting an anniversary card in the mail from Stampin' Up! Canada in the mail a year from now?  If I haven't convinced you to join me yet, here are 10 more reasons...ok, 11!

  • Save $$$...high quality, coordinating stamping supplies at a discount
  • Sneak Peeks...SU Demonstrators get to see and order new products a month before they are released to everyone else!
  • Friendships...I have met some of my closest friends through Stampin' Up! (from all across North America!)
  • Freedom...the freedom to make your own schedule, the freedom to earn some extra $$$, the freedom to do your business your way
  • Earn $$$...pay a bill each month, fund your child's extra curricular activities, or support your crafting habit!
  • Exclusive Events...Convention, Leadership Conference, exclusive Canadian Conferences and my team events (which are SO FUN!)
  • Free Stamps...earn FREE stamps with the Stampin' Start program in your first 6 months as a demonstrator and earn FREE stamps after that with various other programs and promotions
  • Stampin' Connection...an online demonstrator community where you can connect and network with other demonstrators from around the world and see thousands of creative ideas and samples
  • Free Training...through Stampin' Up! and me!
  • Recognition...Stampin' Up! has many ways of recognizing demonstrator achievements from sale to leadership to how long you've been a demonstrator to everything in between.  We earn cash bonuses, product bonuses, free event registration, vacations and so much more!
  • Inspired By Ink...my team that I love so much!  We have Stamp & Share events every second month, a group Facebook Page, and a special You Tube Channel just for us!  We learn techniques and about products, we support and cheer each other on and we help each other out.  Join my team for an instant group of friends!

 So what are you waiting for?  You have nothing to lose!  Join my amazing team during the Short & Sweet promotion and choose $190 of product for only $125...and no shipping charges on your starter kit!  You choose what you want in your starter kit and you choose what kind of demonstrator you want to be.  Sign up for the discount on your crafting supplies or sign up to make it a career, or sign up for something in between!  But hurry, this offer ends August 28!  Run to my website and get started right now!

Have an inspired day!


Sunday, August 24, 2014

Simple Card Sunday - Episode 3, Wonderous Wreath Card

Hi Stampers!  Welcome to Simple Card Sunday!  Today I have a super fun, super easy Christmas card to share.  I know...Christmas?!?!?!  But, it's never too soon to start thinking about making your Christmas cards and this design is so simple it might even be the one for you this year!


Remember, for a card to be included in Simple Card Sunday it has to use minimal supplies, be completed in 5 easy steps and be able to be made in 10-15 minutes.

Are you ready?  Here we go!


Sigh...I LOVE this card and I LOVE this stamp set!!!!

Here are the 5 easy steps:
  • Fold the Old Olive (5 1/2 x 8 1/2) piece in half
  • On the Whisper White piece ( 3 3/4 x 5), stamp the biggest wreath image with Pear Pizzazz ink.  Stamp the smaller wreath image over the first stamped image with Old Olive ink.  And, then stamp the berry image with Real Red ink over the wreath.
  • Stamp the sentiment at the bottom of the card with Old Olive ink
  • Mat the Whisper White piece on the Real Red piece ( 3 7/8 x 5 1/8).  Apply Stampin' Dimensionals on the back of the Real Red piece and then stick it on the folded Old Olive card base.
  • Tie a simple bow with some Real Red Cotton Ribbon and stick it on the wreath with a glue dot.
Check out the video to see me make this card in real time and a ribbon bow tip!


Here's one more card made with this same layout.  This card features the Bright & Beautiful stamp set from the Holiday Catalog as well as the Star Framelits!  You can get the Star Framelits bundled with the Bright & Beautiful set FREE when you purchase a Big Shot before August 31.  Already have a Big Shot?  That's wonderful!  You can get the Framelits and set bundled at a 15% discount until the end of August.  Head over to my online store to place your order today and don't forget to use the hostess code JVPYSGHR to be entered into a draw for some awesome gold metal buttons.


Get a jump on your jingle!  You can find everything you need to create my featured card in my online store starting August 28 when the Holiday Catalog goes live!  Don't forget to order the envelopes so you'll be all set to send your cards out!  Head on over there with the shopping list to place your order today!

Shopping List
Stamps:  Wonderous Wreath
Ink:  Pear Pizzazz, Old Olive, Real Red
Cardstock:  Old Olive, Real Red, Whisper White
Accessories:  Real Red Cotton Ribbon

Have an inspired day!


Tuesday, August 19, 2014

Color Me Autumn Meets the Envelope Punch Board


I love fall!  It's my favorite season...the smells and colors, the crisp air, leaves dancing in the wind, back to school time, sweaters (I love sweaters!), pumpkin, apples, cinnamon and Thanksgiving which is by far my favorite holiday...sometimes we celebrate both Canadian and American Thanksgiving at our house because I love it so much!  What about you?  Leave me a comment and tell me what your favorite season is!

The other day I was playing with some of my new Holiday Catalog stuff, of course the fall themed stuff, and came up with a cute box.  Did I mention how much I love my job????  I get paid to play with paper and ink...what could be better!!!


I used Soft Suede cardstock and the Envelope Punch Board to make my box (if you don't already have the Envelope Punch Board, you NEED one!).  It's embellished with some Color Me Autumn DSP, luscious Hello Honey ribbon and a cute, rustic little wooden acorn (yep, we have autumn wooden elements in the Holiday Catalog!).  The sentiment comes from a fantastic stamp set called Merry Everything and is full of tags for all the occasions from now to New Years!  And, here's the best part, it has a coordinating punch!  You know how much I love it when stamps have coordinating punches or framelits!!!

I put together a little photo tutorial for you so you can make some of these great little boxes.  You are going to want to start with an 8x8 piece of cardstock and then just follow the tutorial.  Remember,  you can click on the picture to make it bigger (and don't forget to pin it so you remember how to make it!).


I put some apple cider packets and a little 3x3 card in my box so it's all ready to give to someone special this fall.


When the Holiday Catalog goes live on Aug 28, you will be able to order everything you need to create this box at home in my online store.  Grab the shopping list and place your order before the end of August with the hostess code JVPYSGHR to be entered to win a pack of the new gold buttons from the Holiday Catalog!

Shopping List
Stamps:  Merry Everything, For All Things
Ink:  Soft Suede
Cardstock:  Soft Suede 
DSP:  Color Me Autumn
Accessories:  Stitched Satin Ribbon (Hello Honey), Autumn Wooden Elements
Tools:  Envelop Punch Board

Have an inspired day!


Sunday, August 17, 2014

Simple Card Sunday-Episode 2

Happy Sunday everyone!  It's been a rough day at my house...my laptop died and I almost started my oven mitt on fire.  Thankfully the oven mitt incident was minor...just a little smoke and a bad smell!  And, my awesome husband built and ordered me a new laptop.  I can't wait for it to arrive!


Anyway, on to some stamping, right?  Today I have another simple card to share.  Remember for a card to be classified as perfect for Simple Card Sunday it has to be done with minimal supplies, be created in 5 easy steps and be able to be made in 10-15 minutes.

And, here it is in all it's glory!


5 Simple Steps:
  • Fold the Early Espresso piece in half
  • Glue the 4 pieces of DSP (2x2) to the Crumb Cake piece (4 x 5 1/4)
  • Tie the ribbon and attach it to the card
  • Stamp the sentiment (Petite Pairs with Early Espresso ink)
  • Glue the Crumb Cake piece to the Early Espresso card base

And, for you visual people, here's a video so you can see me assemble the card in real time!  I even included a tip for tying knots!


And, here are a couple more ideas for this same card layout.

This one uses the Confetti Celebration DSP and Endless Birthday Wishes stamp set

I flipped this one and used the Amazing Birthday set as well as a little embossing and a little washi tape!
You can find everything you need to create my featured card in my online store.  Grab the shopping list and head on over there to place your order today.  Don't forget to use the hostess code JVPYSGHR to be entered for a prize!

Shopping List
Stamps:  Petite Pairs
Cardstock:  Early Espresso, Crumb Cake
DSP:  Color Me Autumn (available when the Holiday Catalog goes live in Sept)
Ink:  Early Espresso
Accessories:  Cotton Ribbon (Early Espresso)

Have an inspired day!


Tuesday, August 12, 2014

A Girl and Her Blendabilities


Hi Stampers!  Remember last week when I showed you that card that I had colored with the Blendabilities?  And, remember how I said I was hopelessly addicted?  Well, I have another Blendabilities card to show you!  Tonight was my Blendabilities for Beginners class and it was so fun!  Everyone got a package of Blendabilities and a Memento Ink Pad.  We learned all about the markers and how to use them.  We made a color chart, colored some accessories and then just played with them by coloring some images.  Finally, we finished the evening making a card!


What do you think?  It was one of those cards that went a total different way than I had originally planned, but I'm so happy with the way it turned out.  I even got an "oooh, that's really pretty" from my husband when I showed him and it takes a lot to get that reaction out of him!!!!

I love how you can shade and blend with the Blendabilities.  Here....take a closer look at the coloring.....


Did you spot the little sneak peek item in this close up?  Leave a comment telling me what you think it is!

Everything you need to make this fun card can be found in my online store.  Grab the shopping list and head on over there to place your order.  Don't forget to use the hostess code JVPYSGHR to be entered to win a prize (that sneak peek item I mentioned!).

Shopping List
Stamps:  Bloom with Hope (Hostess), And Many More
Ink:  Crumb Cake, Mememto Black
Cardstock:  Crumb Cake, Rich Razzleberry, Old Olive, Whisper White
Accessories:  Blendabilities (Rich Razzleberry, Old Olive, Daffodil Delight), Old Olive Baker's Twine
Tools:  Big Shot, Modern Mosaic embossing folder, Modern Label punch, Stampin' Sponges

Have an inspired day!


Sunday, August 10, 2014

Simple Card Sunday-Flashback Miss You Card


 Hi Stampers...happy Simple Card Sunday!  If you're new to Simple Card Sunday let me tell you how it works.  We are all busy and have limited creative time so my goal is to show you cards that can be made in 10-15 minutes, in 5 simple steps, using minimal supplies.  In addition to that, I will be having more videos for Simple Card Sunday so you can see me make the card in real time!

So, lets get on with our card this week!


You can make this card in 5 Simple Steps.


And, finally, here are a couple more ideas using the same layout!

This one is super simple and features the Park Lane DSP.
For this one, I flipped the card and stepped it up a bit with layered ribbon and some rhinestones.  It uses the All Is Calm DSP & Endless Wishes set which will be in the upcoming Holiday Catalog!


I love this layout...the measurements are easy and economical for mass production, it's quick and simple!

You can get everything you need to create my featured card in my online store. So grab the shopping list and head on over to my online store to shop today!

Shopping List
Stamps:  Really Good Greetings
Ink:  Pool Party
Cardstock:  Pool Party, Basic Gray, Very Vanilla, Real Red
DSP:  Flashback
Accessories:  Hello Honey ribbon
Tools:  Stampin' Sponges, Paper Snips, Owl Punch, Stampin' Dimensionals

Have an inspired day!


Thursday, August 7, 2014

Blendabilities Meets Blooming With Hope

I feel like I need to shout it out...I LOVE COLORING!!!!  There...I feel better now!  I especially love coloring with the new Blendabilities Markers that were released with the catalog in June.  They color beautifully.  Let me show you...


I used them on the Watercolor Paper on this card.  I like it, but I do prefer coloring with them on plain old Whisper White cardstock.  I used the Old Olive, Cherry Cobbler and Daffodil Delight Blendabilities to color the flowers on this card.  So fun!  Stay tuned for more Blendabilities colored cards...I'm hopelessly addicted!  ;)

You can find everything you need to create this card in my online store.  Head on over there with the Shopping List and place your order today!

Shopping List
Stamps:  Petite Pairs, Blooming with Hope (Hostess)
Ink:  Crumb Cake, Blendabilities (Cherry Cobbler, Old Olive, Daffodil Delight)
Cardstock:  Crumb Cake, Old Olive, Very Vanilla
Other Paper:  Watercolor Paper
Accessories:  Cherry Cobbler Seam Binding
Tools:  Big Shot, Circle Framelits, Honeycomb Embossing Folder, Paper Piercer, Stampin' Sponges

Have an inspired day!


Tuesday, August 5, 2014

Christmas Bliss Card & Tag Set

Well, it is sweltering here...not that I'm complaining because it won't be long before it's minus 5 million and snowing again!!!!  Along the lines of thinking cooler thoughts, I decided it would be fun to have a Christmas in July class.  So, at the end of July I had a group of ladies over to get a jump on their jingle with this fun project!


The did a card & tag set featuring the Christmas Bliss stamp set and some new DSP, All is Calm (which will be in the upcoming Holiday Catalog...coming soon to a mailbox near you!).  They made a fun divided box to hold their creations which had a clear lid!  Yep, we used the window sheets to make a lid for our boxes so you can see the fun creations inside!  In addition to their boxes, they also made 4 cards with lined envelopes and 4 tags.


I am loving the colors in the All is Calm DSP...I'm pretty sure I will be using a lot of this DSP in the coming months!!!!  Did you  notice the DSP in the envelopes?  It's super easy to fancy up your envelopes with the Envelope Liner Framelits and DSP of your choice!


And, here it is all packaged up nice in the box!  I tied a piece of Smoky Slate chevron ribbon around the box when all was said and done just to finish it off.

I still have a few kits left if you are interested in doing this class virtually.  The virtual class includes the stamp set, supplies for the projects (excluding tools and inks), written instructions, postage to get it to you and a link to exclusive videos so you can see how to put it all together.  Cost is $50.  Let me know if you are interested!  Please note this is only available to Canadians.

Have an inspired day!


Sunday, August 3, 2014

Simple Birthday Wishes

It's Simple Card Sunday again and today I have a simple birthday card to share.  This is a card that my clubs did in June!


I used the super fun Endless Birthday Wishes photopolymer set for this card.  I love my rubber stamps a lot, but I have to say I do enjoy some aspects of the photopolymer stamps.  They are clear which is pretty cool...you can see right through them when you stamp them which makes for perfect placement.  I also enjoy being able to put a string of words together to make a sentiment like I did for this card.  Just place them where you want them and press the block onto them...voila, instant stamp!


I started with a Pear Pizzazz card base which I embossed with the Perfect Polka Dots embossing folder.  The cake was stamped with Basic Gray ink on a small square of white cardstock and placed behind the long white strip.  See how the cake is colored?  I did that with a stamp from the Work of Art set...I think this is going to be a must have set like Gorgeous Grunge!  I added a little sparkle with Dazzling Details on the sparklers on the cake!

Let's talk about that large white strip, shall we?  I started by punching out a 1 3/4" circle, then pierced around it.  I stamped the sentiment and added a small scallop trim (with the Dotted Scallop ribbon Border Punch).  I finished it off with three Daffodil Delight punched stars.  The whole strip is put on the card with Stampin' Dimensionals so that it looks like the cake is recessed in behind the white strip.  Fun little technique for a little different spin on a card!

You can find everything you need to make this card in my online store.  Head on over there with the shopping list and place your order today!

Shopping List
Stamps:  Endless Birthday Wishes, Work of Art
Ink:  Basic Gray, Strawberry Slush
Cardstock:  Pear Pizzazz, Whisper White, Daffodil Delight, Strawberry Slush
Accessories:  Dazzling Details
Tools:  Dotted Scallop Ribbon Border punch, Paper Piercer, template and mat, Itty Bitty Accents Punch Pack (star), Big Shot, Perfect Polka Dots embossing Folder, Stampin' Dimensionals

Have an inspired day!