Showing posts with label Swaps. Show all posts

Thursday, August 6, 2015

Watercolor Wings....Stampin' On the Road!

Hi Stampers!  I mentioned in my last post that I recently attended Stampin' Up!'s convention and participated in a huge organized swap.  As if 80 cards wasn't enough, at the last minute I decided that I wanted to make some cards for my special friends and general swapping. So, I cut all the supplies I needed and got them ready to stamp on the drive to convention!  Stamping is a great way to pass a 12 hour car ride...well, stamping and a lot of laughing and good times with a great friend!


I stamped, sponged and assembled away as we traveled south to Salt Lake City.  It was quite the adventure making swaps cards while driving through the winding mountain highway and through a nasty storm (we seem to get caught in a storm every year)!

Stampin on the road somewhere between Montana and Idaho!


I'm happy to say I completed all the cards I wanted to on the drive and they were ready for swapping when convention started!


I think Watercolor Wings is one of my favorite sets in the catalog and is the only set I used for this card.  You have so many options to give the butterflies details with this stamp set...two step stamp it, or three step stamp it for even more detail! Because it's a photopolymer set, you can easily see through the stamps to line them up perfectly (even if you're stamping on the road!).  I chose to three step stamp it and used Soft Sky, Tempting Turquoise and Island Indigo to stamp the butterfly.  The body and antenna were done with Soft Sky as well as the sentiment.

TIP:  Best adhesive for sticking the Burlap to your projects....Tear & Tape Adhesive! It's super easy to use and super sticky for the burlap.

If you are in Canada and need a Stampin' Up! demonstrator, I would love to help you out!  You can find everything you need to create this card in my online store.  Place your order there or contact me to place the order for you!

Have an inspired day!


Thursday, April 16, 2015

Hi Stampers!  Today I'm sharing one of the cards I did for a swap with my downline when the Occasions Catalog first came out!  It was love at first sight for me when I saw the Painted Petals stamp set so I knew I had to use it for our swap!


I love it when the idea in my head comes to life so wonderfully like this one did!  Everything about this card makes me smile...the color combination (So Saffron, Wild Wasabi & Whisper White), the ovals, the stamp images and the little embellishment I made at the top of the card!

You can find everything you need to create this card in my online store.  Head on over there with the shopping list and place your order today (or contact me to order!).

Shopping List
Stamps:  Painted Petals, Dictionary
Ink:  Wild Wasabi, So Saffron
Cardstock:  So Saffron, Wild Wasabi, Whisper White
Accessories:  Linen Thread, Basic Metal Buttons
Tools: Big Shot & Ovals Framelits, Large Oval Punch, Banner Punch, Stampin' Dimensionals, Stampin' Sponges

If you are Canadian and need a Stampin' Up! demonstrator I would love to help you out!  Contact me today to get a copy of our current catalogs.

Have an inspired day!


Thursday, September 18, 2014

Festival of Trees Swap Card

Hi Stampers!  On Tuesday, I showed you one of my swap cards from when I got together with my downline for our Holiday Catalog Shoebox Swap.  Today I'm going to show you my other swap card.


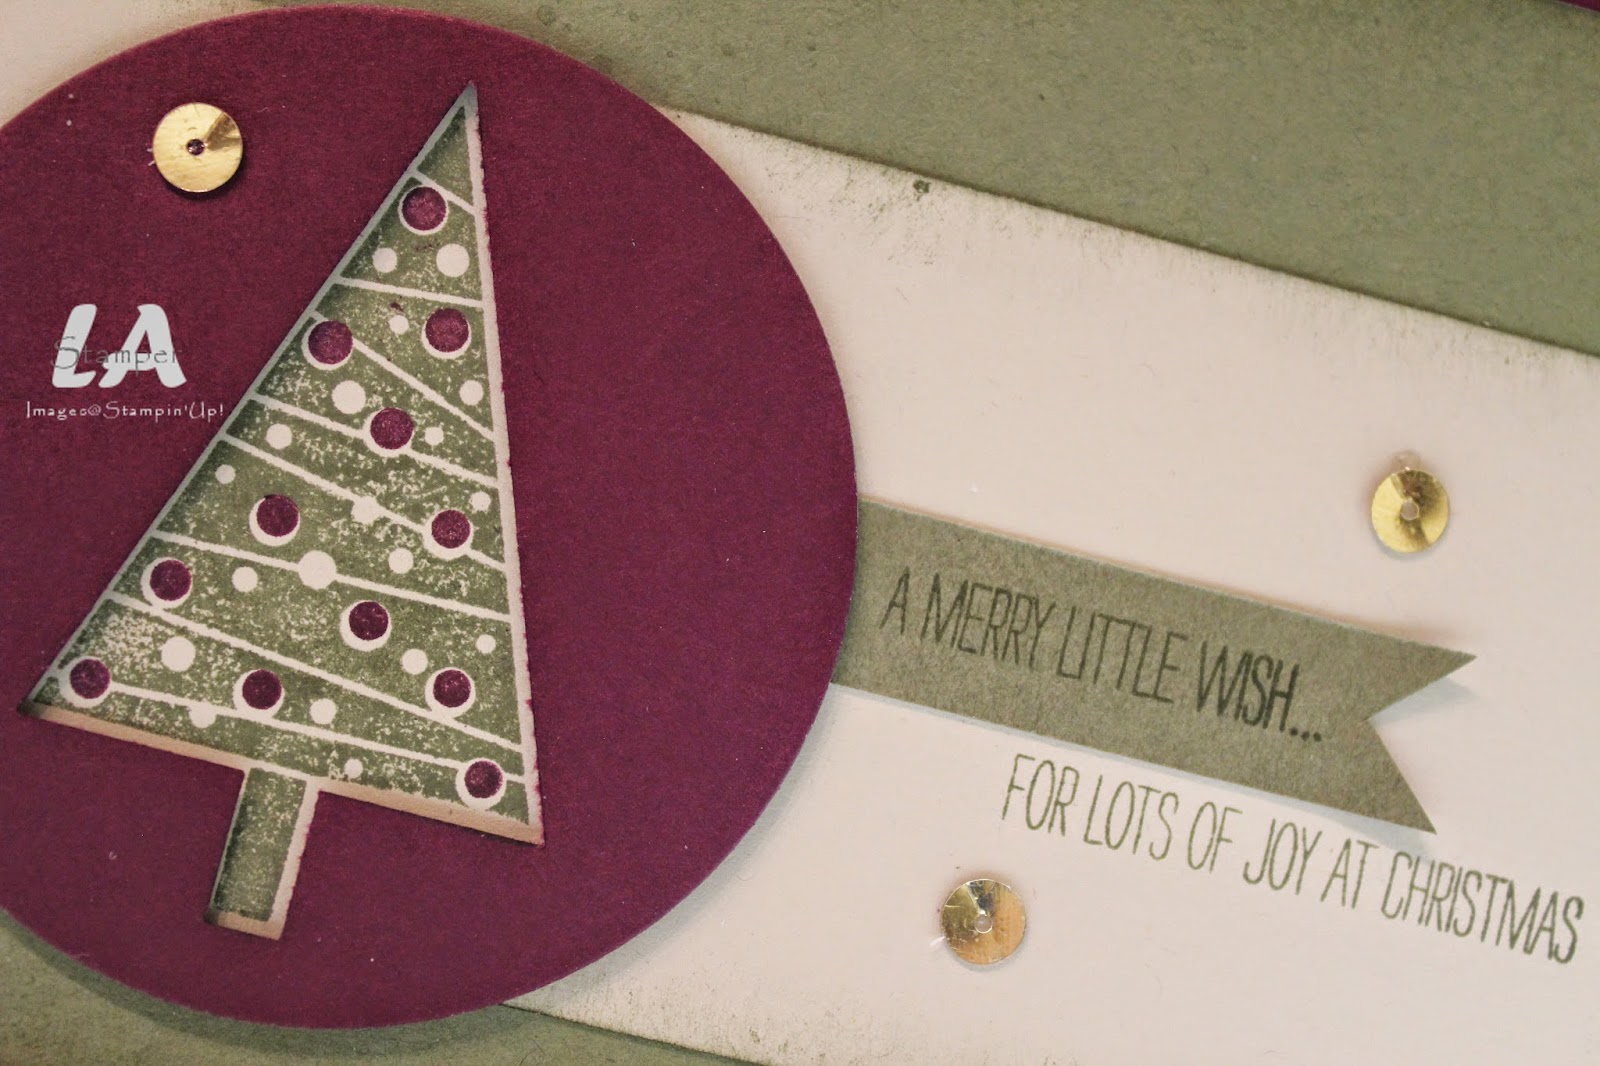
You all know that my favorite set from the Holiday Catalog is Wonderous Wreath, but I think the Festival of Trees set is a close second!  I love the variety of trees and that there's a coordinating punch so I can punch out all those fun trees!


Blackberry Bliss, Always Artichoke and Sahara Sand...one of my new favorite color combinations!  Here's a little tip for this card, punch the tree out of Blackberry Bliss cardstock and then cut it out in a circle shape with the Circle Framelits and voila, you have a tree shape in a circle!  You can then stamp your tree on your background cardstock and have it perfectly fit in the tree shape you punched.  Another thing I love about this set is that it's photopolymer so it's super easy to stamp the tree with one color (Always Artichoke) and then stamp the decorations with another color (Blackberry Bliss) and get them perfectly lined up!

You can find everything you need to create this super fun card in my online store.  Head on over there with the shopping list and place your order today!  Bonus...the Festival of Trees set is bundled with the Tree Punch so when you order them together you save 15%!

Shopping List
Stamps:  Festival of Trees, Gorgeous Grunge
Ink:  Blackbery Bliss, Always Artichoke
Cardstock:  Blackberry Bliss, Always Artichoke, Sahara Sand
Accessories:  Gold Sequins
Tools:  Stampin' Sponges, Tree Punch, Big Shot & Circles Framelits

Have an inspired day!


Tuesday, September 16, 2014

Holiday Cheer Shaker Card

Hi Stampers!  I'm in a shaker kind of mood lately (check out my star shaker box here) and decided to make a shaker card for one of my swap cards.


Every time a new catalog comes out I get together with my downline members and we stamp!  Everyone signs up for 2 different stamp sets and then designs cards (or other projects) with those 2 sets.  Then they prep the projects so they can be completed in 10-15 minutes and bring everything needed to create the projects.  As a group we all sit around a huge table and make the projects.  It is SO FUN and we get to go home with loads of cards from a lot of sets in the catalog without having to buy all the sets ourselves!  If you've been to one of my events lately, you've seen some of those projects on display....I have an uber-talented group of girls in my downline and I love showing off their creations as well as getting ideas from their creations!

This card was one of my swaps.  I signed up for the Project Life set Holiday Cheer!  Even though the PL sets are full of smaller images, they are still perfect for making cards!


I used 2 images from the Holiday Cheer set, the snowflake and the "Baby It's Cold Outside" stamps.  The shaker was made with the Shaker Frames, which are awesome circles of double sided sticky foam.  They're kind of like the Stampin' Dimensionals in circle frame form!  I used the super fun Frosted Sequins for the shaky stuff.  You get what seems like millions of silver sequins (2 sizes) and white snowflakes in the container.  Very fun!

You can find everything you need to make this fun shaker card in my online store. Head on over there with the Shopping List and place your order today!

Shopping List
Stamps:  Project Life Holiday Cheer
Ink:  Lost Lagoon, Basic Gray, Pool Party
Cardstock:  Lost Lagoon, Pool Party, Soft Sky, Basic Gray
DSP:  All Is Calm
Accessories:  Frosted Sequins, Shaker Frames, Rhinestones, Window Sheets
Tools:  Circle Punches (2 1/2", 1 3/4", 1 1/4", 1"), Stampin' Sponges

Have a inspired day!


Sunday, July 20, 2014

All Abloom Lots of Thanks

Happy Sunday!  I'm on my way back from the annual Stampin' Up! convention and I am exhausted!  My brain is FULL of fabulous ideas, I saw so many of my stamping friends that I don't get to see very often, I made new stamping friends and had a GREAT road trip with my girls!


Today I'm sharing a super simple card with you that my clubs did in June.  A version of this card ended up being one of my swap cards for convention.  You may be asking, "Swap card Lisa?  What's that?"!  Whenever demonstrators get together we swap card fronts.  It's like trading ideas....and I'm coming home with a bunch that I can't wait to display at my events for the next little while!


I love so many things about this card...the color combination (Daffodil Delight, Mossy Meadow & Island Indigo), the DSP (All Abloom), the layout and the simplicity of it!  It's a basic Crumb Cake card base with a little bit of stamping.  I used the Gorgeous Grunge stamp set to make the splatters as well as the strip of diagonal lines.  There's a scrap of DSP (All Abloom) along the bottom and also a strip of Daffodil Delight cardstock.  I added some white Baker's Twine and then made a medallion to hilight my sentiment (from Lots of Thanks).  I love the look of the piece cut with the Starburst framelit to mat the circles.  It's nice to have a great circle shape that's not a scallop!

You can find everything you need to make this card in my online store.  Head on over there with the shopping list and place your order today!

Shopping List
Stamps:  Lots of Thanks, Gorgrous Grunge
Ink:  Crumb Cake, Mossy Meadow, Island Indigo
Cardstock:  Crumb Cake, Daffodil Delight, Island Indigo, Whisper White
DSP:  All Abloom
Accessories:  White Baker's Twine, Rhinestones
Tools:  Big Shot, Starburst and Circles Framelits, 1 3/8" Circle Punch, Corner Rounder

And while you're shopping, remember that DSP is Buy 3 Get 1 Free this month!  Now is definitely the time to stock up on all the gorgeous DSP in the catalog!

Have an inspired day!


Thursday, July 17, 2014

Flashback Gusseted Pouch

Today I want to share some special swaps that I made for convention.  I always do up some swaps for general swapping and then a few special ones for my good friends!


While surfing Pinterest one evening, I came across the cutest little gusseted pouches made by Diane Barnes over at Color Me Happy!  She's a Stampin' Up! demonstrator in Australia!  I followed her basic instructions pretty closely and only made one change.  Here's what I came up with.


I love how they turned out!  I used the Flashback DSP again for these (I'm loving this DSP....the colors, the designs...I just love it!). 

Here's some basic measurements and instructions:
  • start with a 6x6 piece of DSP
  • line it up at 2 1/4", punch and score (on the envelope punch board)
  • line it up at 3 1/4", punch and score
  • turn the DSP 90 degrees, line up the first score line with the guide, punch and score
  • line up the second score line with the guide, punch (don't score)
  • turn the DSP 90 degrees, line up at 2 1/4", punch and score
  • line it up at 3 1/2", punch and score
  • turn the DSP 90 degrees, line up the first score line with the guide, punch and score
  • line up the second score line with the guide, punch (don't score)
You then fold it up and embellish.  I have a video for you to follow too with all the little extras I did.  Before I show you that, let me show you what I put in them!


Each pouch has 2 mint patties which I prettied up with some punched cardstock and DSP.  So cute!

Here's the video tutorial.


For the month of July, Designer Paper is on sale.  Buy 3, Get 1 FREE!  I used the Flashback DSP for this project, but there are so many fun options with DSP this year that I'm sure you will have no problem choosing 4...or 8, or 12!!!!!  Head on over to my online store and order some DSP today.  Don't forget to use the hostess code CZKJ2ZAD so you can be entered to win some washi tape!

Have an inspired day!


Thursday, June 26, 2014

Hello Honey & Lost Lagoon Cake Pop!

Each time a new catalog comes out I do a big swap with the demonstrators on my team.  We get together and stamp an afternoon or evening away and go home with loads of new samples to share at our events.  For the last swap we did in May, one of the projects I did was a cake pop holder.


As soon as I saw this stamp in the Num Num stamp set I knew exactly what my project would be!  My color inspiration came from the Moonlight DSP stack and I paired Hello Honey with Lost Lagoon and a little bit of Basic Gray.


I started with a strip of Hello Honey cardstock which I stamped with an image from the Mosaic Madness set and Hello Honey ink.  I punched each end with the Scallop Tag Topper Punch and did some scoring in the middle so it would be able to sit flat on a table.

The little saying is from the Num Num set and I colored it with Stampin' Write Markers to get it multi-colored.  I stuck it on my project with the new Fast Fuse adhesive and embellished with a little Lost Lagoon banner and a metal button.  The cake pop is tied in with some Lost Lagoon ribbon (you know...that luscious new In Color ribbon that you need every color of!!!).

I will admit that at first I didn't really like the new Fast Fuse adhesive.  It's really sticky, but there's a bit of a learning curve.  Now that I've figured it out I think I will be using it a lot more!!!!  Here's a little video comparing Fast Fuse and SNAIL so you can see the difference between the two...and I had a little Harry Potter moment (HP fans will know it when they see it!!!)!


Everything you need (except the cake pops!) to create this project can be found in my online store.  Head on over there with the shopping list and place your order today!

Shopping List
Stamps:  Num Num, Mosaic Madness
Ink:  Hello Honey, Stampin' Write Markers (Hello Honey, Lost Lagoon, Basic Gray)
Carstock:  Hello Honey, Lost Lagoon, Basic Gray
Accessories:  Lost Lagoon Stitched Satin Ribbon, Whisper White Baker's Twine, Basic Metal Buttons
Tools:  Banner Punch, Scallop Tag Topper Punch, Stampin' Trimmer, Fast Fuse Adhesive

Have an inspired day!


Thursday, June 19, 2014

Blackberry Bliss Sympathy Card

Continuing on with Blackberry Bliss this week, I have a simple and pretty Sympathy card to show you.


I don't' often make sympathy cards, but I just loved the saying in the Blooming with Hope set and it seemed to fit nicely with the card.  And, one of the best things about stamping is that you could easily re-create this card with a birthday wish!


I started with a blackberry bliss base for my card and layered on a piece of Sahara Sand which I stamped with the flower image (with Sahara Sand ink).  I am loving the combination of Sahara Sand and Blackberry Bliss...who am I kidding, I am loving Blackberry Bliss with almost anything right now!!!!!

The focal point is a Whisper White tag.  I stamped the flower image with black StazOn ink and watercolored it (Aqua Painters, Blackberry Bliss and Mossy Meadow ink).  Then I stamped my sentiment, added some piercing and finished it off with some Blackberry Bliss ribbon (did I mention how much I love the new In Color ribbon!) tied with some Linen Thread.

The result is a beautiful and simple card.  Although when I made about 35 of them for swaps I was no longer thinking they were simple and was seeing little pierced dots in my sleep!!!!

You can find all the supplies you need to create this card at home in my online store.  Head on over there with the shopping list and place your order today!

Shopping List
Stamps:  Blooming with Hope (hostess)
Ink:  Blackberry Bliss, Sahara Sand, Mossy Meadow, Black StazOn
Cardstock:  Blackberry Bliss, Sahara Sand, Whisper White
Accessories:  Blackberry Bliss stitched satin ribbon, Linen Thread
Tools:  Aqua Painter, Stampin' Dimensionals, Paper Piercer and Mat, Angled Tag Topper Punch

Have an inspired day!


Thursday, August 8, 2013

Birthday Basics Candles

I can't believe that in less than a month my kiddos will be back in school!   Shhhh...don't tell anyone, but I'm a little excited!  The days when all 5 of my day home kids are here combined with my own 3 kids it gets a little crazy and exhausting around here!!!!  I also thrive on routine and although I love the first few weeks of lazy summer days when we just do whatever, I start longing for the routine of school days by August.

Anyhoo...I'm sure you stopped in today to see some stampin, so lets get on with it, right!  I'm sharing my second swap card from convention with you today.  I always do 2 different swap cards at SU events for a couple reasons.  First, I get bored doing lots of the same card and second, lots of times it's nice to be able to swap 2 for 2 with someone if they have 2 fabulous cards!


My card was super simple, but super fun!  And, I actually had 2 versions of it...but I totally forgot to take a picture of the other version.  It had the birthday hat paper on it and was done with Island Indigo rather than Raspberry Ripple.


You can see I did a layer of the DSP matted with cardstock and then embellished with some fun little banners.  The stamped banner is popped up with some Stampin' Dimensionals.  To get two colors on one image, I used my Stampin' Write Markers rather than an ink pad.

This card is super simple and doesn't require a whole lot of supplies.  Head on over to my online store with the shopping list to order the supplies you need to create this card today!  If you use the hostess code 9S2F9VJ2 and place your order before August 30, you will be entered in a draw for an embossing folder of your choice!

Have an inspired day!


Cardstock:  Smoky Slate, Raspberry Ripple, Whisper White
DSP:  Birthday Basics
Stamps:  Sketched Birthday
Ink:  Stampin' Write Markers (Raspberry Ripple, Smoky Slate)
Tools:  Big Shot, Bitty Banners Framelits
Other:  Stampin' Dimensionals


Thursday, August 1, 2013

Papillion Potpourri Prettiness!


A long time ago one of the girls in my downline, Cheryl, taught me a super awesome trick for coloring butterflies...specifically the two very detailed butterflies in the Papillion Potpourri set that have coordinating punches.  Ever since then, every time I need a butterfly I turn to one of those two and color them with this technique.  The technique is simple and involves sponge daubers and ink before you punch.  At the end of this post I have a video for you showing you how to do it!

Recently I made a really pretty butterfly card for my convention swaps...and got lots of compliments on the butterfly!


The card itself is a pretty simple one layer card.  I did a little tone on tone stamping on the background of the card for a subtle look.  The crumb cake layer was embossed with the Square Lattice embossing folder...still one of my favorite embossing folders...and I rubbed ink over it for a kind of burlap look.  I added some luscious Crushed Curry Chevron Ribbon and a few more cardstock elements before the butterfly was added.


See that chevron pattern stamped on the oval?  It's the large oval from the Oh, Hello set stamped and then punched smaller.  I love that chevron oval and find that I pull it out a LOT for easy small backgrounds.  And, that thank you.  Be still my heart...I LOVE that font!  This is quite possibly my favorite thank you stamp in the entire catalog...at least for now!!!!!  ;)

Let's get on with that video so you can see how to make beautifully blended butterflies for your projects!


Now, go forth and make butterflies people!!!!!

Remember, everything I used to make this card can be found in my online store.  Head on over there with the shopping list (at the bottom of this post) so you can order everything you need to create this card in your stamping space.

Have an inspired day!


Shopping List
 
Stamp Sets:  Papillion Potpourri, Oh Hello, Lots of Thanks
Ink:  Early Espresso, Crumb Cake, Cajun Craze, Pumpkin Pie, Crushed Curry
Cardstock:  Early Espresso, Crumb Cake, Cajun Craze, Very Vanilla
Embellishments:  Crushed Curry Chevron Ribbon
Big Shot:  Square Lattice embossing Folder
Punches:  Elegant Butterfly, Oval
Stampin' Dimensionals
Sponge Daubers
Stampin' Sponges

Wednesday, June 6, 2012

Rubber Boots & Puddles


Well, what a 24 hours it has been...4 confirmed tornadoes touched down, severe thunderstorms, hail, flooding, IN-SANE rain (like couldn't see across the street downpour at one point) in Southern Alberta last night.  Thankfully Lethbridge didn't see a tornado and from what I hear we didn't have flooding or hail, but we sure did get an awesome lightening show!  At one point I don't think the thunder even stopped...just lots of rumbling.  In our house we had restless dogs and kids and we were checking the weather channel frequently for updates in case we needed to head to the basement for cover.

With all this crazy weather going on, I think it's appropriate to share my card for the day...


I made this card for a swap I recently participated in.  I saw a similar design on Pinterest a while back and filed it away in my brain for future use!  There's a a few new products used on this card...the rubber boot image is from one of our new hostess sets, Happy You, and all the little banners were cut with the new Framelits set "Bitty Banners".  I colored my boot and the flowers with my Stampin' Write Markers, which for some reason is something I don't usually do!  I think I'm more of a watercolor colorer, but the markers were perfect to make this image bright!  I used a combination of textured cardstock and DSP for the banners...Soft Suede (cardstock), Pink Pirouette and Rose Red (DSP).  The tops of the banners are finished off with two layers of ribbon...Rose Red Seam Binging on the bottom and Pink Pirouette Taffeta on the top.

I purposely left a sentiment off this card because I think it could be used for a number of different occasions.  And, this swap was a full card swap so I figured if the recipients wanted to use this card in the future, they could stamp whatever sentiment they needed!

So, what do you think?  Do you love it?

Yesterday was Tuesday which means there was new digital downloads.  You can check them out here.  There are some on there that I will be getting...the new In Color DSP and the camping stamp set brush.  What about you?  And, before I forget, make sure you update your MDS to the latest version so you can get the new In Colors and start creating with them!

Have an inspired day!


Thursday, February 9, 2012

Mixed Bunch and Beautiful Blossoms


One of my favorite products in the Occasions Mini (and let's face it, I have a lot of favorites in this mini!) is the Mixed bunch stamp set and coordinating Blossom punch.  Check out what I did with these products for a swap I had with my downline a while back.


I wanted to use colors other than what are showcased in the mini right now and I think I achieved that!  My favorite part of this card is the ribbon detail.  There's a layer of Soft Suede Taffeta ribbon on the So Saffron strip which, then has a layer of Very Vanilla narrow Taffeta tied around it.  The texture on that area of the card is fantastic!

The sentiment I chose for this card is from the Pursuit of Happiness set.  The sentiments in that set are FANTASTIC!!!  Check it out here.

Have an inspired day!


Monday, January 16, 2012

Come Fly With Me!

I'm bringing back Mini Catalog Monday with a super fun card today!  One of the new sets in the Occasions Mini that I immediately fell in love with is the Send Me Soaring set...full of kites and fun sayings to go along with them!

The card I'm sharing today, is another of my recent swap cards.  I made loads of these and I will say, I seriously underestimated the amount of sponging with this card when making 30 of them!!!!


I did something really fun with the kite!  It's a striped kite, but I didn't want stripes all the same size when I colored it.  So, I inked it up with Pool Party ink and then colored between some of the stripes with my Poppy Parade marker.  By coloring between the strips (sticking the tip of the marker in the spaces of the image) you get a thin line on either side of where you colored.  It was perfect for the look I was going for!

I sponged EVERYTHING with Soft Suede ink.  This toned down the Poppy Parade red enough that I was able to use the new Riding Hood Red ruffled ribbon!!!  I {heart} this ribbon...it comes already riffled and stitched down the center.  It's satin and oh, so soft!!!  It comes in 4 colors...and you're gonna want all 4...trust me!!!

Wondering about that Designer Paper below the kite?  It's from the package of DSP that you can earn FREE during Sale-A-Bration (starting Jan 24)!

Have an inspired day!


Friday, January 13, 2012

Wedding Party

I recently participated in an AMAZING Occasions Mini and Sale-A-Bration swap with some demonstrator friends.  The Sale-a-Bration set I chose was Party This Way...a birthday set.  I'm really not sure what I was thinking when I chose that set!!!  The set is very birthday, so I decided to do something not birthday with it.  I chose to use the banner stamp from the set along with the new wedding wheel in the Occasions Mini and this is what I came up with.


I just love the color combination of Bravo Burgundy and Crumb Cake!  The wheel is simply stamped across the Crumb Cake layer...it makes a great background!  The banners were stamped with Bravo Burgundy ink on Bravo Burgundy cardstock and then punched out with the Pennant punch.  I also punched out plain triangle pennants from Vellum Cardstock.  To jazz them up a bit I added little punched flowers with pearls in the middle.  Each of the three pennants are stuck onto the card separately and then I glue little bows, made form the Whisper White Baker's Twine, where each pennant met.

I used a LOT of dimensionals on this card!  Each pennant has one and then the Whisper White layer is also popped up with them!  Here's a look at the dimension.


Remember, you can earn the Party This Way stamp set (among other fun products) FREE with a $60 order during Sale-A-Bration which begins on January 24.  Well, that's all for today!  Have an inspired day!

Thursday, September 1, 2011

The Most Wonderful Time of the Year...

Well, it looks like a week and a half of little sleep and no appetite has caught up with both Kevin and I.  We BOTH have managed to catch a cold, just in time for the last long weekend of the summer...awesome (that was a very, very sarcastic awesome!!!).  I usually catch a cold in September, but it typically happens a couple of weeks after the kids have gone back to school.  Maybe this means that I won't be sick later this month?  Cross your fingers for me!!!

The blog posts that I wrote in the last week and a half have been written in a state of numbness and overwhelming emotions...I know that kind of sounds like an oxymoron, but that's how it's been!  I went back last night and read what I wrote and wow!  I wrote some pretty emotional and deep stuff didn't I?  I know that's not the norm here at LA Stamper...I try to keep it pretty light hearted and fun.  So, I want to say a huge thank you to all of you that kept coming back and offered prayers and words of support and hung in there with me as I tried (and continue to try) to make sense of and move past this situation.  With that said, lets move on to some fun stuff!

September really is the most wonderful time of the year!  Fall is coming...the air gets crisper, the leaves start changing color.  Fall is my favorite season by far!  The kids go back to school...don't get me wrong, I love my kids dearly, but I crave the routine of the school year...and the HOLIDAY MINI starts!!!!

The Holiday Mini is always FULL of fun stuff and this year is no exception!  New ribbon, gorgeous stamps, fabulous new DSP, mini jingle bells, holiday stitched felt, and so much more!  I can't wait to show you some fun projects using some of these new products.  I know you're going to love them as much as I do!

When any of our catalogues start, I do a HUGE swap with my downline members.  We have a blast stamping ALL day getting loads of samples ready to share with everyone.  We did our Holiday Mini Swap last weekend and it was so fun!  Here is a card made by Heather that showcases the new stocking stamp set and coordinating punch.


Isn't it so cute how she made the Christmas stocking into baby booties just by using pink and doing some creative and easy trimming?  I know that this stocking set and coordinating punch are going to become one of your favorites too!!!

One last thing!  Since my celebration was kind of de-railed, I have decided to offer you a sweet deal!  Since it's my 9th stampaversary, I'm offering a No Shipping, No GST sale for 9 days!  So, anyone placing an order from me between Sept 1 & 9 will NOT be charged shipping or GST!!!  Woohoo!!!  This special only applies to Canadians ordering through me and does not apply to online orders (you must call or email your orders to me).

Have an inspired day!


Friday, July 22, 2011

Swapping & Chocolate

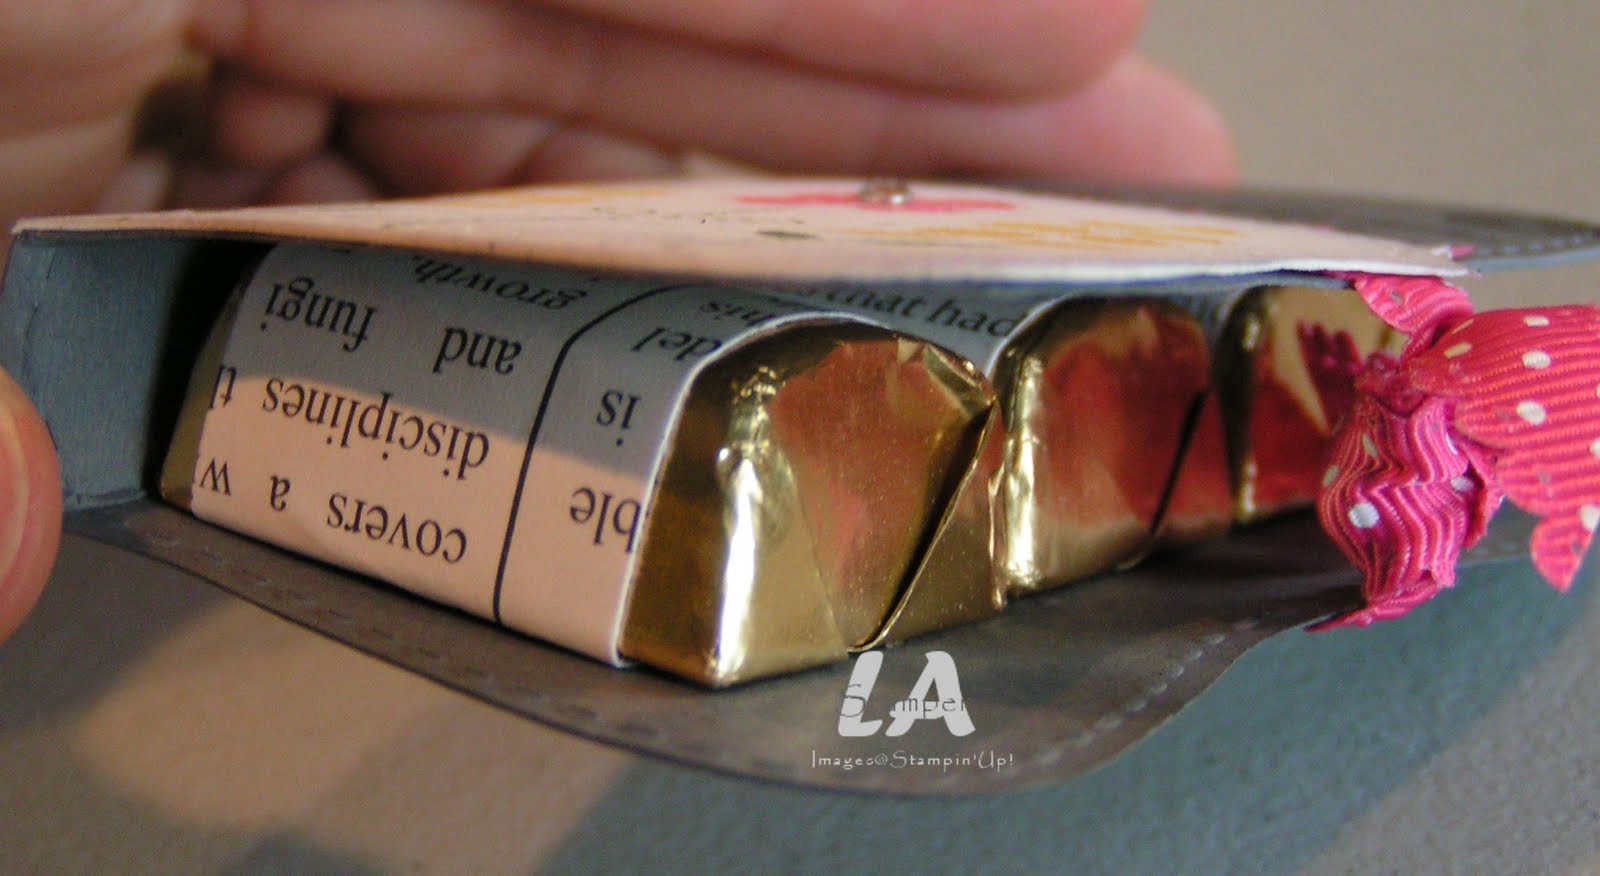
I always try to have a 3D swap at events because I love the fun little projects I get in return from other demonstrators.  I get a lot of ideas for 3D projects from these swaps.  This year at Convention was no different.  I made a cute little book of Hershey Nuggets that I swapped.


I used a few new things for this swap...Melon Mambo Scallop Polka Dot Ribbon (love it!), and the new Best of Everything stamp set.

I used the fabulous Top Note die for the base of my project and scored it 1/4" on either side of the middle points to make a book.  The flowers were colored and stamped on Naturals White cardstock and I added a little rhinestone to the middle of the Melon Mambo flower.


Each one held three Hershey Nuggets which I wrapped with some First Edition DSP.  Super Cute!

Have an inspired day!


Thursday, July 21, 2011

Swappin' Crazy!

One of the hilights of any Stampin' Up! event is the swapping!  Sometimes, the swapping even starts in the airports and hotel lobbies before Convention even starts!  This year I made 2 cards and 1 3D item for swapping.  Over the next few days I will share all three of my swaps with you and have a fun class announcement...so keep watching for that!

I decided to do a bright and fun birthday card for one of my swaps this year.


I used Peac Parfait, Poppy Parade and Not Quite Navy for my card.  The base is Peach Parfait which I embossed with my beloved Big Shot and the Perfect Polka Dots Embossing Folder.  You can see my sentiment on the Whisper White piece...I stamped it with Not Quite Navy and the stamp is from the new birthday hostess set, Happiest Birthday Wishes.  I absolutely love this new birthday hostess set and I know you will too!  Check it out here...and contact me today to book your workshop so you can earn it FREE!!!

Notice how I wrapped a piece of Peach Parfait ribbon around it and tied it off with a cute little bow?  I used the Bakers Twine to do this.  I think I made 30 of these cards...that was 30 bows too many!!!!!  But, they were cute, so it was worth it, right?!?!?  Everyone I swapped with told me how cute they were.


My little present was done with some punches.  Can you guess which punches I used?  Leave me a comment with your guess and you could win a spool of Daffodil Delight 5/8" Grosgrain Ribbon!  I will say that I used the new Just Add Cake DSP and a little rhinestone to add a little bling!

That's all for today!  Have an inspired day!