I have to start this post by saying I HATE spiders. They seriously creep me out. Creatures with 4 eyes and 8 hairy legs that wrap up their prey and suck the insides out are wrong...and scary...even if I am waaaaay bigger than them!!!
That being said, I love one of the image in a set from the upcoming Holiday Mini catalog. It's from a Halloween set and I used it to make some swaps for convention. It's one of those sets that as soon as I saw it, I had loads of ideas bouncing around in my head!
I started with my Fancy Favor die and cut some Basic Black cardstock with it, which I then embossed with the spider web embossing folder. Just to make the web design stand out a bit, I gently rubbed some Whisper White ink over it with a sponge. I didn't make it into a box, I decided to make a pouch. You can see how I did that in this post. I added a belly band with some new DSP and then my stamped image, which was popped up with some Stampin' Dimensionals.
Hee, hee...Spider Cider...can you guess where I went with this? Have a look at what was inside my pouch...
A package of apple cider!!! I folded a piece of More Mustard cardstock around the pack of apple cider (I stamped it with my EEK! stamp first!) and tied it at the top with some Tangerine Tango and Basic Black ribbon.
There you have it. I can't wait to show you more fun stuff with this stamp set!
Have an inspired day!
Showing posts with label Holiday Mini. Show all posts
Friday, July 20, 2012
Monday, January 2, 2012
Wintery Treats
The 1x8 Cello Bags in the Holiday Mini are perfect for making quick and fun treats. Check out my wintery one...
In real life this is waaaay more sparkly...darn taking pictures at night!!!! I filled my cello bag with York Mint pieces (I found them in the States last time I was down shopping...haven't seen them in Canada). As soon as I saw them I had to have them because this project popped into my head!!! Once the bag was full, I made a wrap around for it. I used a piece of Night of Navy cardstock which I embossed with the Snow Burst Embossing Folder. It is folded around the bag. I embellished with a punched piece (round tab punch) which I stamped with a silver "enjoy" (used the Platinum Shimmer Paint for this ) and a snowflake which I punched from a piece of the Silver Glimmer Paper (seriously...it's like a sheet of diamonds!!!). The whole thing is finished off with a piece of Night of Navy Grosgrain ribbon.
I used quite a few products from the Holiday Mini for this project...1x8 Cello Bags, Snow Burst Embossing Folder and Silver Glimmer Paper. Get 'em while you can people...the Holiday Mini is done tomorrow!!! Contact me to order your "must haves" ASAP.
Have an inspired day!
In real life this is waaaay more sparkly...darn taking pictures at night!!!! I filled my cello bag with York Mint pieces (I found them in the States last time I was down shopping...haven't seen them in Canada). As soon as I saw them I had to have them because this project popped into my head!!! Once the bag was full, I made a wrap around for it. I used a piece of Night of Navy cardstock which I embossed with the Snow Burst Embossing Folder. It is folded around the bag. I embellished with a punched piece (round tab punch) which I stamped with a silver "enjoy" (used the Platinum Shimmer Paint for this ) and a snowflake which I punched from a piece of the Silver Glimmer Paper (seriously...it's like a sheet of diamonds!!!). The whole thing is finished off with a piece of Night of Navy Grosgrain ribbon.
I used quite a few products from the Holiday Mini for this project...1x8 Cello Bags, Snow Burst Embossing Folder and Silver Glimmer Paper. Get 'em while you can people...the Holiday Mini is done tomorrow!!! Contact me to order your "must haves" ASAP.
Have an inspired day!
Sunday, January 1, 2012
Simply Embossed
Happy New Year everyone! I hope this morning finds you ready to start the new year!!! We had a blast ringing in the new year last night with some good friends of ours...good food, fun games, lots of laughs, memories made and good times with great company!
Today for Simple Card Sunday I have a quick and cute Valentine's card to share with you. I taught my clubs the Inlaid Embossing Technique in December, and this is the card they made.
It's a super easy technique. You start by punching some shapes (in this case, Cherry Cobbler hearts) and glue them onto a piece of cardstock. Then you run the whole thing through the Big Shot with an embossing folder (I used the Square Lattice folder). And, that's it! Quick, cute and easy!
Have an inspired day!
Today for Simple Card Sunday I have a quick and cute Valentine's card to share with you. I taught my clubs the Inlaid Embossing Technique in December, and this is the card they made.
It's a super easy technique. You start by punching some shapes (in this case, Cherry Cobbler hearts) and glue them onto a piece of cardstock. Then you run the whole thing through the Big Shot with an embossing folder (I used the Square Lattice folder). And, that's it! Quick, cute and easy!
Have an inspired day!
Saturday, December 31, 2011
Love Shaker
Ok, so not my best title, but you'll see what I mean in a second.
In the Holiday Mini we have a product called Shaker Frames and they make shaker cards soooooo easy! Check it out...
I made this super cute Valentine's shaker card which was inspired by my friend Allison! You can see her card here. I pretty much followed her instructions to make my shaker heart shaped using the circle shaker frames.
My shaker is filled with Mica Flakes (get 'em while you can people...there has been no word of them carrying over, so I'm assuming they will retire on Jan 3), Champagne Glass Glitter and punched hearts (from the Owl Punch).
I used the exact same products to make a fun 6x6 scrapbook page.
The only thing I added was a piece of Cherry Cobbler cardstock for a photo mat. I also punched along the top of the Crumb Cake piece with the Scallop Edge punch. This page could easily stand alone in a 6x6 album or brag book, or it could be added to an 8 1/2 x 11 or 12x12 page.
Have an inspired day!
In the Holiday Mini we have a product called Shaker Frames and they make shaker cards soooooo easy! Check it out...
I made this super cute Valentine's shaker card which was inspired by my friend Allison! You can see her card here. I pretty much followed her instructions to make my shaker heart shaped using the circle shaker frames.
My shaker is filled with Mica Flakes (get 'em while you can people...there has been no word of them carrying over, so I'm assuming they will retire on Jan 3), Champagne Glass Glitter and punched hearts (from the Owl Punch).
I used the exact same products to make a fun 6x6 scrapbook page.
The only thing I added was a piece of Cherry Cobbler cardstock for a photo mat. I also punched along the top of the Crumb Cake piece with the Scallop Edge punch. This page could easily stand alone in a 6x6 album or brag book, or it could be added to an 8 1/2 x 11 or 12x12 page.
Have an inspired day!
Friday, December 30, 2011
Woolly Socks
Have you got the Stocking Builder Punch yet? Time is running out if you haven't! The Holiday Mini ends on Jan 3 and the Stocking Builder Punch will not be carried over to next year's Idea Book & Catalog.
Here's a fun idea for you that uses the Stocking Builder Punch and Stitched Stockings stamp set in a non-Christmas way.
Doesn't it look like a pair of woolly socks?!?!? I love that this punch and stamp set can be used in a masculine way! I've just uploaded a few more ideas for this fantastically versatile punch and stamp set...check out my LA Stamper page on Facebook to see those ideas.
My last order from the Holiday Mini will go in on Jan 2...if there's anything you must have let me know before then!
Have an inspired day!
Here's a fun idea for you that uses the Stocking Builder Punch and Stitched Stockings stamp set in a non-Christmas way.
Doesn't it look like a pair of woolly socks?!?!? I love that this punch and stamp set can be used in a masculine way! I've just uploaded a few more ideas for this fantastically versatile punch and stamp set...check out my LA Stamper page on Facebook to see those ideas.
My last order from the Holiday Mini will go in on Jan 2...if there's anything you must have let me know before then!
Have an inspired day!
Saturday, December 17, 2011
A Christmas Scrapbook
Hi! I have a super fun project to share with your today and I have to thank my good friend Kristine for her inspiration! I've made a Scrapbook in an Evening class where you come and complete a 20 page 6x6 album ready for all your Christmas pictures! That's right...20 complete 6x6 pages in one evening!
Isn't it cute? All class participants will receive an entire Simply Scrappin' Kit as well as the coordinating album to complete their project. This class will be on December 29 at 7:30pm at my house and the fee is $45 (for an additional $10 you can add on an extra package of page protectors to put even more pages in your album!). Fee is due at time of registration. Space is limited, so contact me ASAP to reserve your spot!
Have an inspired day!
Isn't it cute? All class participants will receive an entire Simply Scrappin' Kit as well as the coordinating album to complete their project. This class will be on December 29 at 7:30pm at my house and the fee is $45 (for an additional $10 you can add on an extra package of page protectors to put even more pages in your album!). Fee is due at time of registration. Space is limited, so contact me ASAP to reserve your spot!
Have an inspired day!
Monday, November 28, 2011
Shake It Up!
I love to make Shaker Cards, but they're a bit of work, so I don't make them too often! Well, Stampin' Up! to the rescue! In the Holiday Mini you will find a new product called Shaker Frames. They are foam circles that are sticky on each side to make Shaker Cards super easy! In each pack of Shaker Frames you get 6 sets of circles and each set has 6 circles in it...that's 36 for just over $6!
This month, my clubs made some shaker cards with these new Shaker Frames as well as the new Mica Flakes (so fun...but only if you don't sneeze, cough or sigh when the Mica Flakes are open!).
I just love that little fat snowman...and the fact that his belly is the shaker part of the card makes me want to just shake him up!!!!! If you look close you will see that his snowball and his face are sparkly too. I used the new Dazzling Details to achieve that look. This card sparkles, shimmers and shakes and is SO fun!!!
Have an inspired day!
This month, my clubs made some shaker cards with these new Shaker Frames as well as the new Mica Flakes (so fun...but only if you don't sneeze, cough or sigh when the Mica Flakes are open!).
I just love that little fat snowman...and the fact that his belly is the shaker part of the card makes me want to just shake him up!!!!! If you look close you will see that his snowball and his face are sparkly too. I used the new Dazzling Details to achieve that look. This card sparkles, shimmers and shakes and is SO fun!!!
Have an inspired day!
Friday, November 25, 2011
Winter Wishes Stamp-A-Stack
Join me on December 12 for a fun Stamp-A-Stack using the new Winter Wishes stitched felt accents. Each person will received a pack of the Winter Wishes felt accents to use on their cards. We will complete 16 cards (4 of each of 4 designs). Cost is $30.
If you're interested in joining me for this class please RSVP (with your fee) by December 2.
Have an inspired day!
If you're interested in joining me for this class please RSVP (with your fee) by December 2.
Have an inspired day!
Sunday, November 20, 2011
Simple Merry Christmas
Have you started on your Christmas cards yet? Today I have another quick and simple card that will definitely inspire you to get your Christmas cards started!
I truly believe that Stampin' Up! has some of the most gorgeous Designer Papers. They are so gorgeous that they can easily be the focal point of a card, which makes your card quick and easy to mass produce. Let me show you what I mean...
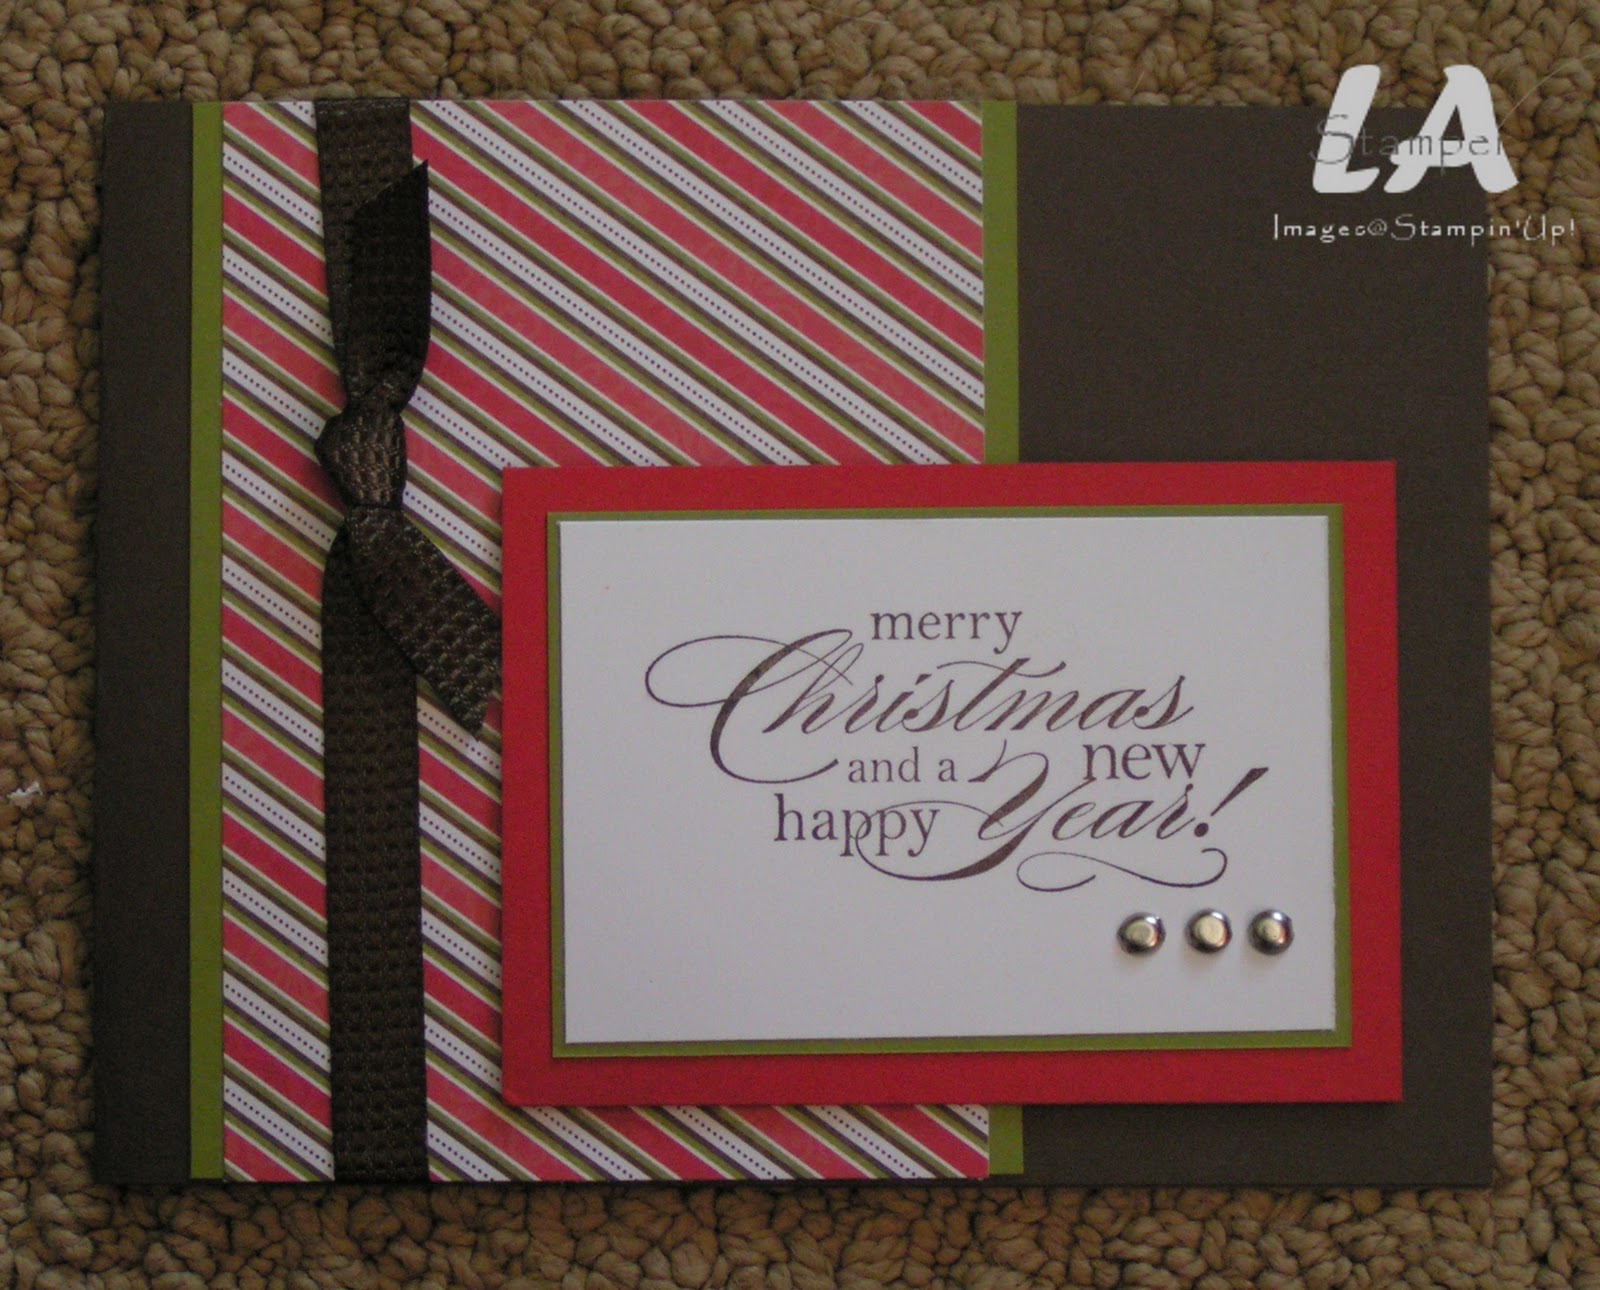
The Designer Paper on this card is from the Letters to Santa set which you can find in the Idea Book & Catalog. This fantastic sentiment is from the Delightful Dozen set...a new one in the catalog this year that you're going to want to check out for sure!
Something hard and something soft completes a card! In keeping with that "rule", I added some silver brads and some of the yummy Early Espresso quilted ribbon (which you can find in the Holiday Mini...and you're definitely going to want to order a roll or two!).
This card may look familiar to you! I did one with the same layout using the Spice Cake Designer Paper at my World Card Day event. You can see it here.
Have an inspired day!
I truly believe that Stampin' Up! has some of the most gorgeous Designer Papers. They are so gorgeous that they can easily be the focal point of a card, which makes your card quick and easy to mass produce. Let me show you what I mean...
The Designer Paper on this card is from the Letters to Santa set which you can find in the Idea Book & Catalog. This fantastic sentiment is from the Delightful Dozen set...a new one in the catalog this year that you're going to want to check out for sure!
Something hard and something soft completes a card! In keeping with that "rule", I added some silver brads and some of the yummy Early Espresso quilted ribbon (which you can find in the Holiday Mini...and you're definitely going to want to order a roll or two!).
This card may look familiar to you! I did one with the same layout using the Spice Cake Designer Paper at my World Card Day event. You can see it here.
Have an inspired day!
Monday, November 14, 2011
Peek-A-Boo!
Time to dust off your Movers & Shapers dies people! The Movers & Shapers dies are so fun to use and you can get some fantastic results from them. And, most of the shapes that you punch out with this die have coordinating punches. The piece punched from the die is a touch bigger than the punched shape, so they layer perfectly!
I was inspired by a card that Tara in my downline did for our last big group swap. Her card was a Thanksgiving card, and I changed it up to be a Christmas card.
I used the Frostwood Lodge DSP (from the Holiday Mini) and took my color palatte from there. The base of my card is Garden Green, accented with Cherry Cobbler and Whisper White. I put a piece of Whisper White cardstock on the inside of my card and stamped the ornament (from the Delightful Decorations set) through the ornament shaped hole which I made with the Movers & Shapers die. There's a rhinestone in the middle of the ornament and on the inside of the card I drew a line from the ornament up to the top of the card so it looks like the ornament is hanging in the card!
The Frostwood Lodge DSP is all plaids and wood grains and is so warm and cozy feeling! Check out all the designs in this set of DSP here. And, for all you digital fans out there, this set of DSP is available as a digital download! You can find it here.
Have an inspired day!
Sunday, November 13, 2011
Simple Stocking
I've said it before and I'm gonna say it again today...I *heart* the Notecards with Envelopes! They are perfect for quick cards and today I have a fun and quick Christmas card to share with you!
This was one of my make & takes for my workshops in October! The workshop guests started by stamping a stocking with Cherry Cobbler ink on Whisper White cardstock. Then they got to punch it out with the coordinating Stocking Punch...love that punch! The stocking is put on an Old Olive layer which was embossed with the snowflake embossing folder. It's layered on a piece of Whisper White and then on a layer of Cherry Cobbler cardstock. The finishing touches are a little loop of Old Olive Scallop Dot Ribbon and a Rhinestone on the stocking (in the middle of the snowflake). That Merry Christmas sentiment is from the Petite Pairs set...another favorite product of mine!
Have an inspired day!
This was one of my make & takes for my workshops in October! The workshop guests started by stamping a stocking with Cherry Cobbler ink on Whisper White cardstock. Then they got to punch it out with the coordinating Stocking Punch...love that punch! The stocking is put on an Old Olive layer which was embossed with the snowflake embossing folder. It's layered on a piece of Whisper White and then on a layer of Cherry Cobbler cardstock. The finishing touches are a little loop of Old Olive Scallop Dot Ribbon and a Rhinestone on the stocking (in the middle of the snowflake). That Merry Christmas sentiment is from the Petite Pairs set...another favorite product of mine!
Have an inspired day!
Friday, November 11, 2011
Triangles
As promised, today I have the second project from my die class to share. Remember, I featured the Petite Pockets die. The second project is a triangle box, made by attaching 3 of the Petite Pockets together.
The box was made from Soft Suede cardstock, which was stamped with an image from the Delicate Doilies set. The belly band is a piece of Pool Party cardstock that I crimped and then there's a piece of Spice Cake fabric, tied through a Spice Cake Button, wrapped around it.
Here's how it opens...
There's quite a bit of space in this little box and you could definitely fit all kinds of fun little gifts inside this box.
Have an inspired day!
The box was made from Soft Suede cardstock, which was stamped with an image from the Delicate Doilies set. The belly band is a piece of Pool Party cardstock that I crimped and then there's a piece of Spice Cake fabric, tied through a Spice Cake Button, wrapped around it.
Here's how it opens...
There's quite a bit of space in this little box and you could definitely fit all kinds of fun little gifts inside this box.
Have an inspired day!
Monday, October 24, 2011
A Little Over the Top!
Did you notice the fun new cello bags in the Holiday Mini? They're 1x8 and a steal of a deal at $3.50 for a pack of 50! There are so many ways you can use these bags...you're definitely going to want to order some today!
Check out what my clubs did with them this month...
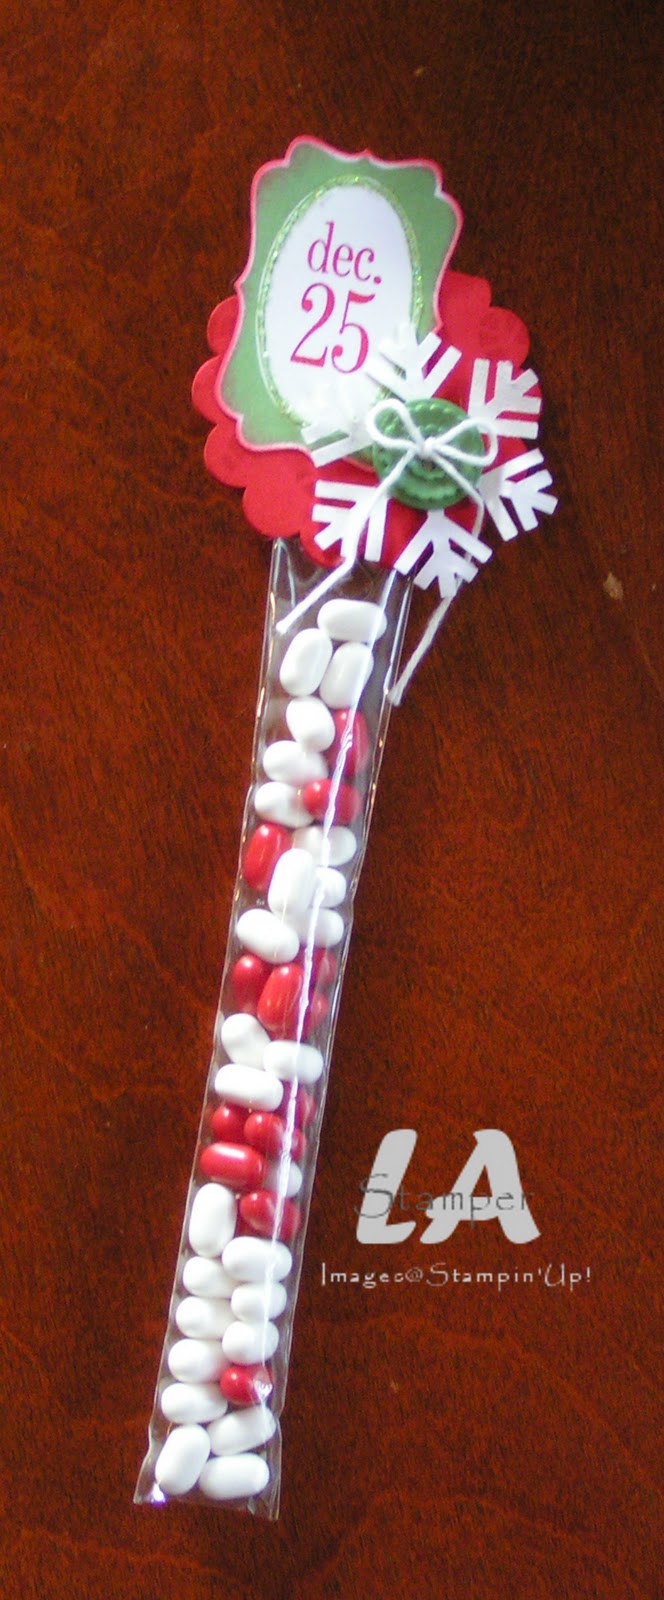
It's a little over the top, and I wouldn't do something this involved for my kids to give their classmates, but for someone special it's totally worth it! The bag is filled with Holiday Tic Tacs (the cinnamon and mint ones) and then I used a bunch of punches to create the topper. Here's a closer look...
I love the button in the middle of the snowflake! That button is from the Holly Berry buttons in the Holiday Mini. It's a great pack of buttons...you get a bunch of Real Red and Wild Wasabi buttons in the pack. I tied a piece of Whisper White Baker's Twine through the button...love the Baker's Twine! Did you notice the little bit of bling around the dec. 25? That was done with another of my favorite products in the Holiday Mini...the Dazzling Details!!! When you order some treat bags, you're definitely going to want to order a bottle...or two...of the Dazzling Details!
That's all for today. I will be back tomorrow with another idea for these fun little bags. Have an inspired day!
Check out what my clubs did with them this month...
It's a little over the top, and I wouldn't do something this involved for my kids to give their classmates, but for someone special it's totally worth it! The bag is filled with Holiday Tic Tacs (the cinnamon and mint ones) and then I used a bunch of punches to create the topper. Here's a closer look...
I love the button in the middle of the snowflake! That button is from the Holly Berry buttons in the Holiday Mini. It's a great pack of buttons...you get a bunch of Real Red and Wild Wasabi buttons in the pack. I tied a piece of Whisper White Baker's Twine through the button...love the Baker's Twine! Did you notice the little bit of bling around the dec. 25? That was done with another of my favorite products in the Holiday Mini...the Dazzling Details!!! When you order some treat bags, you're definitely going to want to order a bottle...or two...of the Dazzling Details!
That's all for today. I will be back tomorrow with another idea for these fun little bags. Have an inspired day!
Sunday, October 23, 2011
Simple Leaves
Today for Simple Card Sunday, I have a quick and easy card using my favorite new stamp set (Gently Falling).
It's a 3x6 card with a fantastic layout that's easy to adapt to almost any occasion. I stamped some leaves from the Gently Falling set and then added a great sentiment. I accented my card with the new Early Espresso ribbon in the Holiday Mini, but when my clubs made it I let them choose between the Cherry Cobbler and Early Espresso ribbon...the card looks great with either color! Add a few brads, stick it all together and you're done!
Next Sunday I'm going to start showing simple Christmas cards each week. Hopefully you will be inspired to get some Christmas cards made using my quick and simple designs!
Have an inspired day!
It's a 3x6 card with a fantastic layout that's easy to adapt to almost any occasion. I stamped some leaves from the Gently Falling set and then added a great sentiment. I accented my card with the new Early Espresso ribbon in the Holiday Mini, but when my clubs made it I let them choose between the Cherry Cobbler and Early Espresso ribbon...the card looks great with either color! Add a few brads, stick it all together and you're done!
Next Sunday I'm going to start showing simple Christmas cards each week. Hopefully you will be inspired to get some Christmas cards made using my quick and simple designs!
Have an inspired day!
Thursday, October 20, 2011
Stockings!
I {heart} stockings and was thrilled when I saw the line of stocking products in the Holiday Mini. Recently I featured the Stocking die at my To Die For Class and the class participants got to make 2 projects with the die. Check out the info on the To Die For class on my Events & Classes page (link at the top!) to see all the details! If you have a Big Shot it's a FREE class and I feature a different die each month. Next month is the Petite Pocket die and I have some fabulous ideas with that die that you don't want to miss!
Today I'm going to show you the card my class participants made!
We placed the folded cardstock onto the die just under the top of the stocking so that it would have a fold at the top and create a shaped card! The cuff, heel and toe were cut from Whisper White cardstock...I love how the die makes the little stitching lines! The holly leaves were cut with the Stocking Accents die and the sparkly berries were punched from Red Glimmer Paper.
The only downside to this projects is that the card ends up being too big to fit into a standard envelope!
Stop by tomorrow to see the other project the class did...it's super fun!
Have an inspired day!
Today I'm going to show you the card my class participants made!
We placed the folded cardstock onto the die just under the top of the stocking so that it would have a fold at the top and create a shaped card! The cuff, heel and toe were cut from Whisper White cardstock...I love how the die makes the little stitching lines! The holly leaves were cut with the Stocking Accents die and the sparkly berries were punched from Red Glimmer Paper.
The only downside to this projects is that the card ends up being too big to fit into a standard envelope!
Stop by tomorrow to see the other project the class did...it's super fun!
Have an inspired day!
Wednesday, October 19, 2011
2-4-6-8...
2-4-6-8...who do you appreciate...
Do you remember that chant?
I always wanted to be a cheerleader when I was a kid...I was never coordinated enough and I don't remember us even having cheerleaders at the schools I went to. Well, I am WAY off topic! This post isn't about cheerleading, but about a quick and easy box!
This is a 2-4-6-8 box and it's super easy to do with the new Simply Scored Tool. You need a piece of cardstock that measures 8 1/2 x 5 1/2 (to make this box...you can change that second measurement to alter the height of your box). Line up your cardstock so the 8 1/2 side is along the top of the Simply Scored and score at 2, 4, 6 & 8. Then turn your cardstock a quarter turn and score it at 1 1/2 or 2. Then you just fold it into a box and you can embellish and fill with treats!
I used the Square Lattice embossing folder on the More Mustard piece and to accentuate the embossing pattern, I brayered my embossing folder with Early Espresso ink before embossing the cardstock. This way, the ink goes into the recessed parts of the design when it's embossed...one of my favorite things to do with the embossing folders.
That's all for today! Have an inspired day!
I always wanted to be a cheerleader when I was a kid...I was never coordinated enough and I don't remember us even having cheerleaders at the schools I went to. Well, I am WAY off topic! This post isn't about cheerleading, but about a quick and easy box!
This is a 2-4-6-8 box and it's super easy to do with the new Simply Scored Tool. You need a piece of cardstock that measures 8 1/2 x 5 1/2 (to make this box...you can change that second measurement to alter the height of your box). Line up your cardstock so the 8 1/2 side is along the top of the Simply Scored and score at 2, 4, 6 & 8. Then turn your cardstock a quarter turn and score it at 1 1/2 or 2. Then you just fold it into a box and you can embellish and fill with treats!
I used the Square Lattice embossing folder on the More Mustard piece and to accentuate the embossing pattern, I brayered my embossing folder with Early Espresso ink before embossing the cardstock. This way, the ink goes into the recessed parts of the design when it's embossed...one of my favorite things to do with the embossing folders.
That's all for today! Have an inspired day!
Saturday, October 8, 2011
My Family
YAY!!! It's Thanksgiving weekend here in Canada. I love Thanksgiving...I love making and eating turkey dinners and it's the one time of year that I make Pumpkin Cake (which my family looks forward to ALL year!). We have family visiting with us this weekend and have a fun weekend planned...Farmer's Market, Corn Maze, season opener for the Oilers (my dad, husband and kids will definitely enjoy this) and of course, turkey!!!
After the year we've had (especially the last few months), I have a lot to be thankful for! I have a wonderful and healthy family and I fully intend to make the best of the time we have together...because I have learned that life can throw you a curve ball when you're least expecting it and change things forever.
One of our family traditions is to get a family picture each year. In the past we've done this around our anniversary in May, but the last few years we've done summer and fall pictures. I have a special album that I put all our family pictures in. As much as my family complains about pictures each year, it's so fun to look back and see how our family has grown and changed! The pictures we had done last year were some of my favorites (although this year's are pretty awesome too!) and I just had to do a scrapbook layout of some of my favorites.
I also accented with some of the new Spice Cake DSP from the Holiday Mini and one of those big beautiful Spice Cake buttons (you need some of these...trust me!!!).
After the year we've had (especially the last few months), I have a lot to be thankful for! I have a wonderful and healthy family and I fully intend to make the best of the time we have together...because I have learned that life can throw you a curve ball when you're least expecting it and change things forever.
One of our family traditions is to get a family picture each year. In the past we've done this around our anniversary in May, but the last few years we've done summer and fall pictures. I have a special album that I put all our family pictures in. As much as my family complains about pictures each year, it's so fun to look back and see how our family has grown and changed! The pictures we had done last year were some of my favorites (although this year's are pretty awesome too!) and I just had to do a scrapbook layout of some of my favorites.
My scrapbook club always comments how coordinated my family looks in pictures. For our family pictures I always make sure we all have coordinating outfits because it makes the pictures so much better! When they saw this layout they commented that even the dog is coordinated...that wasn't planned!!!
I did some really fun stuff with this layout. I made a great leaf background with the Gently Falling set just like I did with my pumpkin frame here. I also used the new Simply Scored tool (I *heart* this tool!!) to add some visual interest to one of my photo mats.
I also accented with some of the new Spice Cake DSP from the Holiday Mini and one of those big beautiful Spice Cake buttons (you need some of these...trust me!!!).
See that tiny Pear Pizzazz scallop edge? I did that with the Dotted Scallop Ribbon border punch and just positioned my punched piece under the DSP so that just the scallop edge would show. Cute!
To my Canadian friends...enjoy your weekend and turkey dinner and remember everything you have to be thankful for! Have an inspired day!
Wednesday, October 5, 2011
World Card Day Fun!
Before I go into the fun we had at my World Card Day event, I need to announce the winner of the Stocking Challenge! Stocking #1 received the most votes...so, congratulations Angela!!! I will have a prize for you at our next Group Gathering! Thanks to everyone who voted!
On to World Card Day! The first Saturday in October is World Card Making Day...a day set aside to celebrate the craft of making cards and kick off the busiest greeting card season (Christmas!). Each year I do a fun day long card making event. This year we had a small group, but what we lacked in size, we make up for in fun!!!
We started our day with a really fun game of speed stamping! To choose participants, we had a round of Stampin' Up! Trivia. The winners were Kelly and Kristi-Ann so they got to play the game! We gave them each a blank BINGO card and they had to fill the squares with images from the Spooky Bingo Bits stamp set. Each image in the set had to be used once and completely inked and stamped in a square on the card. The one who filled their card first won.
We also gave a prize for the best cheerleader during the game...Kim won that one! All winners got to choose a prize from the prize basket!
After we got everyone's blood flowing we started a project like nothing else we have done before at World Card Day. Did you notice the new Card Keepers in the Holiday Mini Catalog? Well, each participant got to make a card keeper during the morning!
We stamped some First Edition DSP with the tall leaf image from the Just Believe set and added some small punched flowers which were embellished with pearls! They got to choose between three different colors for their ribbon and flowers.
Janet was the only one who chose pink! Since our event raises money for Breast Cancer Research, we gave Janet a prize for doing a pink one!!!!
Right before lunch we did another game...Blind Stamping! Sherri made a Halloween card and our two participants (Kim and Shelley) had to recreate it blindfolded!!! They were great sports and did awesome!
Our day continued with a delicious lunch...we had Slow Cooker BBQ Beef on a Bun and a mini Salad Bar (so fun!)...and some visiting time with each other!
During the afternoon, we made cards...16 total!!! Here are the 8 that I contributed (Sherri did the other 8). I was inspired by cards I've made in the past, some convention swaps and so many cards on Stampin' Connection (the online demonstrator community).
We had a fun start to our afternoon! Sherri and I began by telling them about some of the new products from the Holiday Mini that they would get to use and how much we loved these products...especially the new Dazzling Details. Then we surprised everyone with their own bottle of it...it was like Oprah's Favorite Things, only it was Lisa and Sherri's Favorite Things...and we didn't give away a car!!!
We had a fantastic day and I'm pleased to say that we raised $150 for Breast Cancer research through our silent auction and the donation we made from each person's registration fee...fantastic considering we had such a small group! Thanks ladies for a great day...can't wait until next year!
Have an inspired day!
On to World Card Day! The first Saturday in October is World Card Making Day...a day set aside to celebrate the craft of making cards and kick off the busiest greeting card season (Christmas!). Each year I do a fun day long card making event. This year we had a small group, but what we lacked in size, we make up for in fun!!!
We started our day with a really fun game of speed stamping! To choose participants, we had a round of Stampin' Up! Trivia. The winners were Kelly and Kristi-Ann so they got to play the game! We gave them each a blank BINGO card and they had to fill the squares with images from the Spooky Bingo Bits stamp set. Each image in the set had to be used once and completely inked and stamped in a square on the card. The one who filled their card first won.
We also gave a prize for the best cheerleader during the game...Kim won that one! All winners got to choose a prize from the prize basket!
After we got everyone's blood flowing we started a project like nothing else we have done before at World Card Day. Did you notice the new Card Keepers in the Holiday Mini Catalog? Well, each participant got to make a card keeper during the morning!
We stamped some First Edition DSP with the tall leaf image from the Just Believe set and added some small punched flowers which were embellished with pearls! They got to choose between three different colors for their ribbon and flowers.
Janet was the only one who chose pink! Since our event raises money for Breast Cancer Research, we gave Janet a prize for doing a pink one!!!!
Right before lunch we did another game...Blind Stamping! Sherri made a Halloween card and our two participants (Kim and Shelley) had to recreate it blindfolded!!! They were great sports and did awesome!
Our day continued with a delicious lunch...we had Slow Cooker BBQ Beef on a Bun and a mini Salad Bar (so fun!)...and some visiting time with each other!
During the afternoon, we made cards...16 total!!! Here are the 8 that I contributed (Sherri did the other 8). I was inspired by cards I've made in the past, some convention swaps and so many cards on Stampin' Connection (the online demonstrator community).
We had a fun start to our afternoon! Sherri and I began by telling them about some of the new products from the Holiday Mini that they would get to use and how much we loved these products...especially the new Dazzling Details. Then we surprised everyone with their own bottle of it...it was like Oprah's Favorite Things, only it was Lisa and Sherri's Favorite Things...and we didn't give away a car!!!
We had a fantastic day and I'm pleased to say that we raised $150 for Breast Cancer research through our silent auction and the donation we made from each person's registration fee...fantastic considering we had such a small group! Thanks ladies for a great day...can't wait until next year!
Have an inspired day!
Subscribe to:
Posts (Atom)