Showing posts with label frame projects. Show all posts

Wednesday, July 24, 2013

Birthday Basics Frame

Wow!  Has it really been almost 2 months since I posted?  It's crazy how life flies by when you have a lot going on.  I was smart before Kevin had his surgery and set up quite a few posts, but then it was one thing after the other, my posts ran out and well, family came first so my blog (and a lot of other things) were neglected.  I am happy to say that after some scary moments (coming home to an ambulance in front of my house and quite a few hours in the ER), Kevin is doing well and recovering nicely.  Each day he is able to do more and more for himself which means I can get back to my beloved stamp room and creating!  It will still be a long time before things are back to "normal" at our house, but I see improvement everyday and I'm getting my stamping mojo back!

So, cheers to this being the start of consistent blogging and lets kick it off with a fun birthday project (because I just got back from the biggest birthday bash...Stampin' Up!'s convention celebrating their 25th anniversary!).

This is a project my clubs did last month.  I love, love, love the Birthday Basics designer paper in the catalog right now and I thought this was a great project to use it.


I found some inexpensive plain wood frames at my local big box craft store.  They are PERFECT for altering with fun Stampin' Up! product!  As you can see, I did mine with the balloon paper, but my club members got to choose their paper from the pack so they were all different!  I traced my frame onto the DSP and then cut it to fit.  The DSP is mod-podged to the frame.  To clean up the edges, I sanded it and then sponged it.

Everyone did a little banner embellishment for their frames with cardstock that matched their paper and the coordinating Hearts A Flutter stamp set and framelits.


Here's a little tip about making banners like this.  All the pieces are stuck on the frame (and to each other) with Stampin' Dimensionals.  Then, I tied two little bows...one for each end...and glued them on.  So, it looks like it's strung on a piece of Baker's Twine, but really it's not!

And, to finish off the frames, we added some ribbon around the outside edge.


The In Color Stitched Satin Ribbon fit perfectly around the edge of the frame and matched the colors in the DSP.  Perfect!

Until the end of July, when you order 3 packs of DSP you will get 1 FREE!  You can find all the details about this special on my website here.

And, as always, you can shop for all the stampin' supplies needed to create this project at home in my online store!  Head on over there with the shopping list and place your order today!

Make sure you stop back tomorrow to see the coordinating card (and a video) that goes with this fun frame.  Have an inspired day!


Shopping List
Birthday Basics Designer Series Paper
2012-2014 In Color Cardstock
Gumball Green Stitched Satin Ribbon
2012-2014 In Color Ink Pads
Stampin' Sponges
Whisper White Baker's Twine
Hearts A Flutter stamp set
Hearts A Flutter Framelits
Basic Rhinestones
Fabulous Phrases stamp set
Stampin' Dimensionals
Bermuda Bay ink and cardstock

Tuesday, April 3, 2012

Summer Smooches

I have been giving you some little sneak peeks of the Summer Smooches products for a week now and I'm so excited that April is here and it's Summer Smooches time!


One of the exciting parts of this promotion is that there's something for EVERYONE!!!  There's traditional papercrafting supplies (stamps, paper, ribbon, brads and a FANTASTIC new Big Shot die!), something for the sewer (fabric & ribbon), home decor products (an awesome stencil...that could be used in paper crafting too!) and some digital products for all you Digital crafters!  You can find all the information about the Summer Smooches promotion here...or click the link to the right!

Did you notice the new look today?  I used some of the Summer Smooches digital products to create my new background, banner and signature for my blog.  I love the bright and fun look of it...don't you?

Today I also have a fun home decor project to share with you.  Remember the frames I showed here?  Well, I did them up Summer Smooches style for a swap I recently participated in.  Sadly, I was super sick on the weekend of the swap and demo meeting, so I couldn't go.  My fellow demonstrators who participated in the swap are going to get some fun mail from me this week when their frames arrive (or next week...because of that love/hate relationship I have with Canada Post)!  Check them out...


Today is Tuesday which means Stampin' Up! released new digital downloads!!!  You can see all of today's downloads here.  There's a super fun alphabet download that I think I need!!!

Well, that's all for today!  Have an inspired day!


Monday, March 26, 2012

Frame It!

I pretty  much squealed with delight at my local craft store when I found some VERY inexpensive unfinished wood frames.  I had, and still have, loads of ideas for these frames...yeah, we are NOT going to talk about how many of these frames I bought!!!!!


I decided to do a frame project with my clubs this month featuring some fun product from the Occasions Mini!


My club members covered their frames with some Twitterpated DSP and then went around the edges of the frame with some Ruffled ribbon.  Each of my club members got to choose from a pile of Twitterpated DSP designs and they got to choose the ribbon to coordinate.  So, each frame was individual and different!  They were fantastic.

I also had a bunch of scraps in coordinating colors so everyone could punch out a flower and they stuck a button in the middle!  Each of them made a banner to go along the bottom which we stamped with "memories" from the Loving Thoughts set.  And, you can't really see it in the picture, but after everything was assembled, we sprayed the frame with Shimmer Mist (which is a combination of Shimmer Paint, Rubbing Alcohol and water), so it shimmers in the light!

Now, to find the perfect picture for my frame!

Have an inspired day!


Tuesday, December 13, 2011

Frosty Kids

I have a super simple project for you today.  This was going to be one of my Great Little Gifts class projects and it was inspired by a project one of my downline did at our Summer Mini swap waaaay back in April (thanks Angela)!!!!


We do NOT have that much snow...yet!  I took this picture of my boys playing in our backyard almost a year ago...in fact, I think it was during Christmas Holidays last year!

I started with a 4x6 frame from my local dollar store.  I wiped the glass off with a swiffer cloth, stamped some snowflakes on it with VersaMark and then embossed with white embossing powder.  That's it, that's all!!!  So fun and super simple!  Beware...the glass gets really hot when embossing!

Today is Tuesday and you know what that means, right?  It's Digital Tuesday and Stampin' Up! released a new set of Digital Downloads which you can find here.   Did you notice the new look today?  A little Christmasy for a couple weeks courtesy of My Digital Studio (Holly Jolly DSP, Stocking punch, Houndstooth background stamp, Tasteful Trim border and the fonts are CK Journaling and CK Ali's Hand...I think!). I'm off to finish up my digital planner book...which I will be sure to share with you when it's finished!

Have an inspired day!

Wednesday, September 28, 2011

Pumpkins

Last week I had my final class in my Festive Frames series.  We did a fall themed frame and my word this time was pumpkin!


I started with a Bravo Burgundy background.  And, I have a little tip for you!  One of the benefits of our Clear Mount stamps is that you can quickly and easily make your own background stamps. 


I used one of my larger size blocks (Block E) and arranged three of the leaf stamps from the Gently Falling set on the block.  Now rather than having to stamp all three individually, I could just stamp all three at the same time and the end result is a beautiful background!

All of my squares are Crumb Cake sponged with Soft Suede ink.  I stamped some little acorns on the squares that have letters on them.  The acorn is another stamp from the Gently Falling set and the letters were cut from Soft Suede cardstock with my beloved Big Shot!!!

Here's a closer look at some of the other fun elements in the project.


To make these leaves, first cut them with the Leaves #2 Die and the Big Shot, them emboss with the Spider Web embossing Folder.  Sponge with a little bleach...emphasis on little...and when the bleach is dry sponge with Soft Suede ink.
Scarecrow is made from a variety of punches.  The "straw" is bits of linen thread.
The pumpkins are just circles (all from circle dies) which have been roughed up around the edges, sponged and layered together.  The stems are the Modern Label punch embossed with the Houndstooth embossing folder and the leaves are Always Artichoke Denim Ribbon.

I had loads of fun at this class and am thrilled with the final product!

Do you love those leaves on the background?  I am offering a Gently Falling Stamp Camp at the end of October.  At the class, you will receive the Gently Falling stamp set and make 4 cards (each with a different technique)!  You can see all the details on my Classes & Events page.  Please contact me to reserve your spot!

If you would like to see the whole series of Festive Frames, you can look here (Jingle), here (Freezin'), here (Spring) and here (Summer).

Have an inspired day!


Thursday, September 22, 2011

Spooky Spiders

Yesterday, I showed you one idea for the new Halloween Decor Elements in the Holiday Mini, and today I'm going to share what I did with the rest of the set.  I HATE spiders...creatures with 8 hairy legs and 4 eyes creep me out!  But, I think they're kinda cool in this application!!!


I started with 1 and a half pieces of Concord Crush DSP (from the In Color stack).  I chose the one with the words all over it...even though it has NOTHING to do with Halloween!  It just worked for my master spooky plan!!!  Once I made my DSP fit my frame, I stamped it with the spooky stamp from the super cute Spooky Bingo Bits set.  Check it out...I love this set!!!

That little mummy is adorable!!!  Ok, back to the project...I stamped the spooky with Concord Crush ink.  Then I smooched it with the Vanilla Smooth Spritz to give it a subtle shimmer!  It was cute, but it still needed something.  So, I dug out my spider webs from my Halloween Decorations and stretched some across the background.  I used lots of different pieces of web and just taped them in place on the back of my background.


The spiders were applied to the glass.  My frame is from Ikea.  It's actually dark brown, but I roughed it up with some sandpaper.  I took the shine off and sanded away some of the brown around the edges.  I love the way this turned out...and all of my boys told me how cool it looked!

Have an inspired day!


Wednesday, September 21, 2011

Spooky Fun

As soon as I saw the new Halloween decor elements in the Holiday Mini I had ideas bouncing around my head for it (kind of like an idea pin ball machine in my head!!!).  I love decorating for Halloween and I love all the little Trick-or-Treaters that come around.  This year's Halloween decor elements are fantastic...becuase I love cute Halloween!  Here's what the set looks like.
Isn't it cute?  I *heart* that little owl!!!  My only issue with it is that I loved it, but didn't want to put it up on my wall only to have to take it down after Halloween.  I found a way to use it and be able to use it every year.  Do you want to see?


It looks like it took more work than it actually did...I promise!  To start with, I crumpled and tore 2 and a half sheets of Cajun Craze DSP (from the Regals Stack).  I then glued it down to the paper that comes in the frame so I knew it would be the right size.  I wasn't too careful when I glued it down, I just made sure it would stick.  Then I rubbed Cajun Craze ink all over it with a sponge...this accentuated the wrinkles and torn edges.  Then I made a moon.  It's done the same way as the rest of the background, only I used So Saffron DSP and sponged it with More Mustard ink.


The actual decor element pieces are applied to the glass in the frame.  They were pretty easy to put on...one piece at a time!  I put the decor elements on before I did the background and used the picture that came in the frame as a guide for where to put the moon.  And, I did have to trim the decor element branch to fit the frame (it's actually 30 inches long and my frame is only 16x20).  My frame is a barn wood frame, which I purchased at a local big box craft store...with a coupon!!!

There are 3 spiders that come in the set.  Tomorrow I will show you what I did with them!

Have an inspired day!


Tuesday, June 21, 2011

Happy Summer!

Yahoo!  Today is the first day of summer...and it's a BEAUTIFUL day!  The sun is shining, the birds are chirping and I can hear the frogs at the pond.  The only downside is the mosquitos right now...they are vicious and blood thirsty.  It needs to get super hot so they all die!

In honour of the first day of summer, I thought I would share the summer frame I did for a recent class.


It is so bright, fun and summery!  Are you wondering what color my background and letters are?  I used the new Island Indigo.  It's like a lighter, richer version of Not Quite Navy.  I love it!  My letters are on Sahara Sand cardstock and the fun summery elements are on a variety of bright polka dot DSP.  I used the Patterns Stack DSP for this in Melon Mambo, Tangerine Tango, Daffodil Delight, Old Olive and Elegant Eggplant.


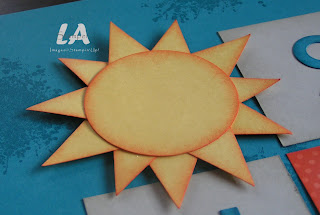
What's a summer frame without a sun?!?!  I used Daffodil Delight sponged with Tangerine Tango to make my sun.  The middle is the 2 1/2" Circle Punch and the rays were punched with the new Pennant Punch...lovin' that punch!!!


More summer stuff...watermelon (YUM!), grape popsicles (YUM!) and a beach ball (Fun!).  All are made with punches.  The watermelon is the 1 3/4" circle and the seeds were made with the new Triple Layer Blossom Punch.  They are the little pieces that get punched out from the middles of the flower petals...perfect watermelon seeds, don't ya think?  The popsicle is a Tag punch with a Word Window for the stick.  Did you notice the bite?  I love the bite...even though I never bite my popsicles!  The bite was made with the Scallop Oval punch.  And, the beach ball is some more circle punches.


FLIP FLOP SEASON is here!!!!  Summer isn't complete without flip flops, so we had to have a pair of those included in the frame!  My flip flops are Tangerine Tango with Daffodil Delight ribbon to make the part that goes over your foot.  If you look really close, you can see they have a little bit of a design on them.  That was done with a new jumbo wheel called Starburst.  It's a great wheel for backgrounds and, like most of our wheels, it coordinates with a great stamp set!


Who wants lemonade?!?!?!?  This little beauty is my favorite part of this project!!!  I've seen lemonade cards floating around the web for a few years now, but had never tried it my self...until now!  The cup is made from Cardsock Vellum which was sponged with Daffodil Delight.  Then I folded in the two long sides and glued them down so that the middle popped up a bit forming a glass shape.  Before I glued it down, I ran a bit of glue along the top and dipped it into Dazzling Diamonds glitter...the perfect sugared rim!  My little lemon is a circle punch (3/4" in Daffodil Delight) which was embellished with more of those watermelon seeds...only this time I punched them from So Saffron cardstock.  Perfect lemon segments, don't you think?  The whole thing is completed with a bendy straw which I trimmed down to fit into my cup.  It's the perfect touch...and is making me want a glass of lemonade!

Here it is hanging in my front entry...


There you have it!  Happy first day of summer...hopefully the weather is super summery where you live and you can get out and enjoy it!

Have an inspired day!


Tuesday, January 4, 2011

It's Freezin'!

I'm not talkin' about outside...actually it's not that cold out right now.  I'm talkin' about the project for my class tonight.


I'm talkin' about a super fun project.  I'm so excited and thrilled with it that I could squeal.  Well, I may have squealed a bit when it was finished...but nobody heard me, so you can't prove it!!!


Isn't it fabulous?!?!?  I love, love, love how it turned out.  Looking at it makes me shiver a bit!  I started with a Crumb Cake base and stamped it with the Serene Snowflakes set with Marina Mist, Bashful Blue and Whisper White ink.  The letters were cut with the Simple Alphabet Dies from Whisper White cardstock.  All the blocks with the letters are Marina Mist, stamped with snowflakes and matted with Whisper White cardstock.  Here are some of my favorite elements of the project!

The sparlky icicles!  I *heart* the icicles!!!


The icicles are made from Crystal Effects.  You put a piece of waxed paper on your work surface.  The draw a line of Crystal Effects (use quite a bit) and pull parts of it down like icicles.  Then you glitter it with Dazzling Diamonds so it sparkles and shines!  Once they're dry, you can easily peel them off the waxed paper and glue them wherever you want.  I peeled them off, cut them to size and glued them on with a thin line of Multi Purpose Adhesive.

Check out the mittens!

The mittens are a Wide Oval, Small Oval and Word Window.  I sponged around the edges of the mittens to help them stand out a bit.  The Word Window makes the cuff.  It was punched out of Whisper White and I crimped it...just for fun!  I love how they are attached with the Clear Tinsel Trim and hung off the "e"!

I love the embossed snowflakes.


The snowflakes are embossed with the Northern Flurry Embossing Folder on a piece of Vellum cardstock.  I gently sponged over the snowflakes with Marina Mist ink and then added some bling in the middles courtsey of some Rhinestones!!!  Notice the "brrrr" at the bottom?  That's stamped with the Just Perfect Alphabet and Marina Mist ink.  Love it!!!

I glittered my own DSP too!


I took a square of Bashful Blue striped DSP (you can find it in the Subtles Patterns Pack) and sponged around the edges with Marina Mist ink.  Then I took my 2-Way Glue Pen, glued some of the stripes and glittered them.  It's a fantastic effect!

And finally, check out this snowman...or snowgirl?


I saw this kind of snowman in an issue of PaperCrafts Magazine a while back.  Since then, it has popped up all over the web in lots of different projects!  I started with a 3 inch circle (one of the new dies!!), punched a 2 1/2 " and 1 3/4" circle to finish it off.  They are roughed up around the edges and were shimmered with a mixture of Frost White Shimmer Paint, water and rubbing alcohol.  Actually I used the same shimmer for the letters too.  In real life they look like freshly fallen snow!

The arms are Chocolate Chip snowflake punches, the eyes and mouth are the black rhinestones from the Holiday Mini and the carrot nose is hand cut from a scrap of Pumpkin Pie cardstock.  The bow is a piece of narrow Grosgrain Marina Mist Ribbon.

Here's the whole project in it's frame.


I *heart* the way this project turned out.  So what do you think?  Do you love it as much as I do?

ETA:  I entered my project in the Create with Connie and Mary challenge CCMC131.  The challenge was to do a project that celebrated snow.  Now, I'm not one to "celebrate" snow, but I do think it's pretty when HUGE snowflakes are falling...it always looks so peaceful, especially at night.  I also LOVE the way snow sparkles...hence all the sparkle and shimmer in my project!  Maybe I'll be in their top three picks! 

Have an inspired day!

Wednesday, December 15, 2010

Par-tay!

A couple weeks ago I hosted a Holiday party for my downline.  We had so much fun!

Our evening started with Sherri singing Superman Grace and then we had a wonderful potluck supper.  It was yummy!


Then our evening continued with some games and, of course, stamping!  I had a special project for my girls to do.


They were all surprised and excited about their project.  I love the way it all came together and I know they will all proudly display their framed project in their craft areas!

We finished off the evening with another game.  The most fun game of the night!  We paired up and had to stamp a card each only using one hand...one person was the right hand and the other was the left hand.  It was hilarious and all the cards turned out perfectly!  We had some good laughs with this game...FYI, Stampin' Up! ink pads can be opened with only one hand!!!


We had a blast and hopefully next year more people will be able to make it.

Have an inspired day!

Thursday, November 25, 2010

Countdown to Christmas-Week 9

I *heart* the project I'm sharing with you today.  This is actually a class I'm doing tomorrow night and it's the first in a series of classes I will be doing throughout the next year.


Throughout the year we will be making different seasonal inserts for the frame.  So fun!!!

I started with a piece of Soft Suede cardstock, which I stamped with the Jolly Jingles jumbo wheel in the Holiday Mini.  I used a Soft Suede ink cartridge with the wheel.  Then I cut some 3x3 squares of Very Vanilla cardstock.  Some of them are layered with Cherry Cobbler and some are layered with Old Olive.  The Cherry Cobbler ones are stamped with the sweet little poinsettia image from Jolly Bingo Bits in Cherry Cobbler ink and topped with some Very Vanilla letters cut with my Big Shot!  All the Cherry Cobbler and Old Olive squares are sponged around the edges.

Here are some close ups of some of the elements on the project.

The wreath...


The tree...


The ornament...ooooh, check out that bling!!!


And, finally the buttons.  I have a thing for buttons...they take me back to my childhood and my grandma's HUGE jar of buttons that my cousin's and I always played with. 


I will leave you with one more shot of the complete project.


Have an inspired day!