I think I'm in love with the Pearls now! Not that I don't love the Rhinestones anymore, but I opened my package of pearls and I think you're going to be seeing a lot of little pearls in the next little while!!! Seriously, the packs of Rhinestones and Pearls that are in the catalogue now are a MUST HAVE on your accessories wish lists people! You need them!!!
One would think that after making 500 of the Fancy Favours (see this post), I would be sick of them...and I am, but at my To Die For class this month featured that die and we did some super fun projects, and I'm going to share them over the next few days! And, then I'm going to put away my Fancy Favour Die for a while!! *grin* I will say that I've cut way more than 500 of these out and my die still cuts and scores like it did the first time I used it. And, I'm still using my original extended cutting pads! So you can see, they last for a LOT of cuts!
First, my color combination for today.
Not only do you need the Pearls & Rhinestones, you also really need the new Color Coach. It's the most fantastic tool ever! At my scrapbook club, we were flipping through the colors trying to decide what to use for one of the layouts when we came across this one. Isn't it purty?!? We have a blast at my Scrapbook Club. If you're interested in joining one contact me today for more info!
I know...be still your heart. LOOK AT THOSE FABULOUS PEARLS!!! But wait, it gets better!
Two words...LOVE IT!!! Ok, so I can hear you now..."Lisa, that can't be the Fancy Favour, it looks nothing like it", "Pretty please show us how to make that". Well, I'm here to please, so I did up a tutorial for you! Before I show you the tutorial, I have to say that I didn't come up with this idea. These little beauties (not so embellished) were on the tables at one of the classes at Convention this year. There's ideas everywhere you turn at Convention!
So, you start with your Fancy Favour and you want to just cut off the fancy edge on the top. This step is optional. I did this because I wanted to scallop the edge. If you want to leave the fancy edge the die makes, just skip this step!
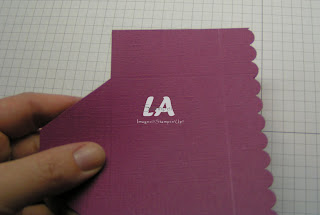
Then, you want to take one of your border punches and punch along your now straight top edge. I chose the Scallop Edge Border Punch. After you've punched the edge, you want to score it. I put the edges of the scallops at the 3/4" mark on my paper cutter and then scored it.
Now you need to do some cutting. You want to cut down the score lines from the scallop edge to the long score line you just made. You also want to cut the little scallopped piece from the top of the tab. Then crease all your score lines really good...this is important so that you have a nice crisp edges on your box. If you don't crease along your score lines really good, you end up with a funny looking box!
Add some glue to the tab to make it one continuous piece (kind of like a square tube!) and the glue the tabs on the bottom. Ack! I think I could put these together in my sleep! *wink*
When it's all glued together, it should look like this.
I tied ribbon around the top of my box to keep the flaps down, and embellished my box with some of the In Color DSP, and some punched flowers from the Level One Hostess set, Punch Potpourri.
You could put all kinds of things in this box and it would make a great gift for someone special! I chose to make some matching cards for my box. I used the same color scheme as the box and each of my cards uses an image from the Punch Potpourri set.
Each of the cards has some little pearls on it...even though you can see them in the picture on the heart card, I promise they're there (they're just itty bitty)!
Next month I am featuring the Alphabet Bigz Dies at the To Die For class. Click here for more info!
That's all for today! I will be back tomorrow with another Fancy Favour idea for you. Have an inspired day!


I love this!!! What an amazing way to showcase one of the new hostess sets. :-)
ReplyDeleteLove it! Lisa!
ReplyDeleteYour awesome!